Developer Guide
- Introduction
- About this Guide
- Setting up, getting started
- Design
- Implementation
- Documentation, logging, testing, configuration, dev-ops
- Appendix A: Requirements
-
Appendix B: Instructions for Manual Testing
- Launch and Shutdown
-
Testing features
- Add a Module
- Delete a Module
- Force Delete a module
- Clear current list of Modules
- Force Clear current list of Modules
- Edit a Module
- List All Modules
- Find a Specific Module or a Group of Modules
- Check Total Modular Credits
- Open Help Page
- Show Required Modules
- Show available Science Modules
- Show available General Education Modules
- Search Module Information
- List all current Tags
- Saving data
- Appendix C: Effort
Introduction
GradPad is an offline computer application meant to help Computer Science students from the National University of Singapore (NUS) plan their modules with more ease. All module information is displayed through our simple and organised Graphical User Interface (GUI). GradPad is also optimised for users who prefer working on a Command Line Interface (CLI).
The objectives of the application include:
- Allowing NUS CS students to track their degree progress.
- Allowing NUS CS students to plan their modules for upcoming semesters.
- Providing a fast and convenient way to view NUS CS module details.
About this Guide
This is a Developer Guide written for developers who wish to contribute to or extend our GradPad Project. The guide will explain the different components that make up GradPad and how these components come together to implement GradPad.
Setting up, getting started
Refer to the guide Setting up and getting started.
Design
Architecture
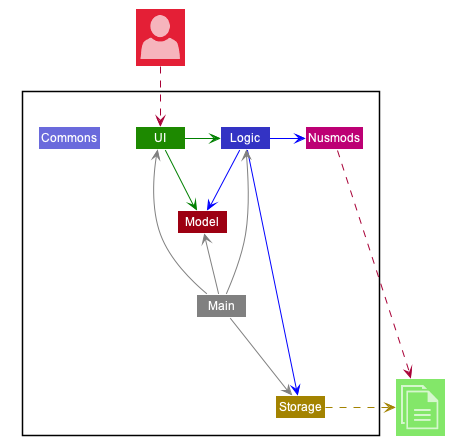
The Architecture Diagram given above explains the high-level design of the App. Given below is a quick overview of each component.
.puml files used to create diagrams in this document can be found in the diagrams folder. Refer to the PlantUML Tutorial at se-edu/guides to learn how to create and edit diagrams.
Main has two classes called Main and MainApp. It is responsible for,
- At app launch: Initializes the components in the correct sequence, and connects them up with each other.
- At shut down: Shuts down the components and invokes cleanup methods where necessary.
Commons represents a collection of classes used by multiple other components.
The rest of the App consists of five components.
-
UI: The UI of the App. -
Logic: The command executor. -
Model: Holds the data of the App in memory. -
Storage: Reads data from, and writes data to, the hard disk. -
Nusmods: Reads data from the NUSMODS public API.
Each of the first four components,
- defines its API in an
interfacewith the same name as the Component. - exposes its functionality using a concrete
{Component Name}Managerclass (which implements the corresponding APIinterfacementioned in the previous point.
For example, the Logic component (see the class diagram given below) defines its API in the Logic.java interface and exposes its functionality using the LogicManager.java class which implements the Logic interface.
How the architecture components interact with each other
The Sequence Diagram below shows how the components interact with each other for the scenario where the user issues the command delete 1.

The sections below give more details of each component.
UI component
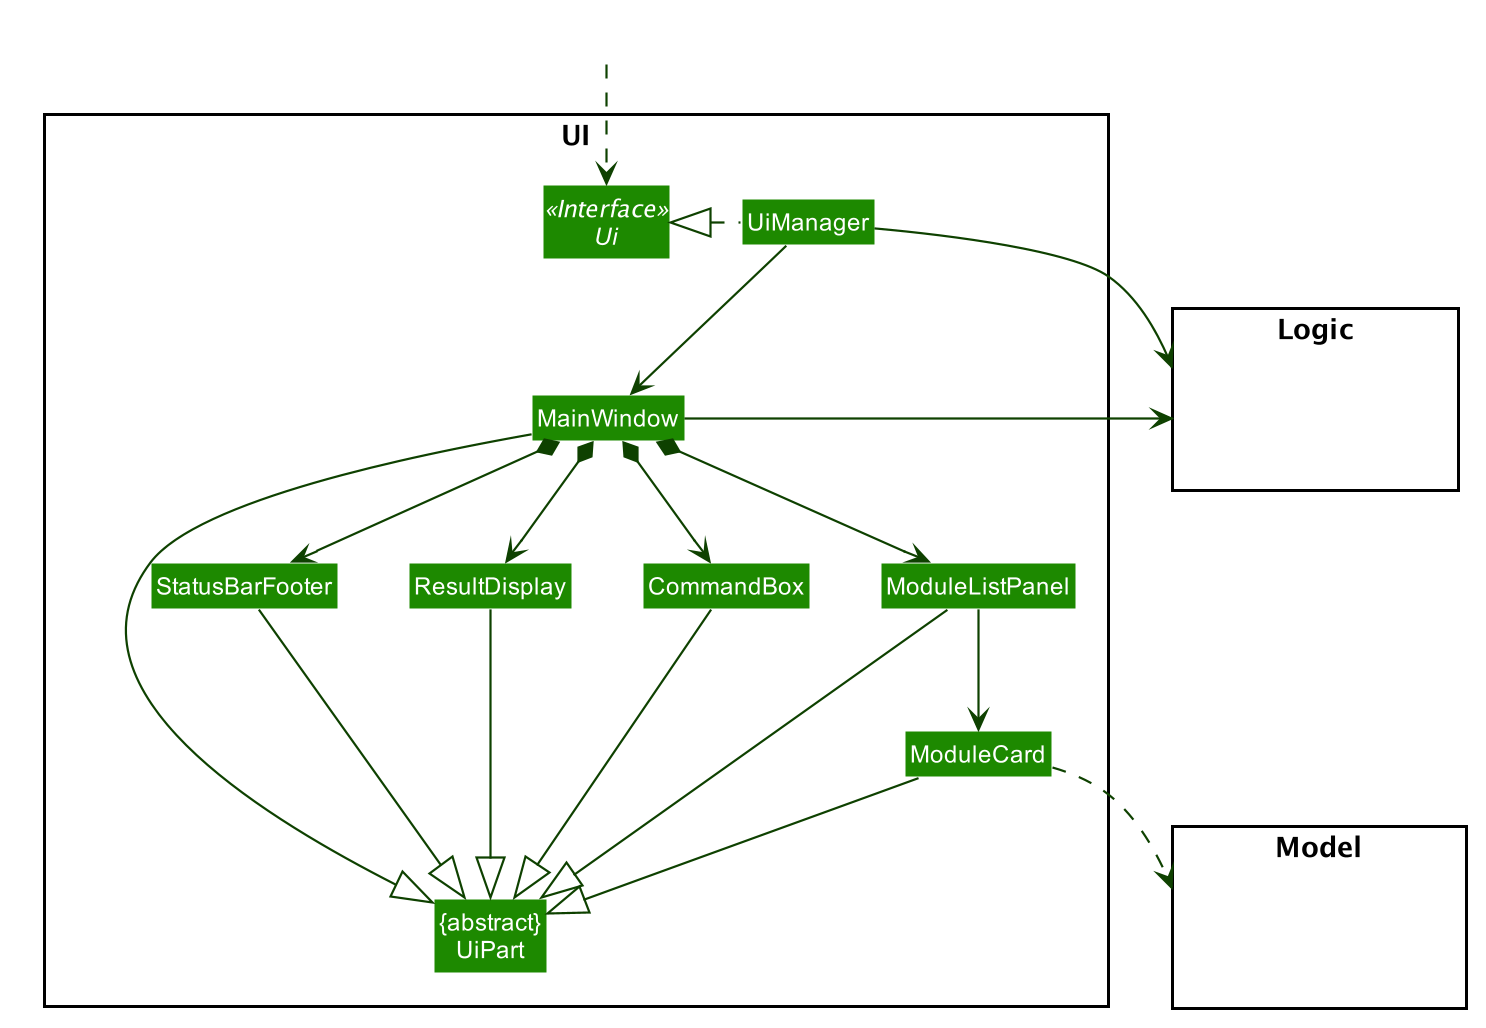
API :
Ui.java
The UI consists of a MainWindow that is made up of parts e.g.CommandBox, ResultDisplay, ModuleListPanel, StatusBarFooter etc. All these, including the MainWindow, inherit from the abstract UiPart class.
The UI component uses JavaFx UI framework. The layout of these UI parts are defined in matching .fxml files that are in the src/main/resources/view folder. For example, the layout of the MainWindow is specified in MainWindow.fxml
The UI component,
- Executes user commands using the
Logiccomponent. - Listens for changes to
Modeldata so that the UI can be updated with the modified data.
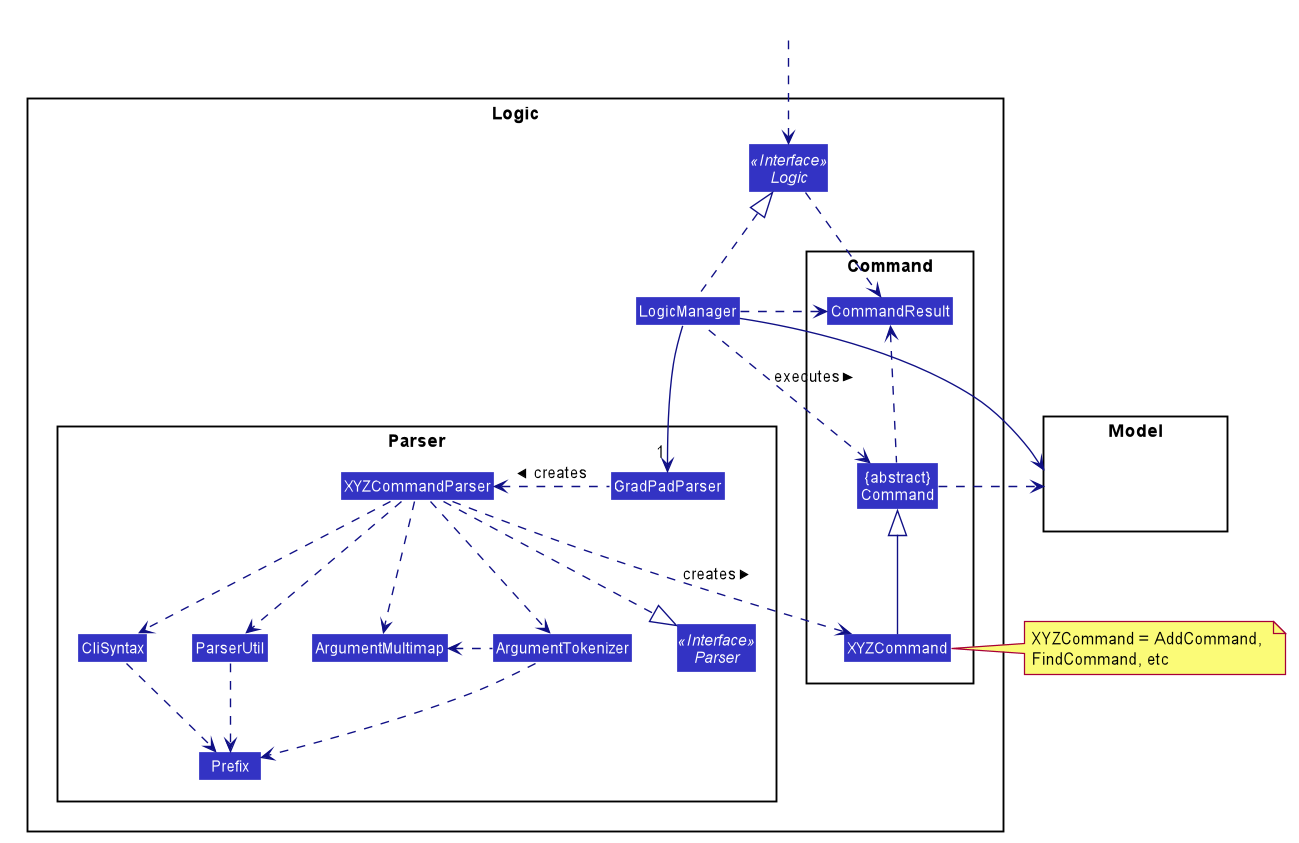
Logic component
API :
Logic.java
-
Logicuses theGradPadParserclass to parse the user command. - This results in a
Commandobject which is executed by theLogicManager. - The command execution can affect the
Model(e.g. adding a module). - The result of the command execution is encapsulated as a
CommandResultobject which is passed back to theUi. - In addition, the
CommandResultobject can also instruct theUito perform certain actions, such as displaying help to the user.
Given below is the Sequence Diagram for interactions within the Logic component for the execute("delete 1") API call.
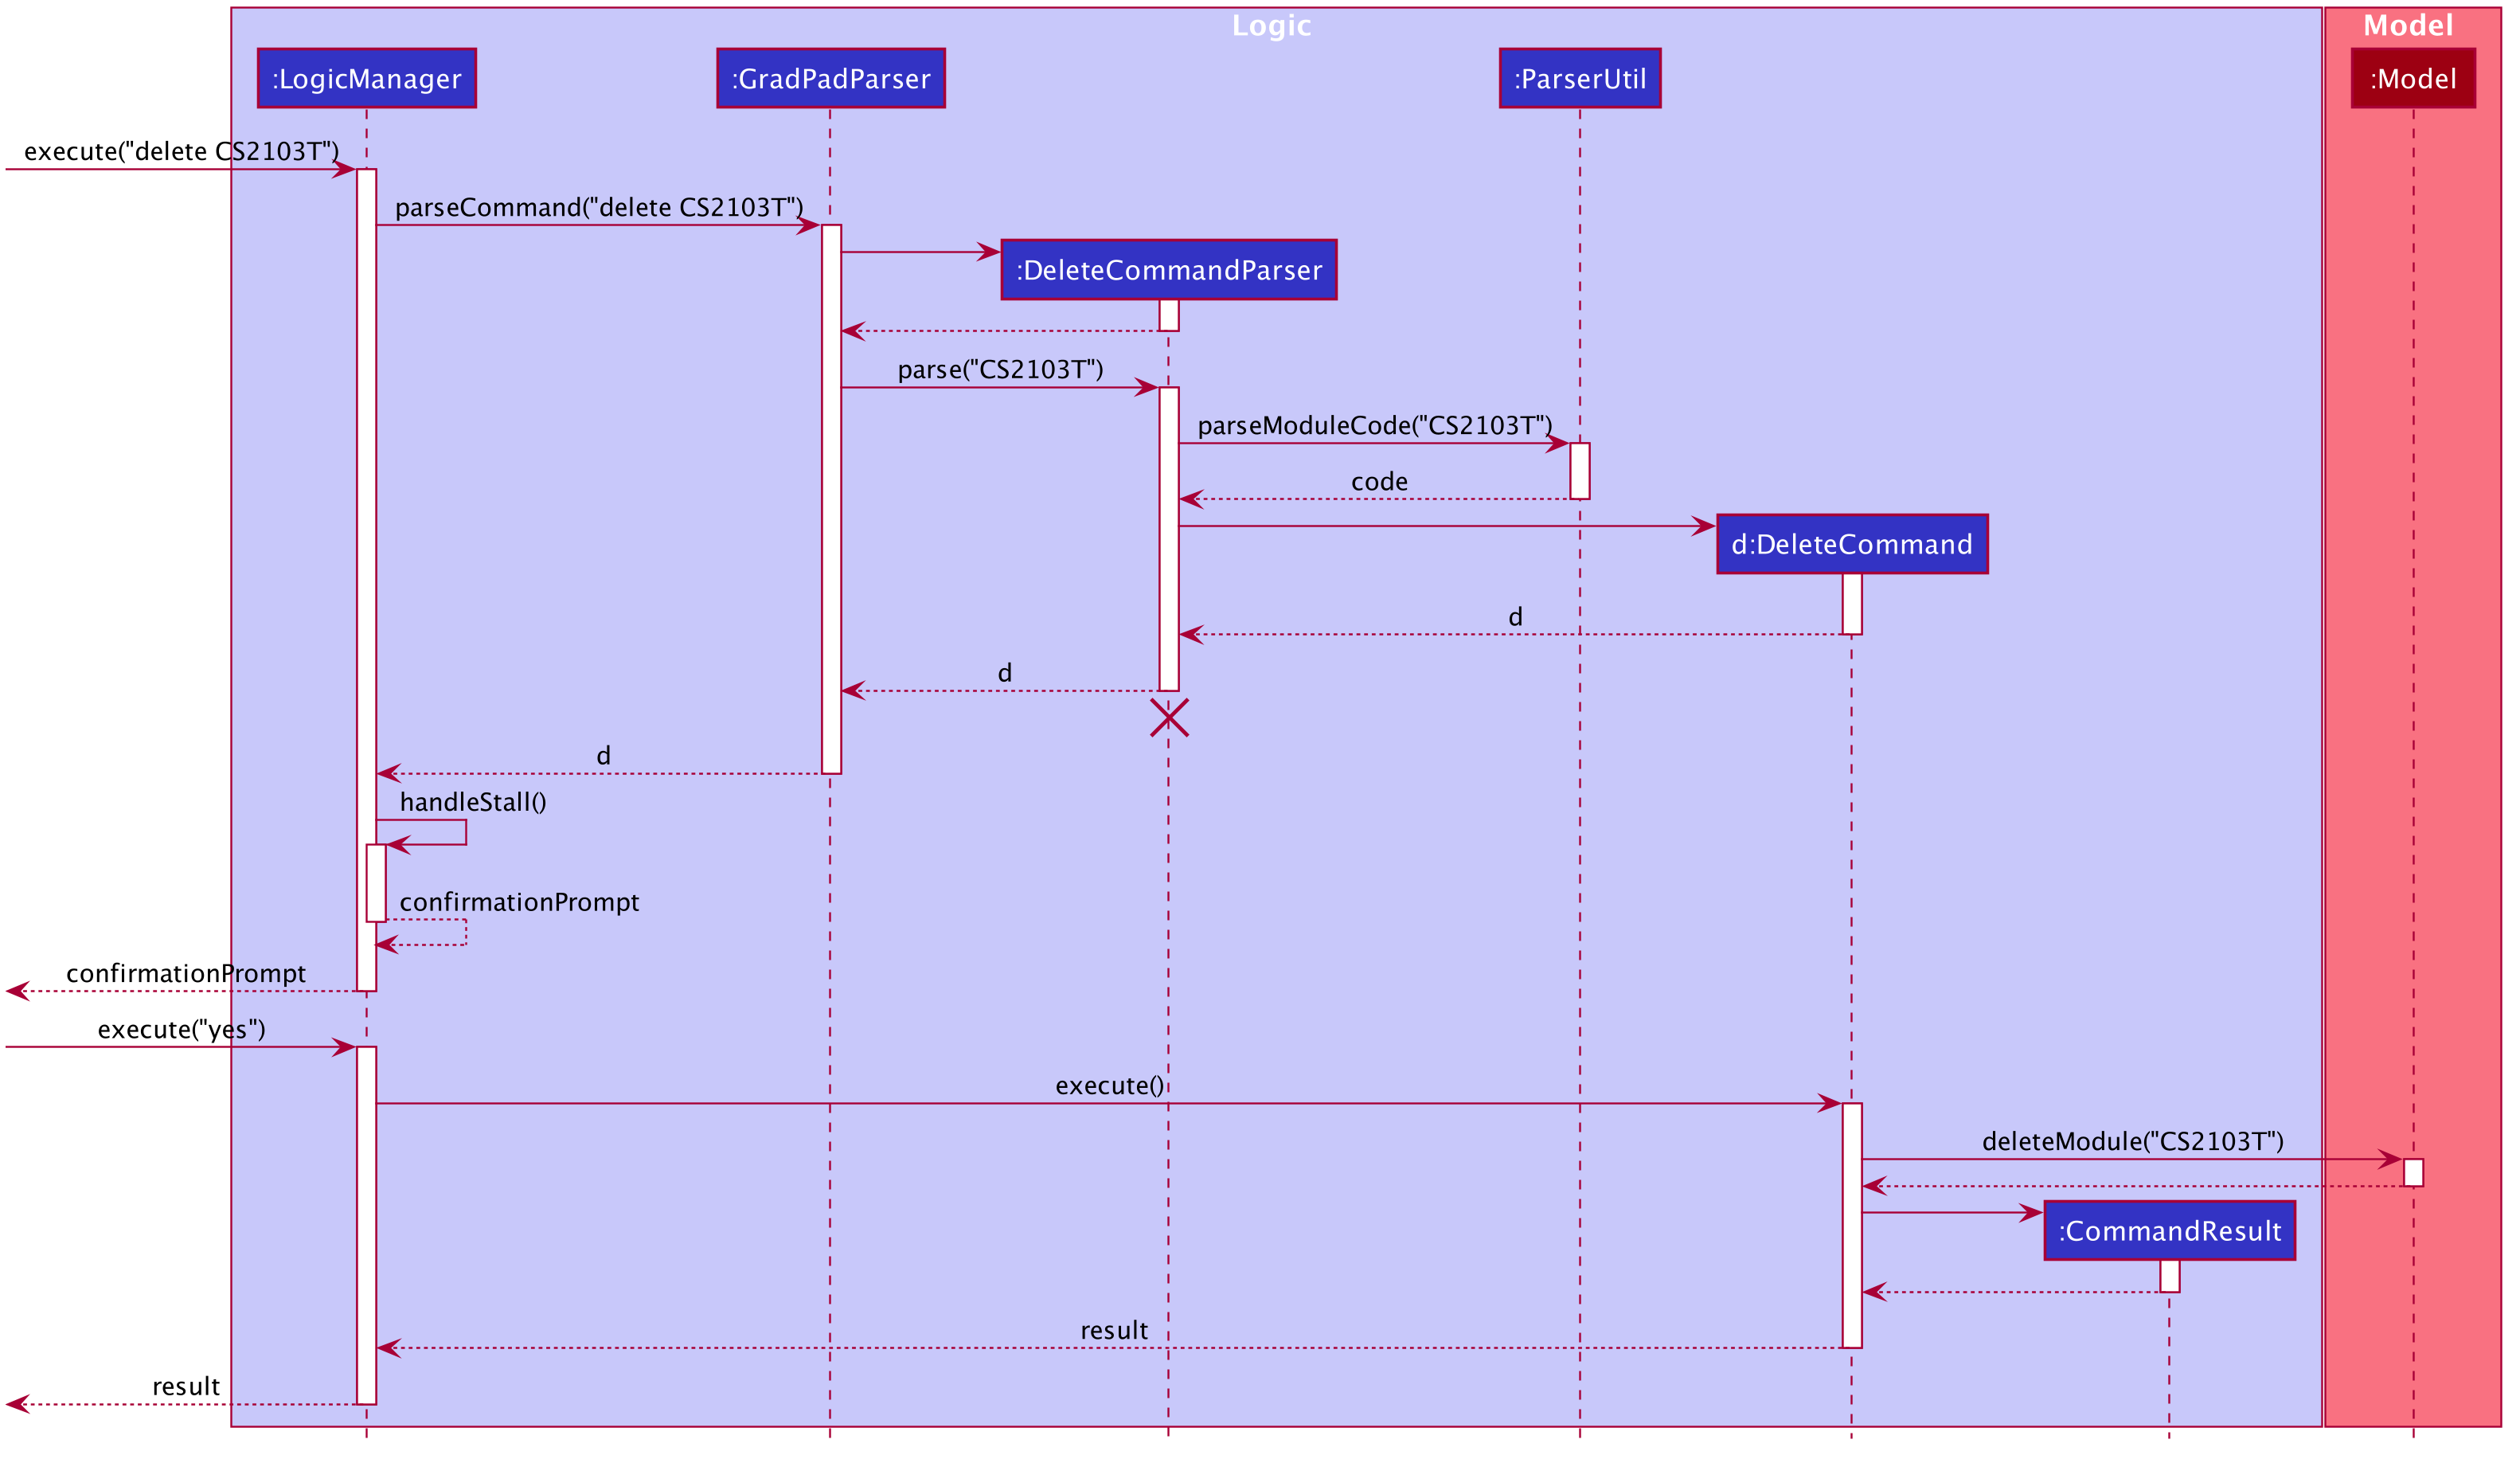
DeleteCommandParser should end at the destroy marker (X) but due to a limitation of PlantUML, the lifeline reaches the end of diagram.
Model component
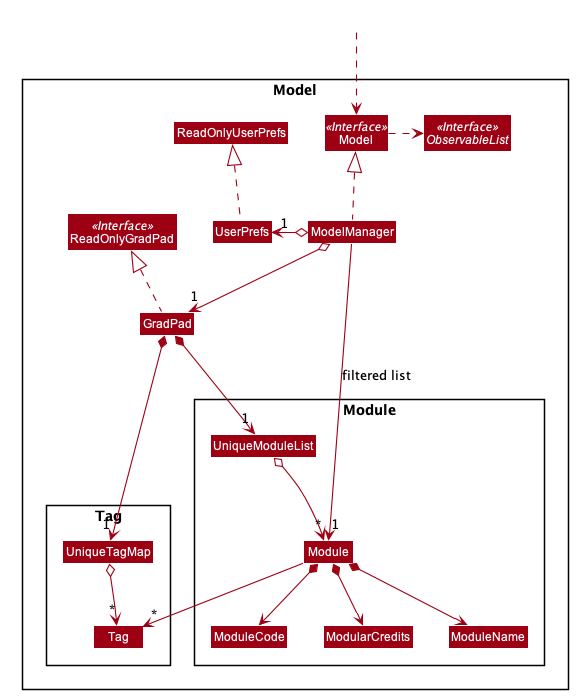
API : Model.java
The Model,
- stores a
UserPrefobject that represents the user’s preferences. - stores the GradPad data.
- exposes an unmodifiable
ObservableList<Module>that can be ‘observed’ e.g. the UI can be bound to this list so that the UI automatically updates when the data in the list change. - does not depend on any of the other three components.
Storage component
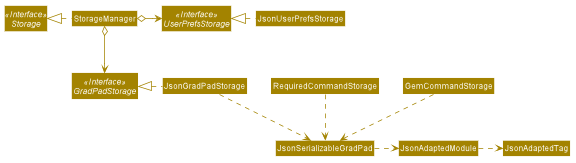
API : Storage.java
The Storage component,
- can save
UserPrefobjects in json format and read it back. - can save the GradPad data in json format and read it back.
- stores required modules that are on the Computer Science curriculum, in the
RequiredCommandStorageclass. - stores all General Education modules available in NUS, in the
GemCommandStorageclass.
Design considerations
We chose to set up the module-specific Storage classes, with the sole purpose of extracting and parsing the JSON data so that GradPad can interact with it.
Rationale
This is done so that the RequiredCommand, GemCommand and ScienceCommand classes do not have to worry about
data retrieval and storage, such that they can focus on executing the command logic.
The two Storage classes are separated to avoid cluttering up RequiredCommandStorage, due to the hefty size of
General Education Modules.
Nusmods component
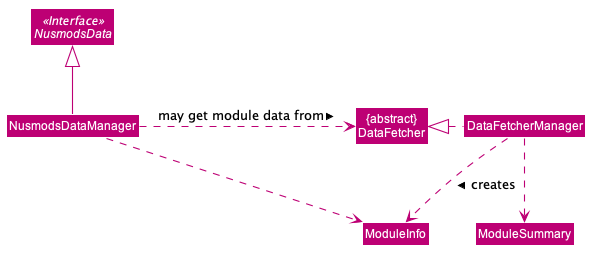
API : NusmodsData.java
The Nusmods component,
- can fetch module data from the NUSMODS public API.
- can save fetched module data in the form of
ModuleInfoobjects to a local JSON file. - can provide module information based on a module code, in the form of
ModuleInfoobjects.
Critically, the component is able to fall back on reading pre-fetched module information from a local file when there’s no internet connection.
Design considerations
We chose to split the Nusmods component into two main parts that have the following responsibilities respectively:
- Fetch module data - handled by
DataFetcher - Allow other GradPad components to access module data - handled by
NusmodsData
Rationale
We chose to do this instead of clumping all the logic together to achieve better encapsulation and abstraction.
With this, the NusmodsData class only needs to be concerned with reading available module data, processing it,
and serving it up to the code who requested it. It doesn’t need to care about how the data got there.
That’s the job of the DataFetcher class. As such, it is easy for us to swap out DataFetcher, or change its
implementation without the need to touch the public interface provided by NusmodsData. This will prove to be
useful when, for example, the NUSMODS API becomes obsolete, and we need to use another API, or if the NUSMODS
API changes, and we need to redesign how we fetch data from it.
Common classes
Classes used by multiple components are in the seedu.addressbook.commons package.
Implementation
This section describes some noteworthy details on how certain features are implemented.
Nusmods feature
GradPad is tightly integrated with the NUSMods public API by using it to retrieve NUS module information to display to users. More specifically, GradPad can perform the following operations:
- Retrieve information about a single module via the
/modulesAPI endpoint - Retrieve a list of all NUS modules via the
/moduleListAPI endpoint - Store retrieved module information data from the aforementioned endpoints as local JSON files
- Read pre-fetched module information from local JSON files
The last 2 operations are crucial to allow GradPad to operate even without an internet connection. This will be elaborated further below.
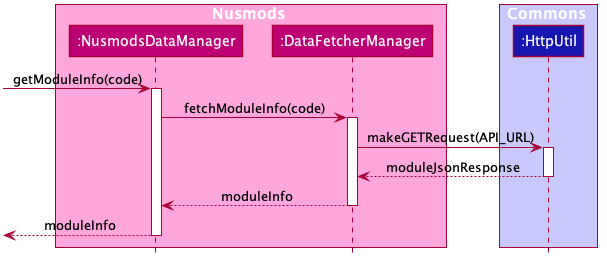
How a single module’s data is retrieved (when connected to the internet)
GradPad uses the ModuleInfo class to represent module information received from NUSMods. Besides storing the various
schema fields in the API’s JSON response as plain old Java objects (POJOs), it also handles the massaging of these
fields when they are read.
For e.g. the raw numerical semesters “3” and “4” must be mapped to “Special Term I” and “Special Term II” when read.
This is the flow of logic when a single module’s data is fetched via the API:
-
Some client code calls the
getModuleInfomethod in theNusmodsDataManagerclass and passes in a module code as a string parameter. -
getModuleInfocalls thefetchModuleInfomethod in theDataFetcherManagerclass. -
fetchModuleInfothen makes a HTTP GET request to the NUSMods/modulesendpoint via themakeGETRequestutility method defined within theHttpUtilclass. It also specifies the module code of the module it wants to fetch. -
The
makeGETRequestmethod returns the HTTP response as a string. In this case, the response returned is a JSON string. -
fetchModuleInfothen parses this JSON string into aModuleInfoobject.
Note: GradPad sets a 3s second timeout for all HTTP GET requests made. Adjust this where necessary.
The following sequence diagram illustrates this flow:
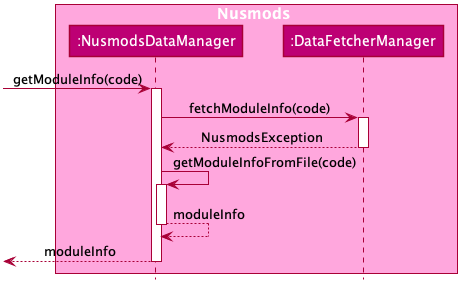
How a single module’s data is retrieved (when disconnected from the internet)
Without an internet connection, GradPad clearly cannot retrieve module information via HTTP requests. Instead, GradPad provides a fallback by including pre-fetched CS curriculum modules in each app release. This is a compromise we choose to take. While pre-fetched data implies that it might not be up-to-date, we feel that this is better than completely disallowing users from using GradPad without an internet connection. On top of this, we only choose to pre-fetch CS curriculum modules as scraping and saving all 5800+ NUS modules means we’ll have to make ungraceful API requests and bloat our releases. It is also not scalable in any way.
This is the flow of logic when a single module’s data is retrieved without an internet collection:
-
Some client code calls the
getModuleInfomethod in theNusmodsDataManagerclass and passes in a module code as a string parameter. -
getModuleInfocalls thefetchModuleInfomethod in theDataFetcherManagerclass. However, as there is no internet connection, this method call will fail with an exception. -
Catching this,
getModuleInfoproceeds to call thegetModuleInfoFromFilemethod within the same class instead. -
getModuleInfoFromFilethen retrieves the local JSON file containing the module’s information, reads it, and parses it into aModuleInfoobject.
The following sequence diagram illustrates this flow:
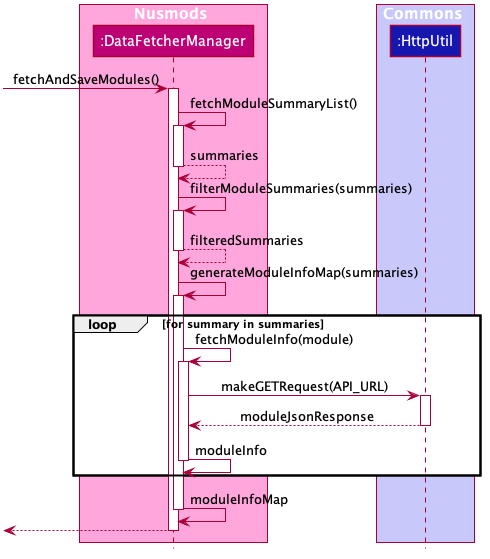
How module data is scraped and saved locally
As explained in the previous section, GradPad is able to access pre-fetched module information stored as local JSON files. This section will explain the script used to scrape and save the 100+ CS curriculum modules that runs before shipping out GradPad releases.
This is the script’s flow of logic:
-
The entry point of this flow is the
fetchAndSaveModulesmethod within theDataFetcherManagerclass. -
fetchAndSaveModulesstarts by fetching a list of all modules from the/moduleListAPI endpoint via a call to thefetchModuleSummaryListmethod. -
fetchModuleSummaryListmakes the HTTP GET request and parses the JSON string response into a list ofModuleSummaryobjects. -
This list of
ModuleSummaryobjects are then filtered to remove all non-CS curriculum modules by passing it through thefilterModuleSummariesmethod. -
Now that this list only contains
ModuleSummaryobjects related to the CS curriculum, it is then passed to thegenerateModuleInfoMapmethod. -
generateModuleInfoMap’s main job is to create a map of module codes toModuleInfoobjects so that GradPad can easily retrieveModuleInfoobjects given a module code. It does this by iterating through everyModuleSummary, and fetching that module’s module information from the/modulesendpoint. It then parses each module’s information into aModuleInfoobject and puts it in a hashmap. -
After this map is populated, it is then serialized and saved into a local JSON file.
Note: GradPad rate-limits step 6 with a 100ms delay between successive hits to the /modules endpoint. Adjust where
necessary.
The following sequence diagram illustrates this flow:
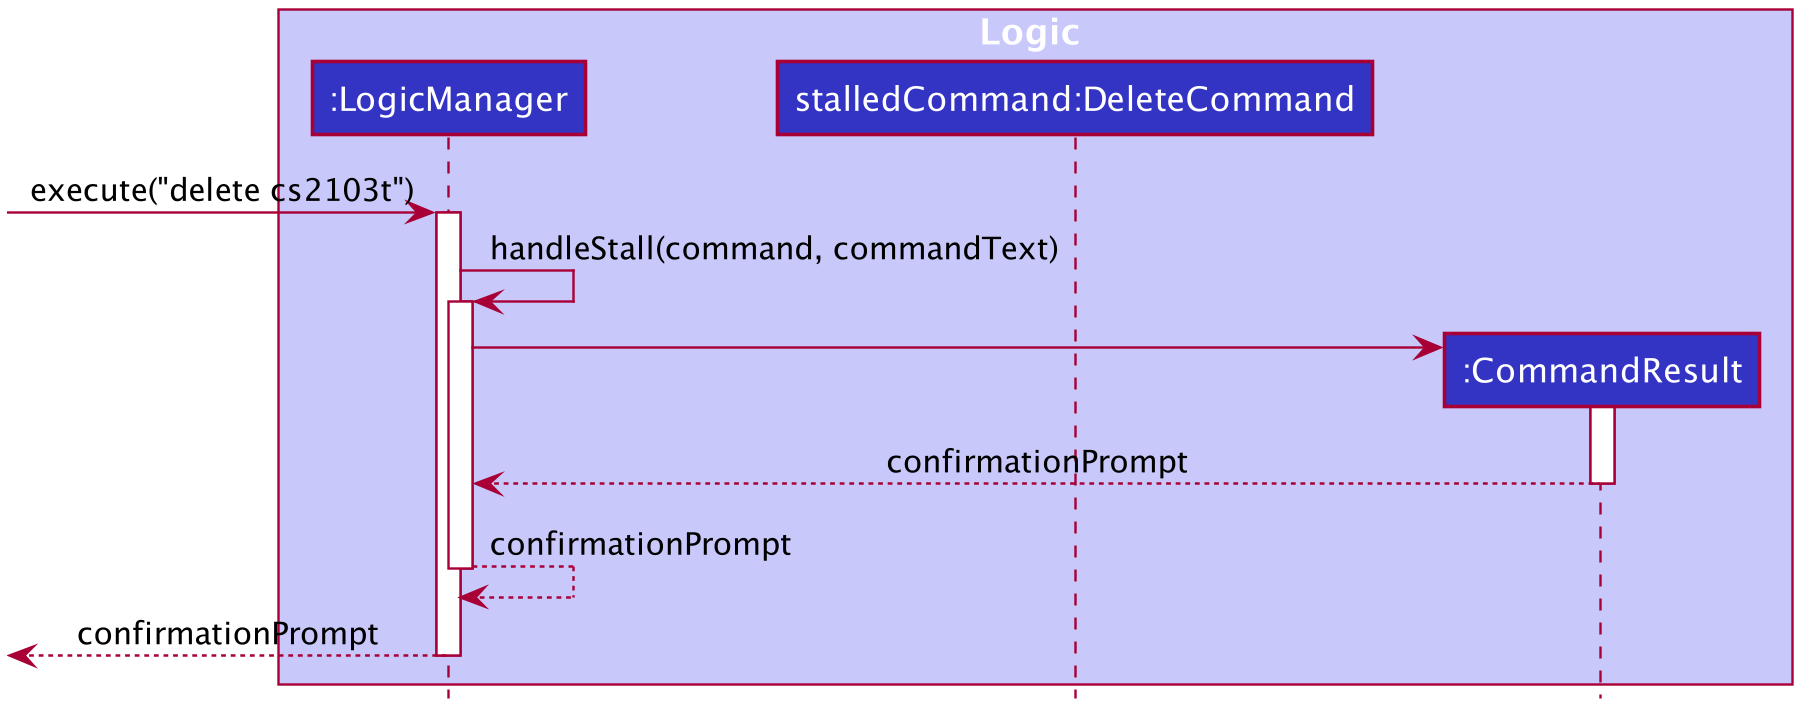
Command Stalling feature
GradPad stalls certain commands that erase data so that users can provide confirmation as to
whether or not they wish to proceed with the commands. This feature relies heavily on each commands’ requiresStall() method.
This is the general flow of logic when handling commands:
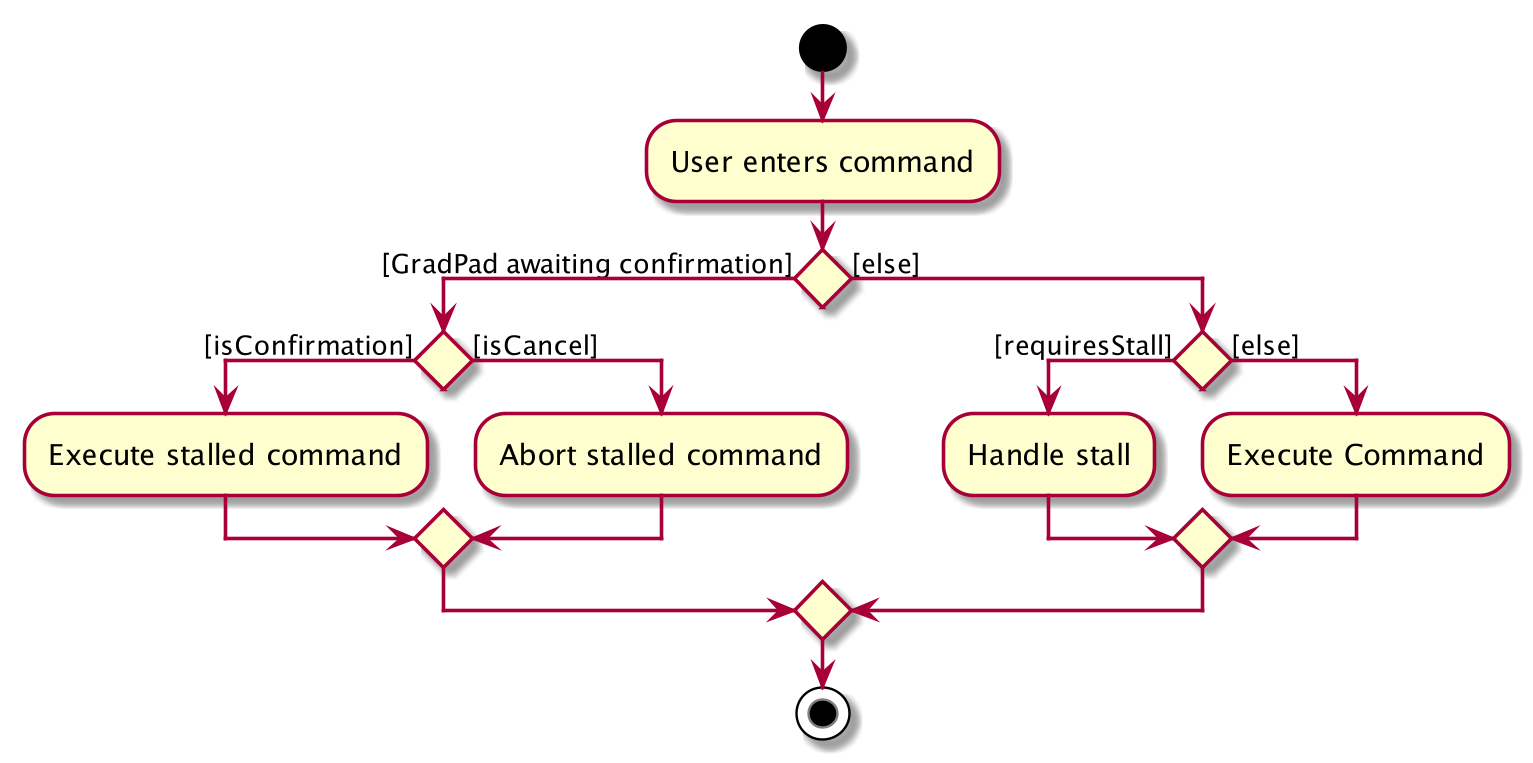
-
If a command
requiresStall,LogicManagerwill self-invoke itshandleStall()to store the command to be stalled. -
handleStall()will then return aCommandResultwhich prompts the user for a confirmation.
The following sequence diagram illustrates this flow:
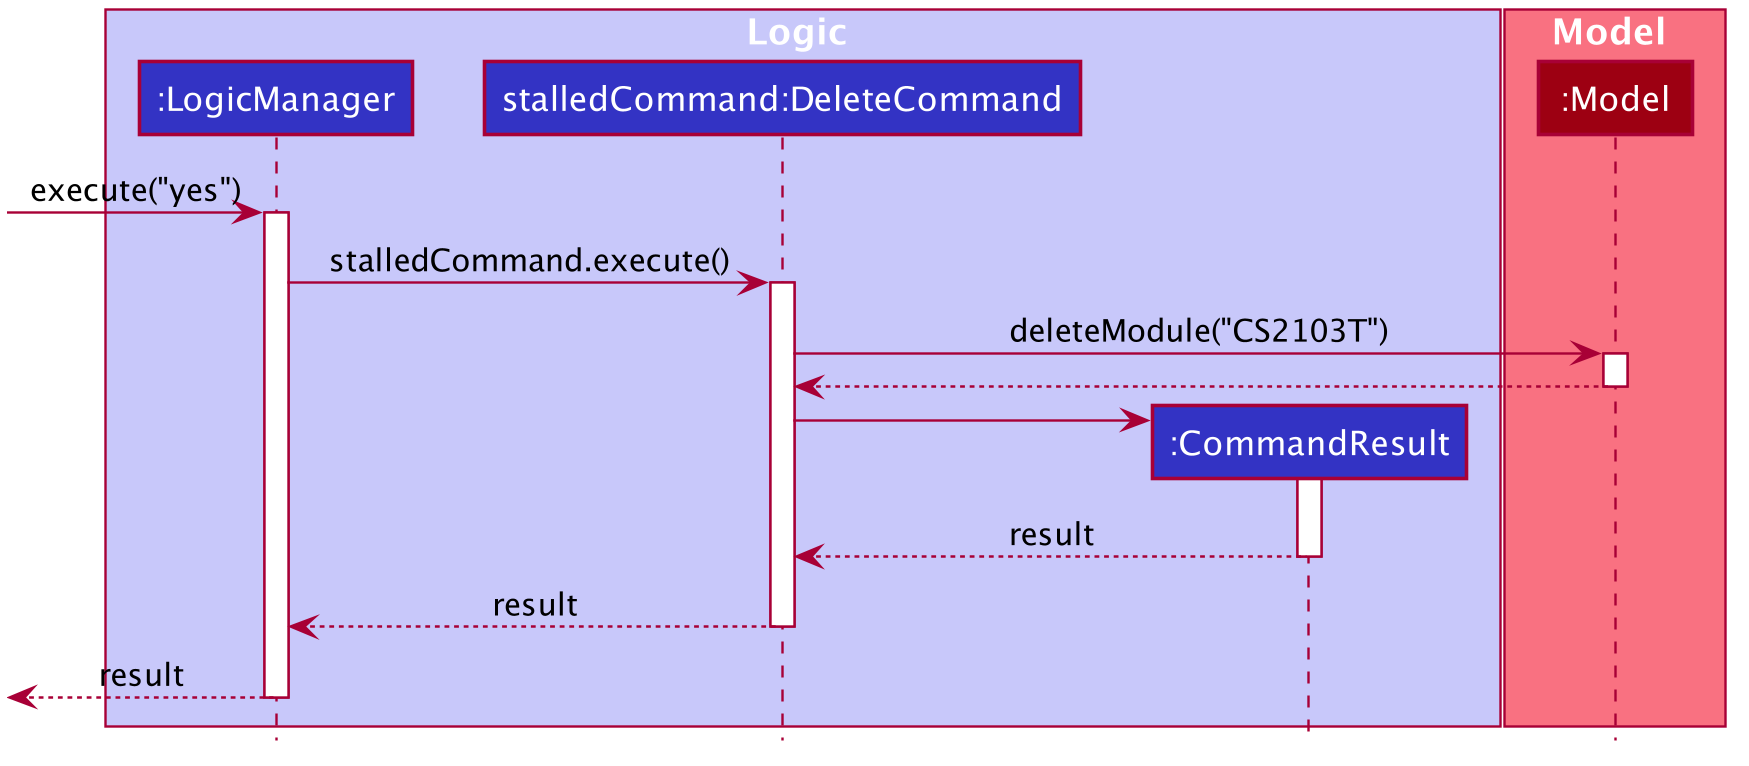
If the user provides a YesCommand, the stalledCommand is executed.
The following sequence diagram illustrates this flow:
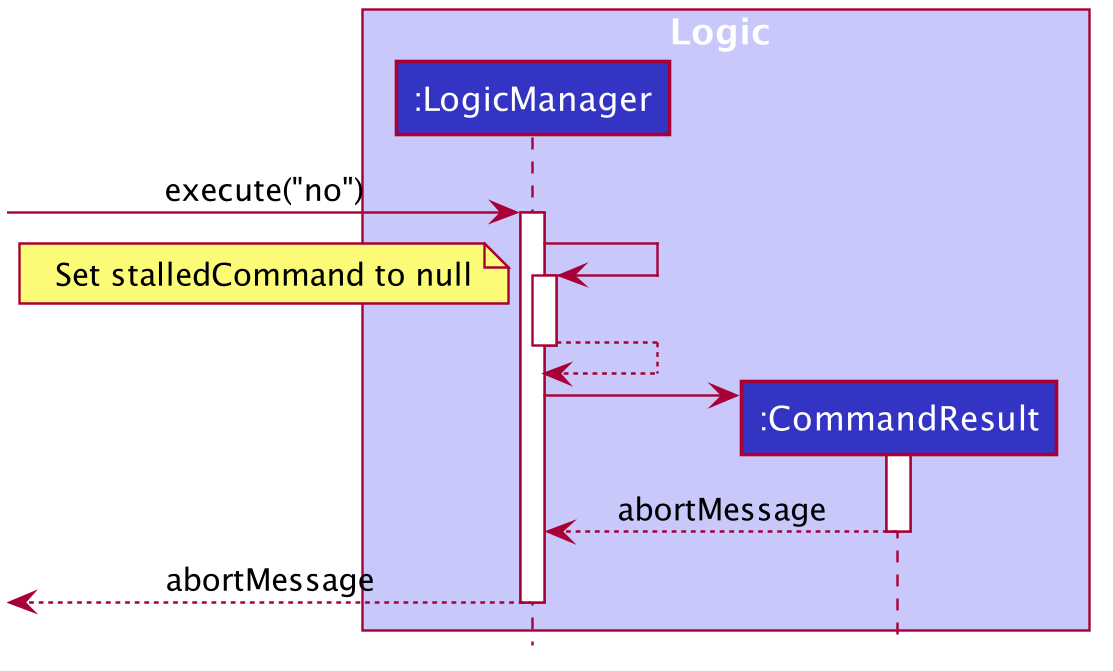
However, if the user does not provide a YesCommand, the stalledCommand will be set to null, after which an abort message will be displayed.
The following sequence diagram illustrates this flow:
Add feature
GradPad allows users to add modules to their list.
The following fields of a module are required (* for optional):
- Module Code
- Tags*
As with all operations in GradPad, the AddCommand class handles the execution of add operations.
The AddCommandParser class helps to parse user’s input before creating the correct add command.
Given below is how an add operation behaves at each step of its execution.
-
The user types in a command string corresponding to an add operation.
-
This calls the
executemethod of theLogicManagerclass. The user input is passed in as a string. -
Logic.execute()then calls theparseCommandmethod of thegradPadParserclass to parse the string input. -
gradPadParser.parseCommand()sees that this is an add command, and so uses theAddCommandParserclass to create a correspondingAddCommand, using theAddCommandParser.parse()method. -
In
AddCommandParser.parse(), the string input is first split into tokens, i.e. module code, tags, etc. -
The
ModuleInfoSearcher.searchModule()is then called to retrieve module information (module title, modular credits, etc.) from Nusmods. -
Once the module information is retrieved, a new
Moduleobject is created from the module information and tags. It now stores the values that we want to add into our list. -
Lastly, in the same method call, an
AddCommandis created with the new populatedModule, and is passed back to theLogicManagerin step 2. -
Logic Managerexecutes the newly createdAddCommand. -
Finally, the
Modelis then updated by adding the newModuleobject.
Auto-Retrieval of Module Information
GradPad’s add feature supports auto retrieval of module information from NUSMods, mainly a module’s title and modular credits.
This is to ensure that the modules added into GradPad are valid NUS modules, and the module information for each module is accurate.
The following sequence diagram shows how the add command is executed.

Edit feature
GradPad allows users to edit modules that have already been added.
The following fields of a module can be edited:
- Module Code
- Tags
As with all operations in GradPad, the EditCommand class handles the execution of edit operations.
The EditCommandParser class helps to parse a user’s input before creating the correct edit command.
GradPad uses the EditModuleDescriptor class to facilitate edit operations. An EditModuleDescriptor is
a temporary bridge that holds the newly-edited fields of a module. You can set the ModuleCode and Tags of an EditModuleDescriptor,
whereas the ModuleTitle and ModularCredits of a module will be retrieved automatically via NUSMods.
At least one field (ModuleCode or Tags) must be specified to successfully edit a module.
Given below is how an edit operation behaves at each step of its execution.
-
The user types in a command string corresponding to an edit operation.
-
This calls the
executemethod of theLogicManagerclass. The user input is passed in as a string. -
Logic.execute()then calls theparseCommandmethod of thegradPadParserclass to parse the string input. -
gradPadParser.parseCommand()sees that this is an edit command, and so uses theEditCommandParserclass to create a correspondingEditCommand. -
In
EditCommandParser, the string input is first split into tokens, i.e. new module code, new tags, etc. -
The
ModuleInfoSearcher.searchModule()is then called to retrieve module information (module title, modular credits, etc.) of the new module from Nusmods. -
Once the module information is retrieved, an
EditModuleDescriptorobject is created from the module information and tags. It now stores the new values that we want to update the target module with. -
An
EditCommandis then created with this populatedEditModuleDescriptor, and is passed back to theLogicManagerin step 2. -
LogicManagerexecutes the newly createdEditCommand. -
The target module to be edited is retrieved. A copy of it is made and using the populated
EditModuleDescriptor, the fields that are to be updated are replaced with their new values. -
The
Modelis then updated by replacing the target module with its new updated copy.
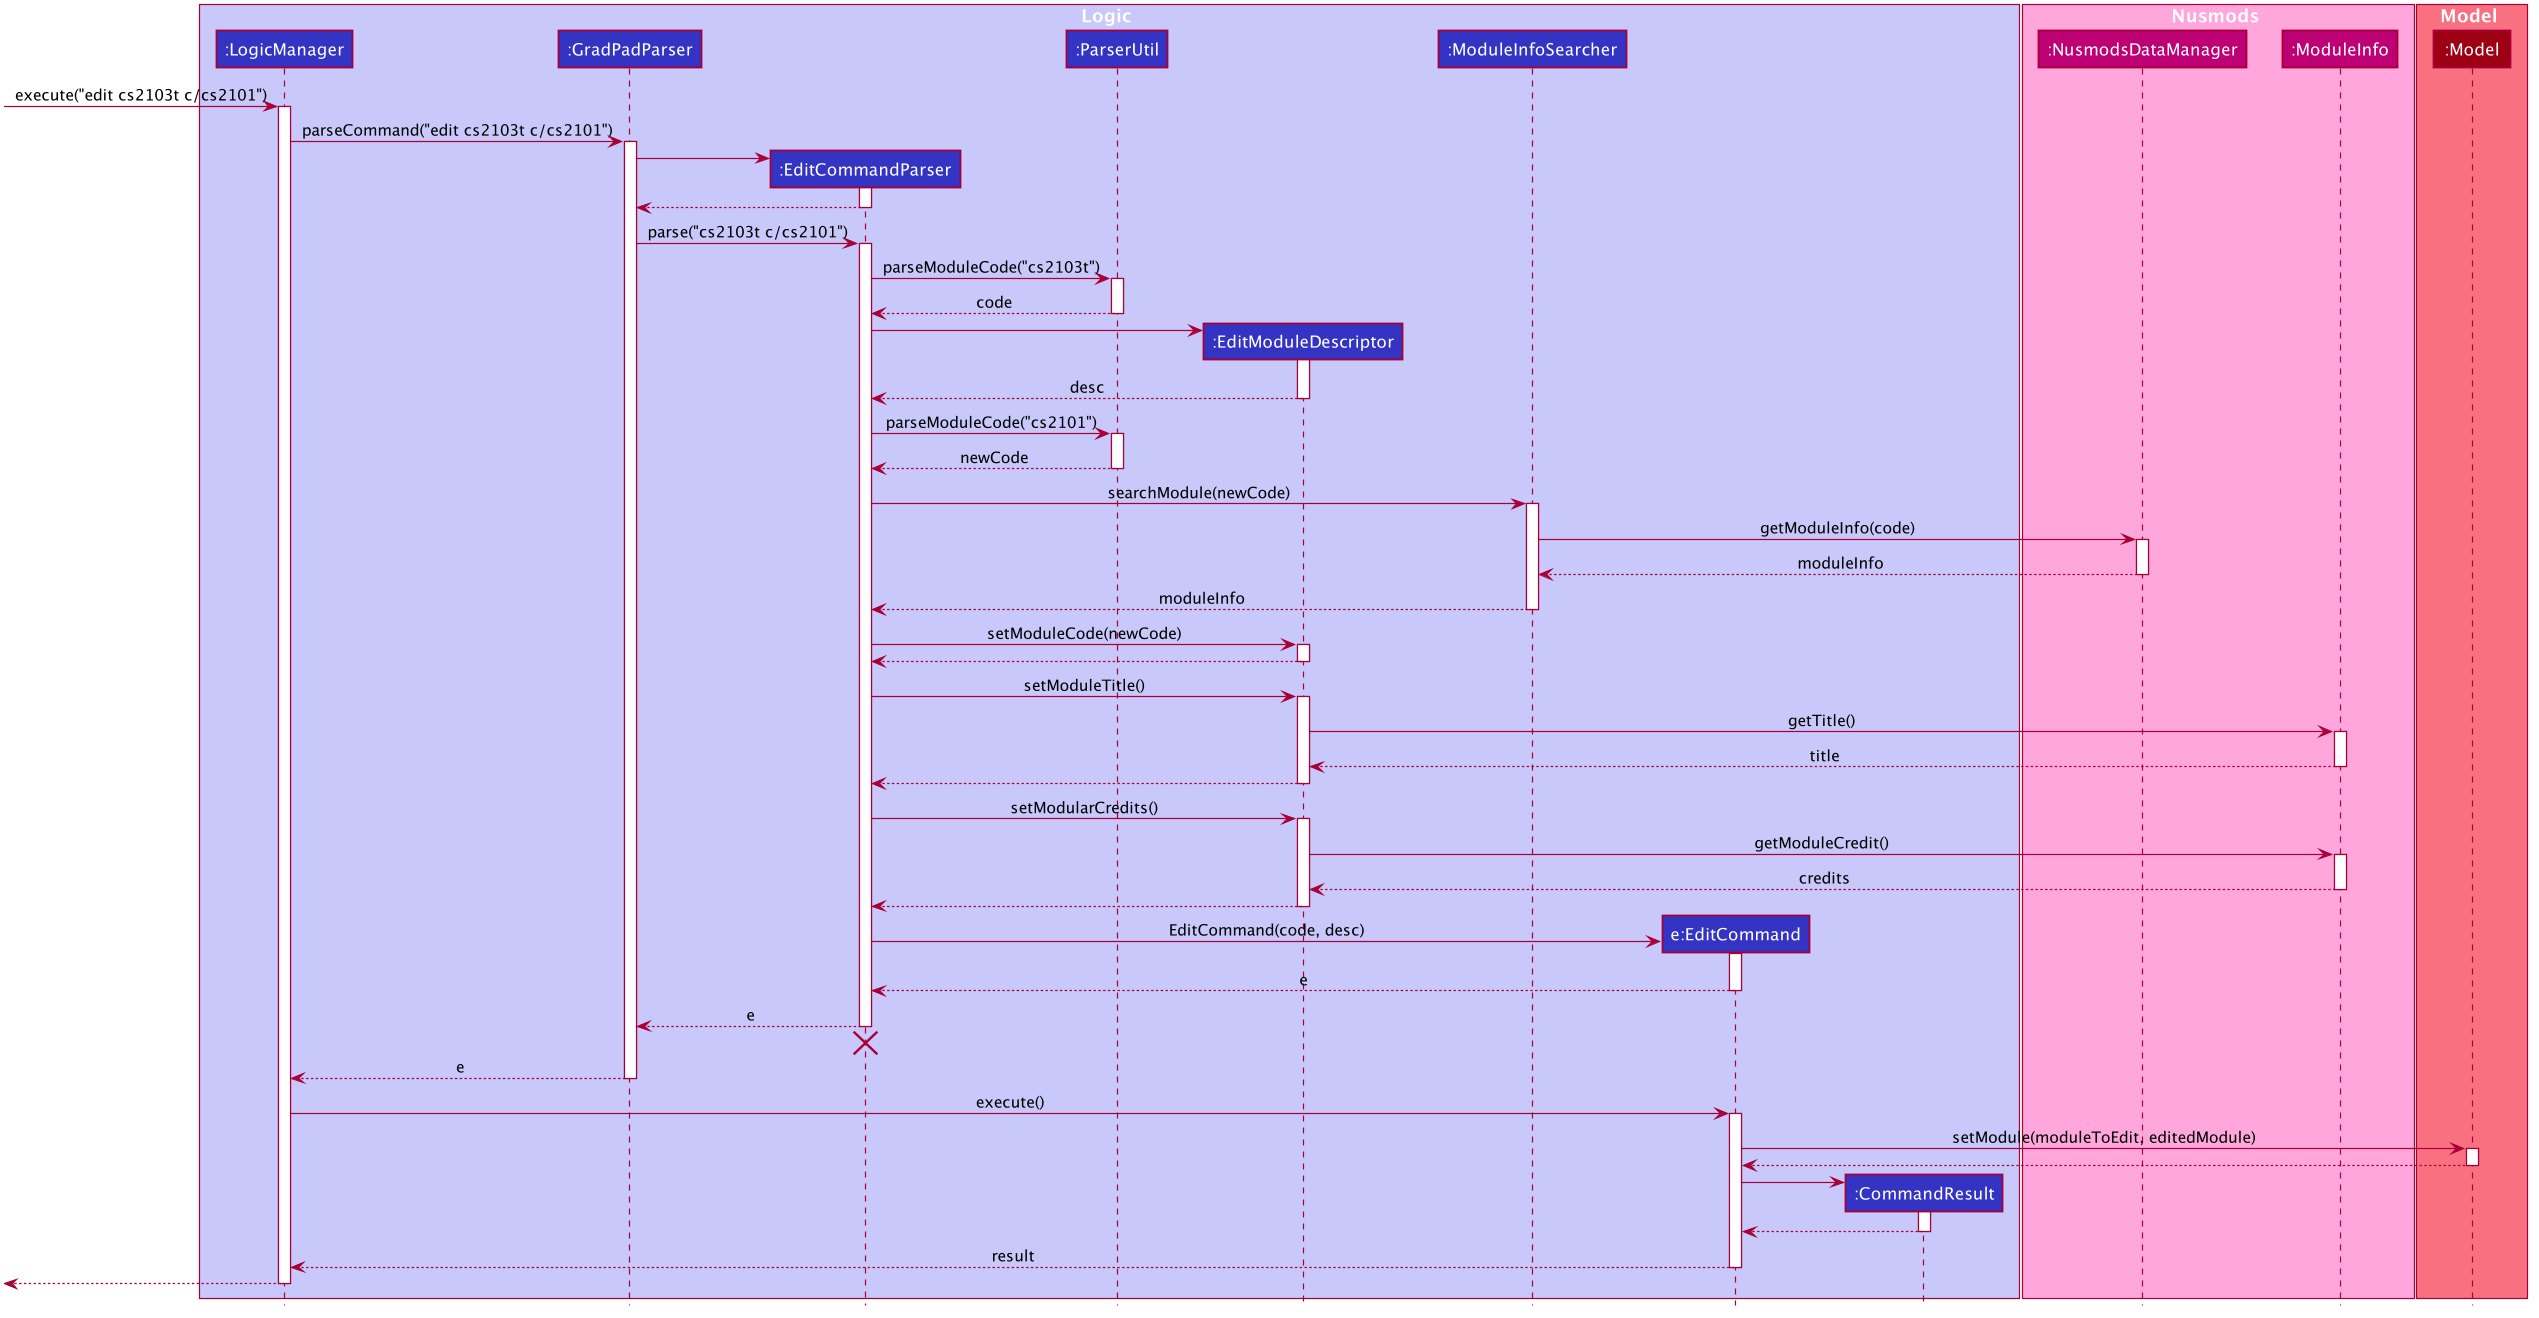
Auto-Retrieval of Module Information
When a user wishes to edit the module code of a module, GradPad’s edit feature supports auto retrieval of the new module information from NUSMods, mainly the module’s title and modular credits.
This is to ensure that newly edited modules are valid NUS modules, and the module information for the edited module is accurate.
The following sequence diagram shows how the edit command is executed.
Delete feature
GradPad allows users to delete modules that have already been added.
As with all operations in GradPad, the DeleteCommand class handles the execution of delete operations.
The DeleteCommandParser class helps to parse a user’s input before creating the correct delete command.
Given below is how a delete operation behaves at each step of its execution.
-
The user types in a command string corresponding to a delete operation.
-
This calls the
executemethod of theLogicManagerclass. The user input is passed in as a string. -
Logic.execute()then calls theparseCommandmethod of thegradPadParserclass to parse the string input. -
gradPadParser.parseCommand()sees that this is an delete command, and so uses theDeleteCommandParserclass to create a correspondingDeleteCommand, using theDeleteCommandParser.parse()method. -
In
DeleteCommandParser, the ModuleCode is first extracted from the string input. -
A
DeleteCommandis then created with the ModuleCode, and is passed back to theLogicManagerin step 2. -
LogicManagerself-invokes itshandleStall()method and returns aCommandResultwhich prompts the user for a confirmation. -
When the user enters a
YesCommand,LogicManagerexecutes the stalledDeleteCommand. -
The target module to be deleted is retrieved, if it exists in the Completed Modules of GradPad.
-
The
Modelis then updated by removing the target module.
The following sequence diagram shows how the delete command is executed.
LogicManager will skip the part where it self-invokes its handleStall() method, and execute the command immediately.
Find feature
GradPad allows users to find a specific module or a group of modules with common tags or sequence of characters. This feature is especially useful if there is a long list of modules currently in GradPad and users want to avoid the hassle of scrolling through the entire list to look for specific module(s).
As with all operations in GradPad, the FindCommand class handles the execution of find operations.
The FindCommandParser class helps to parse a user’s input before creating the correct find command.
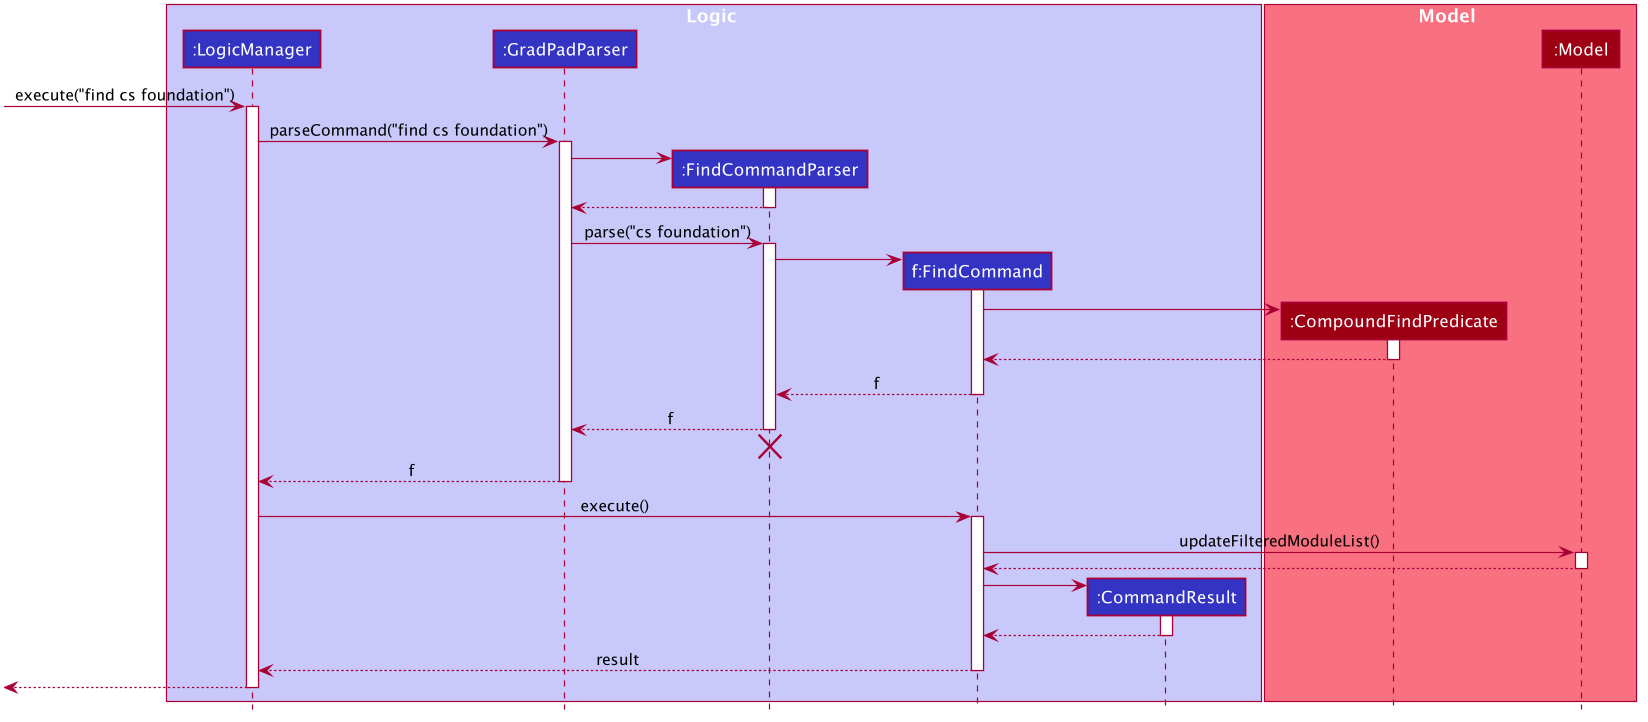
Given below is a series of steps to show how a find operation behaves during its execution.
-
The user types in a command string corresponding to a find operation, e.g. “find cs foundation”.
-
This calls the
executemethod of theLogicManagerclass. The user input is passed in as a string. -
Logic.execute()then calls theparseCommandmethod of theGradPadParserclass to parse the string input. -
GradPadParser.parseCommand()identifies the command as a find command, and thus uses theFindCommandParserclass to extract the string input as a list of keywords and create aCompoundFindPredicatewith said list. -
CompoundFindPredicatewill test every keyword in the list against the logical union of both predicatesModuleCodeContainsKeywordsPredicateandModuleContainsTagsPredicate, and returns the result. -
A corresponding
FindCommandwill then be created using thisCompoundFindPredicate. -
This
FindCommandis then passed back to theLogicManagerin step 2. -
LogicManagerexecutes the newly createdFindCommand. -
FindCommand.execute()calls forModelto filter the GradPad list based on the given predicate(s). -
Finally, a
CommandResultis created and returned to show the result of the execution.
The following sequence diagram illustrates how the find command is executed.
List feature
The list command shows all modules that have been added by the user in the Completed Modules list.
This is needed as certain commands can change the modules that are being displayed. One such command is the
find command, which shows only matching modules in the list.
Before diving into how the list operation is executed, we must first gain a brief understanding of how the
Completed Modules list displays its modules, and how this display can be changed by other commands.
The Completed Modules list is implemented by the ModuleListPanel UI class.
This class contains a list of modules, which comes from GradPad’s Model component, that it uses to
display to the user. To change the contents of the list, commands can apply filters to this list through Model.
For example, a command may ask Model to only show modules that have 4 modular credits.
When this happens, Completed Modules naturally changes the modules it displays too.
The following diagram illustrates this relationship:
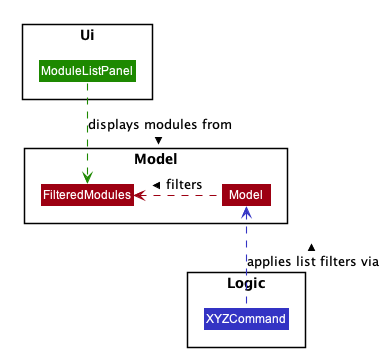
With this in mind, the aim of the list command is therefore to remove any existing filter on this module list,
effectively getting Completed Modules to display all modules once again.
Given below is a series of steps to show how a list operation behaves during its execution to achieve just this.
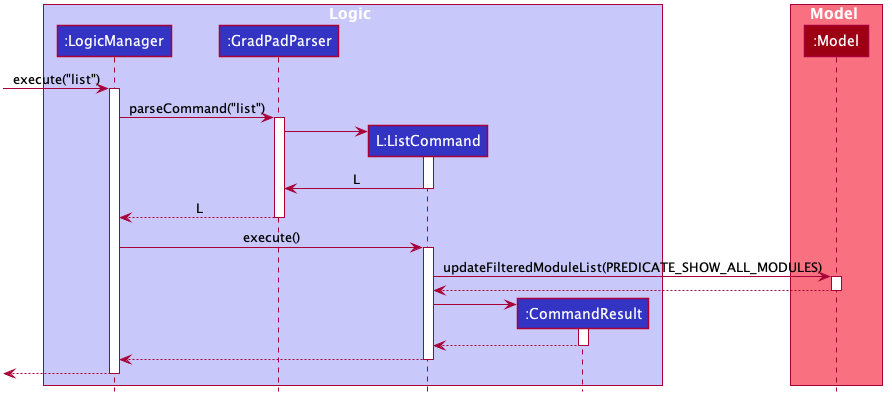
-
The user input is parsed and constructs a
ListCommandobject. (Implementation details of the parser are omitted here as they are not central in developing an understanding of thelistoperation) -
When this command is executed, it calls the
updateFilteredModuleListmethod in theModelclass and passes in a predicate that lets all modules through the filter. -
The
Modelclass updates itsfilteredModuleslist to include all modules as if it were unfiltered. -
The
ModuleListPanelUI component listens to changes infilteredModulesand updates whenever the list is updated. It thus updates to display all modules too.
The following sequence diagram illustrates how the list command is executed.
CheckMc feature
The checkmc command allows users to view a tally of the total no. of modular credits from the modules present
in the Completed Modules list.
As with all operations in GradPad, the CheckMcCommand class handles the execution of checkmc operations.
In brief, it works by going through all modules in the Completed Modules list and summing up each module’s
modular credits.
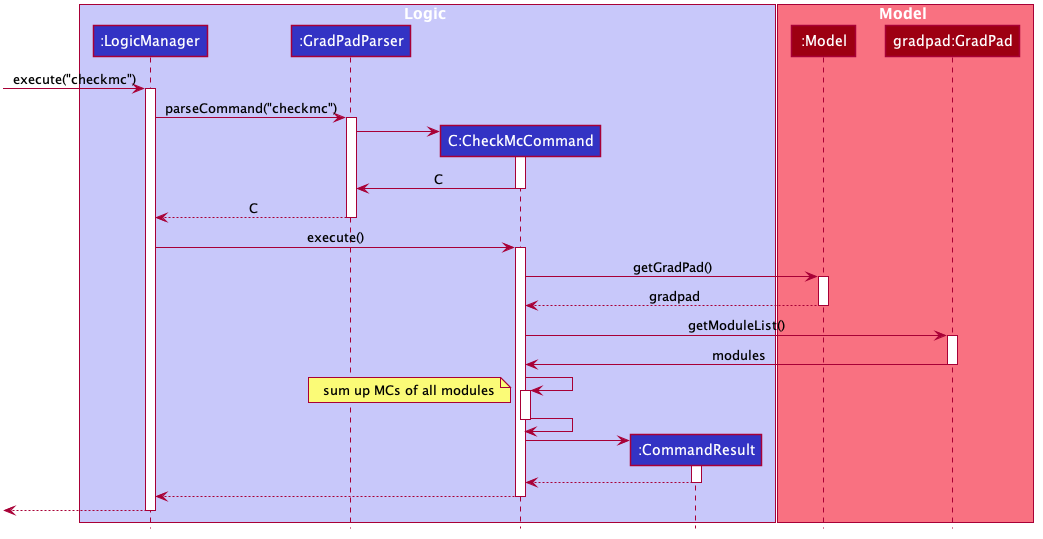
Given below is a series of steps to show how a checkmc operation behaves during its execution.
-
The user enters the
checkmccommand string. -
This calls the
executemethod of theLogicManagerclass with the user input passed in as a string. -
Logic.execute()then calls theparseCommandmethod of theGradPadParserclass to parse the string input. -
GradPadParser.parseCommand()identifies the command as a checkmc command and thus creates aCheckMcCommandobject. -
This command object is then passed back to the
LogicManagerin step 2. -
LogicManagerexecutes the newly createdCheckMcCommand. -
CheckMcCommand.execute()retrieves theGradPadobject stored withinModeland accesses themodulesfield within theGradPad. -
It then loops through
modules, which is a list ofModuleobjects, and sums up all their modular credits. -
Finally, a
CommandResultis created to show the total no. of modular credits calculated.
The following sequence diagram illustrates how the checkmc command is executed.
Check required modules feature
The required command allows users to view the required modules in the NUS Computer Science curriculum
that they have yet to take.
When the command is executed, it checks through the current modules in the Completed Modules list and ensures
that modules that have already been taken are not displayed in the list of remaining required modules.
This is achieved with the RequiredCommand and RequiredCommandStorage class. The RequiredCommandStorage class
handles the extracting, parsing of JSON module data while the RequiredCommand handles the logic
behind filtering the undone modules.
As with all operations in GradPad, the RequiredCommand class handles the execution of required operations.
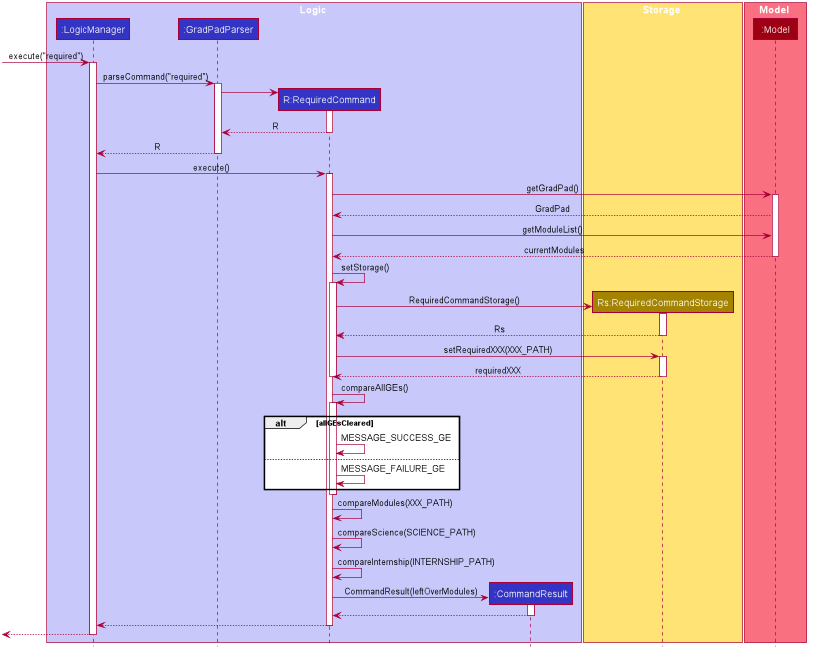
Given below is a series of steps to show how a required operation behaves during its execution.
-
The user enters the
requiredcommand string. -
This calls the
executemethod of theLogicManagerclass with the user input passed in as a string. -
Logic.execute()then calls theparseCommandmethod of theGradPadParserclass to parse the string input. -
GradPadParser.parseCommand()identifies the command as a required command and thus creates aRequiredCommandobject. -
This command object is then passed back to the
LogicManagerin step 2. -
LogicManagerexecutes the newly createdRequiredCommand, which will contain the following uninitialised attributes, list ofcurrentModulesin GradPad, all theleftOverModulesand aRequiredCommandStorageto store all modules in the syllabus. -
Then,
RequiredCommand.execute()retrieves theGradPadobject stored withinModeland accesses themodulesfield within theGradPadwith a few method calls, before storing it incurrentModules. -
RequiredCommand.execute()then calls its own methodsetStorageto create aRequiredCommandStorageobject. -
Within the
setStoragemethod, various method calls are made for each module category (Eg. Foundation, IT Professionalism) to set up theRequiredCommandStorageobject with the all the relevant modules. -
Then,
RequireCommand.execute()call its own methodcompareAllGEs()to check if any GE pillars have not been cleared. It then keeps track of which pillars have not been cleared. -
RequireCommand.execute()then proceeds to call its own methodscompareModules,compareScienceandcompareInternshipto keep track of undone modules by cross-referring to thecurrentModuleslist. -
Finally, a
CommandResultis created with theleftOverModulesto show the filtered list of remaining required modules.
The following sequence diagram illustrates how the required command is executed.
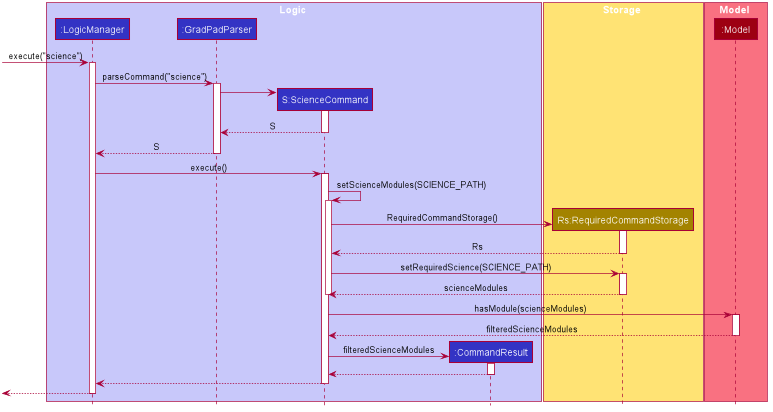
Check all available Science Modules
The science command allows users to view all available Science modules available on the Computer Science curriculum.
When the command is executed, a list of all available Science modules will be displayed on the Result Display.
This is achieved by tapping into the RequiredCommandStorage class to extract and parse the Science modules, while the
ScienceCommand class handles the logic of displaying the modules. This command is separated from the required
command to avoid cluttering of the Result Display.
As with all operations in GradPad, the ScienceCommand class handles the execution of science operations.
Given below is a series of steps to show how a science operation behaves during its execution.
-
The user enters the
sciencecommand string. -
This calls the
executemethod of theLogicManagerclass with the user input passed in as a string. -
Logic.execute()then calls theparseCommandmethod of theGradPadParserclass to parse the string input. -
GradPadParser.parseCommand()identifies the command as a science command and thus creates aScienceCommandobject. -
This command object is then passed back to the
LogicManagerin step 2. -
LogicManagerexecutes the newly createdScienceCommand, which will contain an empty list ofscienceModules, to be filled up by fetching aRequiredCommandStorageobject. -
Then, the
ScienceCommand.execute()calls its own method,setScienceModules()which creates aRequiredCommandStorageobject. -
Inside the
setScienceModules()method, thesetRequiredSciencemethod of theRequiredCommandStorageclass is invoked, which setsscienceModuleswith the list of available Science modules. -
Then,
ScienceCommand.execute()calls forModelto filter out all existing Science modules in GradPad fromscienceModules, via thehasModule()method. -
Finally, a
CommandResultis created with thefilteredScienceModulesto display the modules.
The following sequence diagram illustrates how the science command is executed.
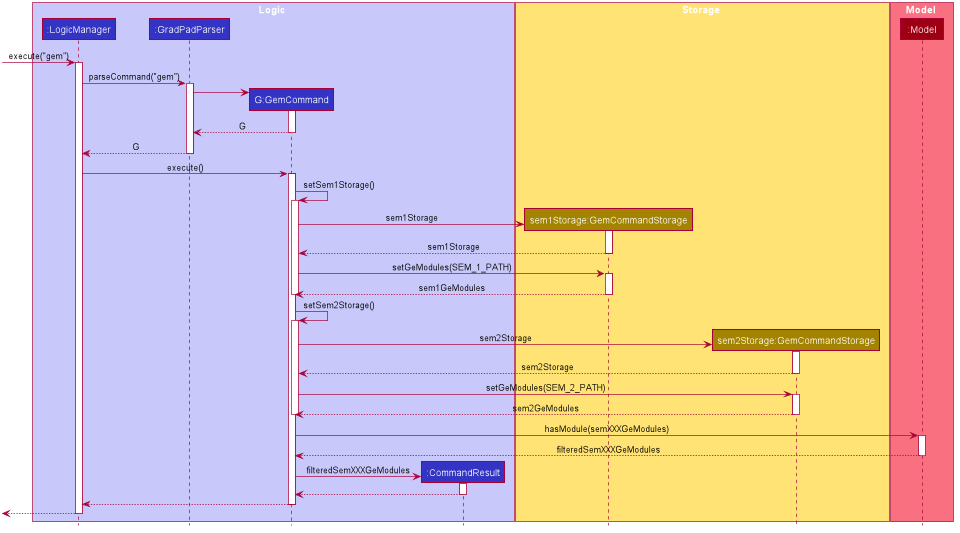
Check all available General Education Modules
The gem command allows users to view all available General Education (GE) modules available in NUS.
When the command is executed, a list of all available GE modules will be displayed on the Result Display.
This is achieved with the GemCommand and GemCommandStorage class. The GemCommandStorage class
handles the extracting and parsing of JSON module data while the GemCommand handles the logic of displaying the
modules. This command is separated from required to avoid cluttering up the Result Display due to the hefty
amount of GE modules displayed.
As with all operations in GradPad, the GemCommand class handles the execution of gem operations.
Given below is a series of steps to show how a gem operation behaves during its execution.
-
The user enters the
gemcommand string. -
This calls the
executemethod of theLogicManagerclass with the user input passed in as a string. -
Logic.execute()then calls theparseCommandmethod of theGradPadParserclass to parse the string input. -
GradPadParser.parseCommand()identifies the command as a gem command and thus creates aGemCommandobject. -
This command object is then passed back to the
LogicManagerin step 2. -
LogicManagerexecutes the newly createdGemCommand, which will contain 2 uninitialisedGemCommandStorageattributes, used to store Semester 1 and 2 General Education Modules. -
GemCommand.execute()then calls its own methodsetSem1StorageandsetSem2Storageto create 2GemCommandStorageobjects. -
Within the
setSem1StorageandsetSem2Storagemethods, various method calls are made for each GE pillar (Eg. GET, GER) to set up thesem1Storageandsem2Storageobjects with the all the relevantsem1GeModulesandsem2GeModules. -
Then,
GemCommand.execute()calls forModelto filter out all existing GE modules in GradPad from bothsem1GeModulesandsem2GeModules, via thehasModule()method. -
Finally, a
CommandResultis created with all the filtered GE modules, displaying all the available GE modules by Semester.
The following sequence diagram illustrates how the gem command is executed.
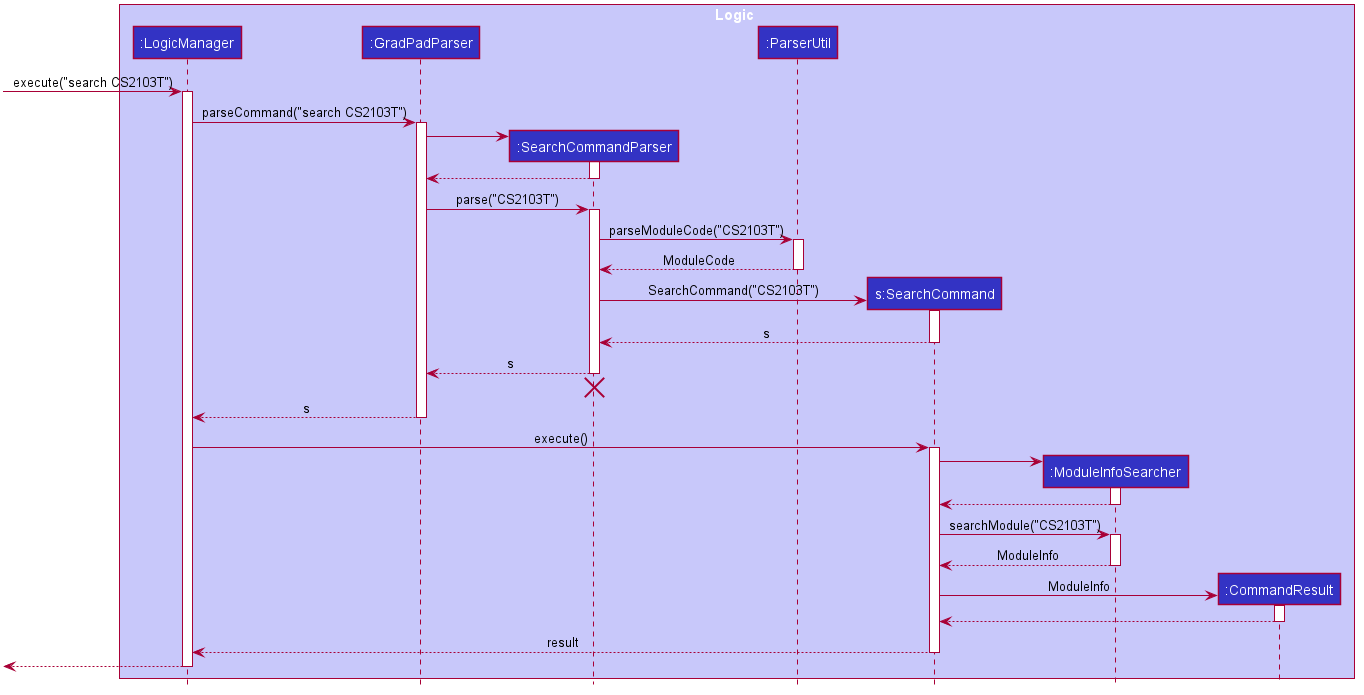
Search feature
The search command allows users to search for any module available in NUS and display the module details.
To retrieve a module’s information, the execution of this command interacts with the Nusmods component, which
contains all logic related to the access of module data from the NUSMODS public API. We will not go into detail
about the component here as we are mainly focused on the implementation of the search functionality.
As with all operations in GradPad, the SearchCommand class handles the execution of search operations.
Given below is a series of steps to show how a search operation behaves during its execution.
-
The user enters a search command string containing a module code, e.g. “search CS2103T”.
-
This calls the
executemethod of theLogicManagerclass with the user input passed in as a string. -
Logic.execute()then calls theparseCommandmethod of theGradPadParserclass to parse the string input. -
GradPadParser.parseCommand()sees that this is a search command, and so uses theSearchCommandParser.parse()method inSearchCommandParser. -
In
SearchCommandParser,SearchCommandParser.parse()extracts the ModuleCode from the string input. -
A
SearchCommandis then created with the ModuleCode, and is passed back to theLogicManagerin step 2. -
LogicManagerexecutes the newly createdSearchCommand. -
SearchCommand.execute()then creates an instance ofModuleInfoSearcherto call thesearchModule()method by passing in the module code. -
searchModule()method will then take in the module code and retrieve theModuleInfoby callingNusmodsData.getModuleInfo()in theNusmodspackage. -
The
ModuleInfoof the searched module retrieved will then be accessed and formatted according to the display requirement. -
Finally, a
CommandResultis created to display the module information that has been retrieved.
The following sequence diagram illustrates how the search CS2103T command is executed.
Tags feature
GradPad allows users to add tags to modules that they add, remove tags from existing modules, list out all
existing tags in GradPad, and filter the Completed Modules list by tags.
Tags are represented by Tag objects which are referenced by Module objects when modules are tagged.
To prevent duplicate tags from being created everytime a module is tagged (as was the case in the original AB3),
the GradPad class uses a UniqueTagMap class to keep track of a collection of unique Tag objects. With this,
when a user tags a module with an existing tag, UniqueTagMap looks for the existing Tag object and adds it to
that Module object. As such, all modules who use a particular tag now reference that corresponding singular Tag
object.
The main benefit of this is evident when GradPad needs to print out a list of all tags, which can be simply done
by printing out UniqueTagMap’s tags. Otherwise, one would have to iterate through all Module objects,
retrieve all their tags, and then filter them to remove any duplicates.
Following this, UniqueTagMap also has to handle the addition and deletion of modules, which is utilized by
the GradPad class’s add, edit, and delete operations for modules.
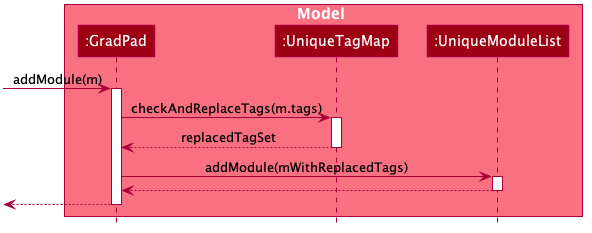
Adding a module with tags
-
When a module with tags is going to be added, the
GradPadclass within theModelcomponent is passed that newly constructedModuleobject from theLogiccomponent (see add feature). -
Its
addModulemethod is invoked with this object as a parameter. -
Before adding this module to its list of modules, this new module’s tags will first be parsed and replaced with existing tags where possible. This is done using the
checkAndReplaceTagsmethod in theUniqueTagMapclass. -
The
checkAndReplaceTagsmethod basically loops through a list ofTagobjects and checks each one against the collection of existingTagobjects it already holds. If it comes across a “new”Tagthat already exists within its collection of tags, it replaces that “new”Tagwith its existing equivalentTagobject in the list. Otherwise, it adds genuinely newTagobjects to its collection. -
Now that the new
Moduleobject’s tags have been checked and replaced, the model adds thisModuleto itsUniqueModuleList.
The following diagram illustrates this flow of logic.
Deleting a module with tags
When a module is being deleted, its Tag objects within cannot simply be deleted, since multiple
Modules may share the same Tag object. Yet at the same time, when a Tag is no longer referenced by any Module,
it should be removed so that it doesn’t loiter around in UniqueTagMap. To achieve this, Tag objects
store a count of the no. of modules that are currently using it. When this count hits 0, the Tag can be safely
removed.
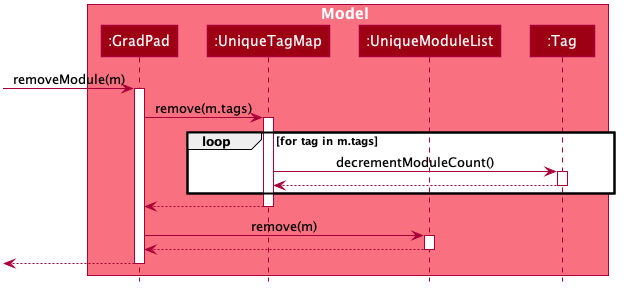
This is the execution flow when a module is deleted:
-
The
removeModulemethod in theGradPadclass is invoked. -
The
removemethod inUniqueTagMapis then invoked with a set of allTagobjects belonging to theModulethat is to be removed. -
Within the
removemethod, eachTag’s module count is decremented. If the count reaches 0 at this point, then theTagmust be unused by all modules. It is thus removed from the collection ofTags withinUniqueTagMap. -
The
Moduleobject can now be deleted from theUniqueModuleListin theGradPadclass.
The diagram illustrates this flow of logic:
Editing a module’s tags
When editing a module’s tags, the old tags are simply “removed” as when a module is deleted, followed by “adding” the new tags, as when a module is added.
[Proposed] Undo/redo feature
Proposed Implementation
The proposed undo/redo mechanism is facilitated by VersionedGradPad. It extends GradPad with an undo/redo history,
stored internally as a gradPadStateList and currentStatePointer. Additionally, it implements the
following operations:
-
VersionedGradPad.commit()— Saves the current GradPad state in its history. -
VersionedGradPad.undo()— Restores the previous GradPad state from its history. -
VersionedGradPad.redo()— Restores a previously undone GradPad state from its history.
These operations are exposed in the Model interface as Model.commitGradPad(), Model.undoGradPad()
and Model.redoGradPad() respectively.
Given below is an example usage scenario and how the undo/redo mechanism behaves at each step.
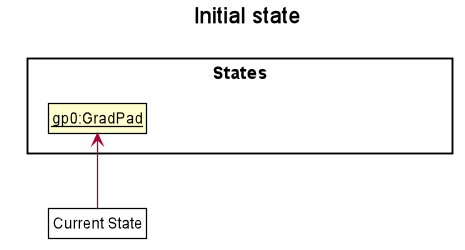
Step 1. The user launches the application for the first time. The VersionedGradPad will be initialized with
the initial GradPad state, and the currentStatePointer pointing to that single GradPad state.
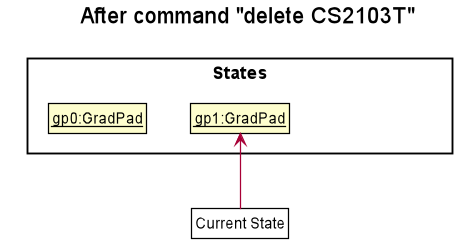
Step 2. The user executes delete CS2103T command to delete the CS2103T Module from the Completed Modules. The
delete command calls Model.commitGradPad(), causing the modified state of the GradPad after the delete CS2103T
command executes to be saved in the gradPadStateList, and the currentStatePointer is shifted to the newly inserted
GradPad state.
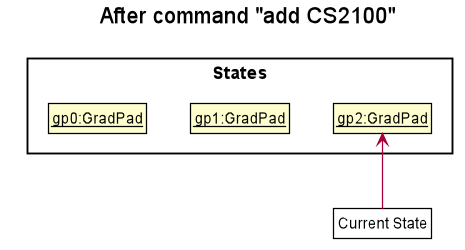
Step 3. The user executes add CS2100 to add a new module. The add command also calls Model.commitGradPad(),
causing another modified GradPad state to be saved into the gradPadStateList.
Model.commitGradPad(), so the GradPad state will not be saved into the gradPadStateList.
Step 4. The user now decides that adding the module was a mistake, and decides to undo that action by executing the
undo command. The undo command will call Model.undoGradPad(), which will shift the currentStatePointer once
to the left, pointing it to the previous GradPad state, and restores the GradPad to that state.
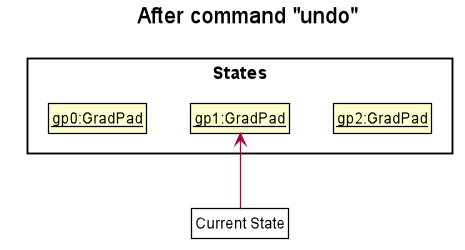
currentStatePointer is at index
0, pointing to the initial GradPad state, then there are no previous GradPad states to restore. The undo command
uses Model.canUndoGradPad() to check if this is the case. If so, it will return an error to the user rather
than attempting to perform the undo.
The following sequence diagram shows how the undo operation works:
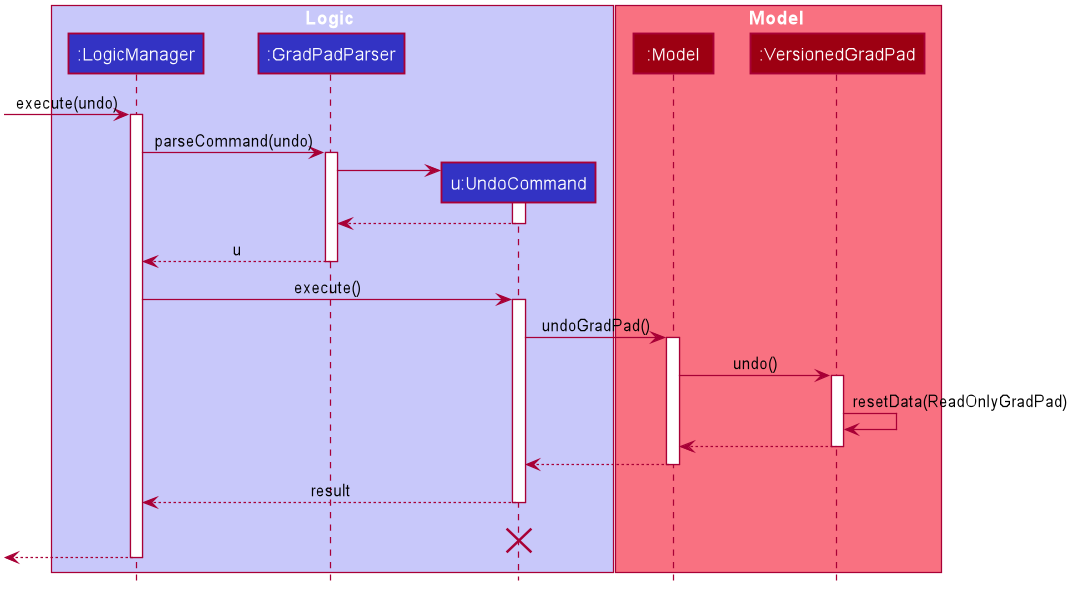
UndoCommand should
end at the destroy marker (X) but due to a limitation of PlantUML, the lifeline reaches the end of diagram.
The redo command does the opposite — it calls Model.redoGradPad(), which shifts the currentStatePointer once
to the right, pointing to the previously undone state, and restores the GradPad to that state.
currentStatePointer is at index
gradPadStateList.size() - 1, pointing to the latest GradPad state, then there are no undone GradPad states to restore.
The redo command uses Model.canRedoGradPad() to check if this is the case. If so, it will return an error to the
user rather than attempting to perform the redo.
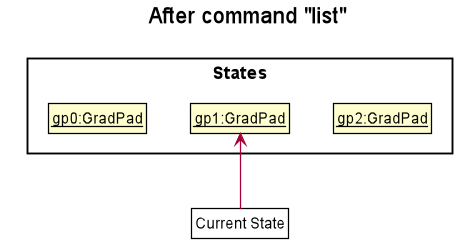
Step 5. The user then decides to execute the command list. Commands that do not modify the GradPad, such as list,
will usually not call Model.commitGradPad(), Model.undoGradPad() or Model.redoGradPad(). Thus, the
gradPadStateList remains unchanged.
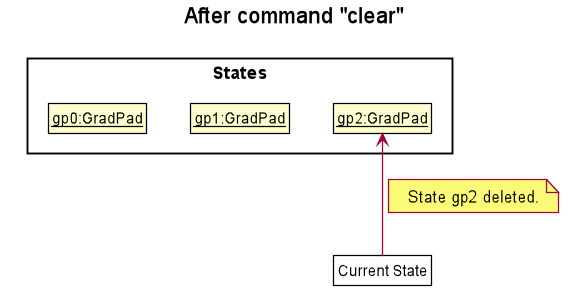
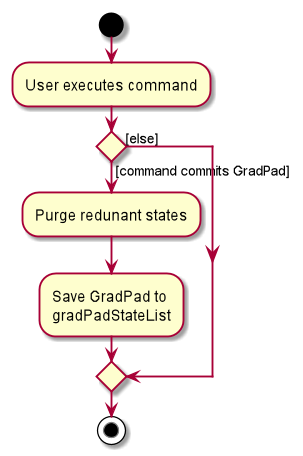
Step 6. The user executes clear, which calls Model.commitGradPad(). Since the currentStatePointer is not pointing
at the end of the gradPadStateList, all GradPad states after the currentStatePointer will be purged. Reason: It no
longer makes sense to redo the add CS2100 command. This is the behavior that most modern desktop
applications follow.
The following activity diagram summarizes what happens when a user executes a new command:
Design consideration:
Aspect: How undo & redo executes
-
Alternative 1 (current choice): Saves the entire GradPad.
- Pros: Easy to implement.
- Cons: May have performance issues in terms of memory usage.
-
Alternative 2: Individual command knows how to undo/redo by
itself.
- Pros: Will use less memory (e.g. for
delete, just save the module being deleted). - Cons: We must ensure that the implementation of each individual command are correct.
- Pros: Will use less memory (e.g. for
Documentation, logging, testing, configuration, dev-ops
Appendix A: Requirements
Product scope
Target user profile:
Anybody → Students → University Students → tech savvy University student → Computer Science students NUS Computer Science undergraduate students, who wish to keep track of their necessary modules (how many are done, how many are left), and also the total MCs tabulation.
Value proposition:
Keep track of your degree progress and modules taken during your time in NUS with ease. Faster and more lightweight than traditional GUI applications, view and update your progress by issuing simple text commands. Modules are conveniently categorized into their respective groupings e.g. Unrestricted Electives, Computer Science Foundations, etc.
User stories
Priorities: High (must have) - * * *, Medium (nice to have) - * *, Low (unlikely to have) - *
| Priority | As a … | I want to … | So that I can… |
|---|---|---|---|
* * * |
NUS Student | see my total Modular Credits | know how many more I require to graduate |
* * * |
NUS Student | see my past Modules | know what I have taken before |
* * * |
user | delete modules | remove entries that I no longer need |
* * * |
user | add modules and MCs | keep track of my Modular progress |
* * |
first-time user | access the available commands | use the app efficiently |
* * |
user | save and load my Module data | keep track of my Modular progress |
Use cases
(For all use cases below, the System is the GradPad and the Actor is the user, unless specified otherwise)
Use case: UC01 - Delete a module from Completed Modules
MSS
- User requests to delete a specific Module in the
Completed Modules - GradPad deletes the module
-
GradPad displays the deleted module onto the
Result DisplayUse case ends.
Extensions
-
1a. The module does not exist in
Completed Modules.-
1a1. GradPad shows an error message.
Use case ends.
-
-
2a. The given module code is invalid.
-
2a1. GradPad shows an error message.
Use case resumes at step 1.
-
Use case : UC02 - Add a module into Completed Modules
MSS
- User requests to add a module into the
Completed Modules - GradPad adds the module into
Completed Modules -
GradPad displays the module added onto the
Result DisplayUse case ends.
Extensions
-
1a. The input command format is invalid.
-
1a1. GradPad shows an error message.
Use case ends.
-
-
1b. Module to be added does not exist in NUS.
-
1b1. GradPad shows an error message.
Use case ends.
-
Use case : UC03 - View help
MSS
- User requests to view help commands
-
GradPad shows a list of commands
Use case ends.
Use case : UC04 - View all Completed Modules
MSS
- User requests to view list of modules in
Completed Modules -
GradPad shows all modules added into
Completed ModulesUse case ends.
Use case: UC05 - Edit a module in Completed Modules
- User requests to edit a module in
Completed Modules - Module is replaced with updated fields
-
GradPad displays the module edited onto the
Result DisplayUse case ends.
Extensions
-
1a. The module does not exist in
Completed Modules.-
1a1. GradPad shows an error message.
Use case ends.
-
-
1b. No field is edited for the module.
-
1b1. GradPad shows an error message.
Use case ends.
-
-
1c. Edited module does not exist in NUS.
-
1c1. GradPad shows an error message.
Use case ends.
-
-
1d. The input fields format is invalid.
-
1d1. GradPad shows an error message.
Use case ends.
-
Use case : UC06 - Find modules in Completed Modules
MSS
- User requests to find modules in
Completed Modulesusing keywords. -
GradPad displays the modules found onto the
Result DisplayUse case ends.
Extensions
-
1a. No modules or tag found.
-
1a1. GradPad displays no modules found message onto
Result Display.Use case ends.
-
Use case : UC07 - View required modules in CS curriculum
MSS
- User requests to view all required modules in CS curriculum
-
GradPad displays the required modules in CS curriculum onto the
Result DisplayUse case ends.
Use case : UC08 - View all available General Education Modules offered in NUS
MSS
- User requests to view all available General Education Modules offered in NUS.
-
GradPad displays all available General Education modules onto the
Result DisplayUse case ends.
Use case : UC09 - View all available Science modules in the CS curriculum
MSS
- User requests to view all available Science modules in the CS curriculum.
-
GradPad displays all available Science modules in the CS curriculum onto the
Result DisplayUse case ends.
Use case : UC010 - Search for module details
MSS
- User requests to search for a module in NUS.
-
GradPad displays the module details in the
Result DisplayUse case ends.
Extensions
-
1a. The module searched does not exist in NUS.
-
1a1. GradPad shows an error message.
Use case ends.
-
Use case : UC011 - Check total modular credits
MSS
- User requests to view total modular credits achieved.
-
GradPad displays the total modular credits in the
Result DisplayUse case ends.
Use case : UC12 - exit GradPad
MSS
- User requests to exit GradPad
-
GradPad exits
Use case ends.
Non-Functional Requirements
- Should work on any mainstream OS as long as it has Java
11or above installed. - Should work on both 32-bit and 64-bit environments.
- Should be backwards compatible with data produced by earlier versions of the application.
- Should be able to hold up to 1000 modules without a noticeable sluggishness in performance for typical usage.
- A user with above average typing speed for regular English text (i.e. not code, not system admin commands) should be able to accomplish most of the tasks faster using commands than using the mouse.
- Should be able to respond within one seconds.
- Should be usable by a novice who has never done module tracking of any sort.
- The application is not required to handle module tracking by NUS students outside of the Computer Science major.
{More to be added}
Glossary
- Mainstream OS: Windows, Linux, Unix, OS-X
-
Module Code: Each module of study has a unique module code consisting of a two- or three-letter prefix that generally denotes the discipline, and four digits.
- First digit: Represents the level of the module, i.e., 1000 indicates a Level 1 module and 2000, a Level 2 module, etc.
- Second digit: Indicates the type of module, i.e., 1 for essential, 2 for elective, 3 for enrichment.
- Modular Credit (MC): A unit of the effort, stated in terms of time, expected of a typical student in managing his/her workload. The MC-value of a module is derived by dividing the estimated total number of workload hours per week for that module by the credit factor of 2.5 (i.e., one MC is equivalent to 2.5 hours of study and preparation per week).
{More to be added}
Appendix B: Instructions for Manual Testing
Given below are instructions to test the app manually.
Launch and Shutdown
-
Initial Launch
-
Download the jar file and copy into an empty folder.
-
Double-click the jar file.
Expected: GUI runs with a set of sample modules. The window size may not be optimum.
-
-
Saving Window Preferences
-
Resize the window to an optimum size. Move the window to a different location. Close the window.
-
Re-launch the app by double-clicking the jar file.
Expected: The most recent window size and location is retained.
-
-
Shutdown
-
Test case: Click the “close” button (red button) at the top of the window.
Expected: The window closes immediately. -
Test case:
exit
Expected: GUI shows a farewell message,”Exiting GradPad as requested …” and delays for 1.5 seconds, after which the window closes. -
Test case:
exitt
Expected: Window does not close. Unknown command message is shown in the result display.
-
Testing features
Add a Module
Prerequisites:
- Module code must be specified.
- Module code format must be valid, e.g. ‘CS2100’ is a valid module code.
- Module to be added must exist in the valid modules list fetched from NUSMods, e.g. module code CS2100 is a valid module, whereas module code CS1000 is an invalid module.
- Module added must not already exist in GradPad.
- Command must follow the
addformat.
Test Cases:
-
Test case:
add cs2100 t/fun
Expected: CS2100 module is added into ‘Completed Modules’ in GradPad. Details of the added module are shown in the result display. -
Test case:
add cs2100
Expected: No module added. Duplicate module message is shown in the result display. -
Test case:
add cs2100 t/funnn
Expected: No module added. Duplicate module message is shown in the result display. -
Test case:
add cs2100 Computer Organisation
Expected: No module added. Invalid module code format message is shown in the result display. -
Test case:
add cs1000
Expected: No module added. Invalid module message is shown in the result display. -
Test case:
add
Expected: No module added. Invalid command format message is shown in the result display. -
Test case:
addd cs2100
Expected: No module added. Unknown command message is shown in the result display.
Delete a Module
Prerequisites:
- Module code must be specified.
- Module code format must be valid.
- Module to be deleted must exist in the list being displayed in GradPad, e.g. CS2100 is in the list and CS2106 is not.
- Command must follow the
deleteformat, followed byy,ye, oryesformats for confirmation.
Test Cases:
-
Test case:
delete cs2100followed byy
Expected: CS2100 module is deleted from ‘Completed Modules’ in GradPad. Confirmation message followed by details of the deleted module are shown in the result display. -
Test case:
delete cs2100followed byn
Expected: No module deleted. Confirmation message followed by Command aborted message are shown in the result display. -
Test case:
delete cs2100 Computer Ogranisation
Expected: No module deleted. Invalid module code format message is shown in the result display. -
Test case:
delete cs2106
Expected: No module deleted. Module not found message is shown in the result display. -
Test case:
delete
Expected: No module deleted. Invalid command format message is shown in the result display. -
Test case:
deleteee cs2100
Expected: No module deleted. Unknown command message is shown in the result display.
Force Delete a module
Prerequisites:
- Module code must be specified.
- Module code format must be valid.
- Module to be deleted must exist in the list being displayed in GradPad, e.g. CS2100 is in the list and CS2106 is not.
- Command must follow the
fdeleteformat.
Test Cases:
-
Test case:
fdelete cs2100
Expected: CS2100 module is deleted from ‘Completed Modules’ in GradPad. Details of the deleted module are shown in the result display. -
Test case:
fdelete cs2100 Computer Ogranisation
Expected: No module deleted. Invalid module code format message is shown in the result display. -
Test case:
fdelete cs2106
Expected: No module deleted. Module not found message is shown in the result display. -
Test case:
fdelete
Expected: No module deleted. Invalid command format message is shown in the result display. -
Test case:
fdeleteee cs2100
Expected: No module deleted. Unknown command message is shown in the result display.
Clear current list of Modules
Prerequisites:
- Command must follow the
clearformat followed byy,ye, oryesformats for confirmation.
Test Cases:
-
Test case:
clearfollowed byy
Expected: All modules are cleared from GradPad. Confirmation message followed by GradPad cleared message are shown in the result display. -
Test case:
clearrrExpected: Modules are not cleared from GradPad. Unknown command message is shown in the result display.
Force Clear current list of Modules
Prerequisites:
- Command must follow the
fclearformat.
Test Cases:
-
Test case:
fclear
Expected: All modules are cleared from GradPad. GradPad cleared message is shown in the result display. -
Test case:
fclearrrExpected: Modules are not cleared from GradPad. Unknown command message is shown in the result display.
Edit a Module
Prerequisites:
- Module code of module to be edited must be specified.
- Module code format of module to be edited must be valid.
- Module to be edited must exist in the list being displayed in GradPad, e.g. CS2100 is in the list and CS2106 is not.
- Module replaced must be an existing module in NUS.
- At least 1 field to edit must be specified (module code/tags)
- Format of field to edit must be valid.
- Replaced fields must be different from current fields.
- Command must follow the
editformat.
Test Cases:
-
Test case:
edit cs2100 c/cs2103t
Expected: CS2100 module is replaced with CS2103T. Details of the edited module are shown in the result display. -
Test case:
edit cs2100 Computer Organisation c/cs2103t
Expected: No module edited. Invalid module code format message is shown in the result display. -
Test case:
edit cs2106 c/cs2103t
Expected: No module edited. Module not found message is shown in the result display. -
Test case:
edit cs2100 c/cs1000
Expected: No module edited. Invalid module message is shown in the result display. -
Test case:
edit cs2100 c/cs2100s Computer Organisation II
Expected: No module edited. Invalid module code format message is shown in the result display. -
Test case:
edit cs2100 c/cs2100
Expected: No module edited. Same module message is shown in the result display. -
Test case:
edit cs2100 t/fun
Expected: CS2100 module tag is replaced with “fun” tag. Details of the edited module are shown in the result display. -
Test case:
edit cs2100 t/fun
Expected: No module edited. Same tag message is shown in the result display. -
Test case:
edit cs2100 t/fun!!!
Expected: No module edited. Invalid tag format message is shown in the result display. -
Test case:
edit
Expected: No module edited. Invalid command format message is shown in the result display. -
Test case:
edittt cs2100 t/cool
Expected: No module edited. Unknown command message is shown in the result display.
List All Modules
Prerequisite:
- Command must follow the
listformat.
Test Cases:
-
Test case:
list
Expected: The full list of ‘Completed Modules’ is displayed. “Listed all modules” message shown in the result display. -
Test case:
listttt
Expected: Current list remains unchanged. Unknown command message is shown in the result display.
Find a Specific Module or a Group of Modules
Prerequisites:
- Arguments must be specified.
- Module to be included must exist in the ‘Completed Modules’ in GradPad, e.g. CS2100 (fun), CS2101 (fun), ST2334 (fun) and CS3230 are in the list and CS2106 is not. The words in the bracket represent the module tags.
- Command must follow the
findformat.
Test Cases:
-
Test case:
find cs2
Expected: CS2100 and CS2101 are displayed. “2 modules found!” message shown in the result display. -
Test case:
find cs2 st
Expected: CS2100, CS2101 and ST2334 are displayed. “3 modules found!” message shown in the result display. -
Test case:
find cs3230
Expected: CS3230 is displayed. “1 modules found!” message shown in the result display. -
Test case:
find cs2106
Expected: No modules displayed. “0 modules found!” message shown in the result display. -
Test case:
find fu
Expected: CS2100, CS2101 and ST2334 are displayed. “3 modules found!” message shown in the result display. -
Test case:
find fun
Expected: CS2100, CS2101 and ST2334 are displayed. “3 modules found!” message shown in the result display. -
Test case:
find funnnn
Expected: No modules displayed. “0 modules found!” message shown in the result display. -
Test case:
find
Expected: Current list is unchanged. Invalid command format message is shown in the result display. -
Test case:
findd CS2101
Expected: No modules displayed. Unknown command message is shown in the result display.
Check Total Modular Credits
Prerequisite:
- Command must follow the
checkmcformat.
Test Cases:
-
Test case:
checkmc
Expected: Total modular credits are calculated and displayed. If there are no modules in ‘Completed Modules’, total modular credits will be 0. -
Test case:
checkmccccc
Expected: Total modular credits are not calculated. Unknown command message is shown in the result display.
Open Help Page
Prerequisite:
- Command must follow the
helpformat.
Test Cases:
-
Test case:
help
Expected: Help page is displayed. -
Test case:
helppppp
Expected: Help page is not displayed. Unknown command message is shown in the result display.
Show Required Modules
Prerequisite:
- Command must follow the
requiredformat.
Test Cases:
-
Test case:
required
Expected: All required modules are displayed in the result display. Modules already in the ‘Completed Modules’ list in GradPad would not be displayed in the ‘Required Modules’ list. -
Test case:
requiredddd
Expected: Required modules are not displayed. Unknown command message is shown in the result display.
Show available Science Modules
Prerequisite:
- Command must follow the
scienceformat.
Test Cases:
-
Test case:
science
Expected: All available Science modules are displayed in the result display. Modules already in the ‘Completed Modules’ list would not be displayed. -
Test case:
scienceeeee
Expected: Science modules are not displayed. Unknown command message is shown in the result display.
Show available General Education Modules
Prerequisite:
- Command must follow the
gemformat.
Test Cases:
-
Test case:
gem
Expected: All available General Education modules are displayed in the result display. Modules already in the ‘Completed Modules’ list would not be displayed. -
Test case:
gemmmmm
Expected: General Education modules are not displayed. Unknown command message is shown in the result display.
Search Module Information
Prerequisites:
- Module code must be specified.
- Module code format must be valid.
- Module to be searched must exist in the valid modules list fetched from NUSMods,e.g. module code CS2100 is a valid module, whereas module code CS1000 is an invalid module.
- Command must follow the
searchformat.
Test Cases:
-
Test case:
search cs2100
Expected: CS2100 module information is displayed in the result display. -
Test case:
search cs2100 Computer Organisation
Expected: No module information is displayed. Invalid module code format message is shown in the result display. -
Test case:
search cs1000
Expected: No module information is displayed. Invalid module message is shown in the result display. -
Test case:
search
Expected: No module information is displayed. Invalid command format message is shown in the result display. - Other invalid search commands to try:
search c/cs2103t,search 1
Expected: No module information is displayed. Invalid module message is shown in the result display. - Test case:
searchh cs2100
Expected: No module information is displayed. Unknown command message is shown in the result display.
List all current Tags
Prerequisites:
- Command must follow the
tagsformat.
Test Cases:
-
Test case:
tags
Expected: All tags currently in use will be shown in the result display. -
Test case:
tagss
Expected: No tags displayed. Unknown command message is shown in the result display.
Saving data
-
Dealing with missing/corrupted data files
-
Corrupt the current saved data file under
./data/gradpad.json. One way is to add-into one of the module code. -
Open the jar file
gradpad.jar
Expected: No data shown in the Completed Modules list. -
Delete the data folder
./data -
Open the jar file
gradpad.jar
Expected: Saved data will reset to sample data and will be shown in the Completed Modules list.
-
Appendix C: Effort
1. NusMods 
GradPad is tightly integrated with the NUSMods public API by using it to retrieve NUS module information to display to users. This integration with NUSMods is definitely complex and not easy. Fortunately, one of our team members had some experience with web development and managed to integrate the API into GradPad. This allows GradPad to retrieve up-to-date module data directly from NUSMods, making GradPad more relevant and adaptable.
As if integrating GradPad, a Java application, with a public web API isn’t tedious enough, we also had to meet the project constraint that GradPad should be able to function even without an active connection to the API. Ideally, it would be straightforward for us to simply scrape data from the API and store it in our own database via a DBMS, which is generally done in other applications to reduce dependency on external APIs. However, the module also forbids the use of a DBMS, which meant we had to come up with a way to scrape and store data in local files instead. At the end of the day, we spent a considerable effort to write a script in Java that scrapes data from the API , transforms them into Java objects, and serializes them into human-readable JSON files.
2. NUS CS Curriculum
Our target audience is Computer Science Undergraduates and so we had to get the NUS CS curriculum and utilize this data in GradPad. Our initial idea was to just store the entire list of modules in the CS curriculum into GradPad. However, we soon realized that there are way more modules than we had anticipated as there is a list of GEMs and science modules that we had initially missed out. Besides this, there are also preclusions in some modules and equivalent modules with different module codes. These are tough challenges that we had to brainstorm hard to come up with innovative solutions to address them. Fortunately, our team managed to address these fundamental problems in the final product.
3. UI
Our GradPad Team has spent a considerable amount of effort on the UI aspect, from choosing the position of the result display and command box input, to the color theme that is the most pleasing to the audience. There should also be a special mention to Syafiq for coming up with the logo of GradPad from scratch, personalizing GradPad’s Ui to our target audience. Our team absolutely loves the color theme we have ended up with and we believe our target audience (Computer Science Undergraduate) will too.
4. Overall
As a whole, we believe that even though this project was rather demanding and time-consuming, we thoroughly enjoyed working with one another. Right from the start, we helped each other with the setting up of Github and the process of the project’s workflow. All of us were also very encouraging and constantly reviewed each other’s pull requests with comprehensive comments, allowing us to learn from each other’s strengths in coding. We are definitely proud of GradPad , and believe that it will serve its purpose to the fullest potential.