User Guide
- GradPad
- NUSMods integration
- Quick start
- Feature Summary List
-
Commands
- Adding a module:
add - Viewing all added modules:
list - Viewing all added tags:
tags - Editing module details:
edit - Finding a specific module or a group of modules:
find - Deleting a Module:
delete - Checking total modular credits:
checkmc - Checking required modules:
required - Checking General Education Modules:
gem - Checking Science modules:
science - Searching for a module:
search - Clearing all modules in GradPad:
clear - Showing the help display:
help - Exiting GradPad:
exit
- Adding a module:
- FAQ
- Command summary
GradPad
We are a team of Computer Science Undergraduates working together to solve module management and graduation planning problems faced by fellow Computer Science students. Below is the detailed User Guide for effective use of GradPad which can ease and improve your module planning process.
GradPad is a one-stop solution to module management for Computer Science Undergraduates. Planning for modules has always been a tedious process but it does not have to be.
The current approach to planning and tracking graduation requirements is to open up tabs after tabs of NUS resources such as NUSMods and School of Computing websites, which can be messy at times. So, our team has come up with the idea of an easy-to-use, all-in-one application that can ease the process of module management for Computer Science Undergraduates.
GradPad consolidates the modules you have taken and displays the remaining required modules to ease your module planning process. A module searching platform is also included in GradPad, providing easy access to module information.
This user guide introduces what you can do with GradPad and the steps needed to do them. In addition, it includes a quick start guide that walks you through the installation and set-up process. With this guide, you’ll be ready to use GradPad in no time.
NUSMods integration

To streamline your module searching process with added convenience, GradPad integrates data from NUSMods. With this, you no longer have to visit NUSMods separately to look up module information. Instead, GradPad offers you all that data in the same app you use to plan your modules.
We have requested and was granted permission from NUSMods to utilise their platform to retrieve module data. These data are retrieved in realtime, directly from NUSMods.
Quick start
Follow the steps below to learn how to get started with GradPad!
-
Ensure you have Java
11or above installed in your Computer. -
Download the latest
gradPad.jarfrom here. -
Copy the file to the folder you want to use as the home folder for your GradPad.
-
Ensure you have internet connectivity to fully utilise GradPad with the latest data from NUSMods.
-
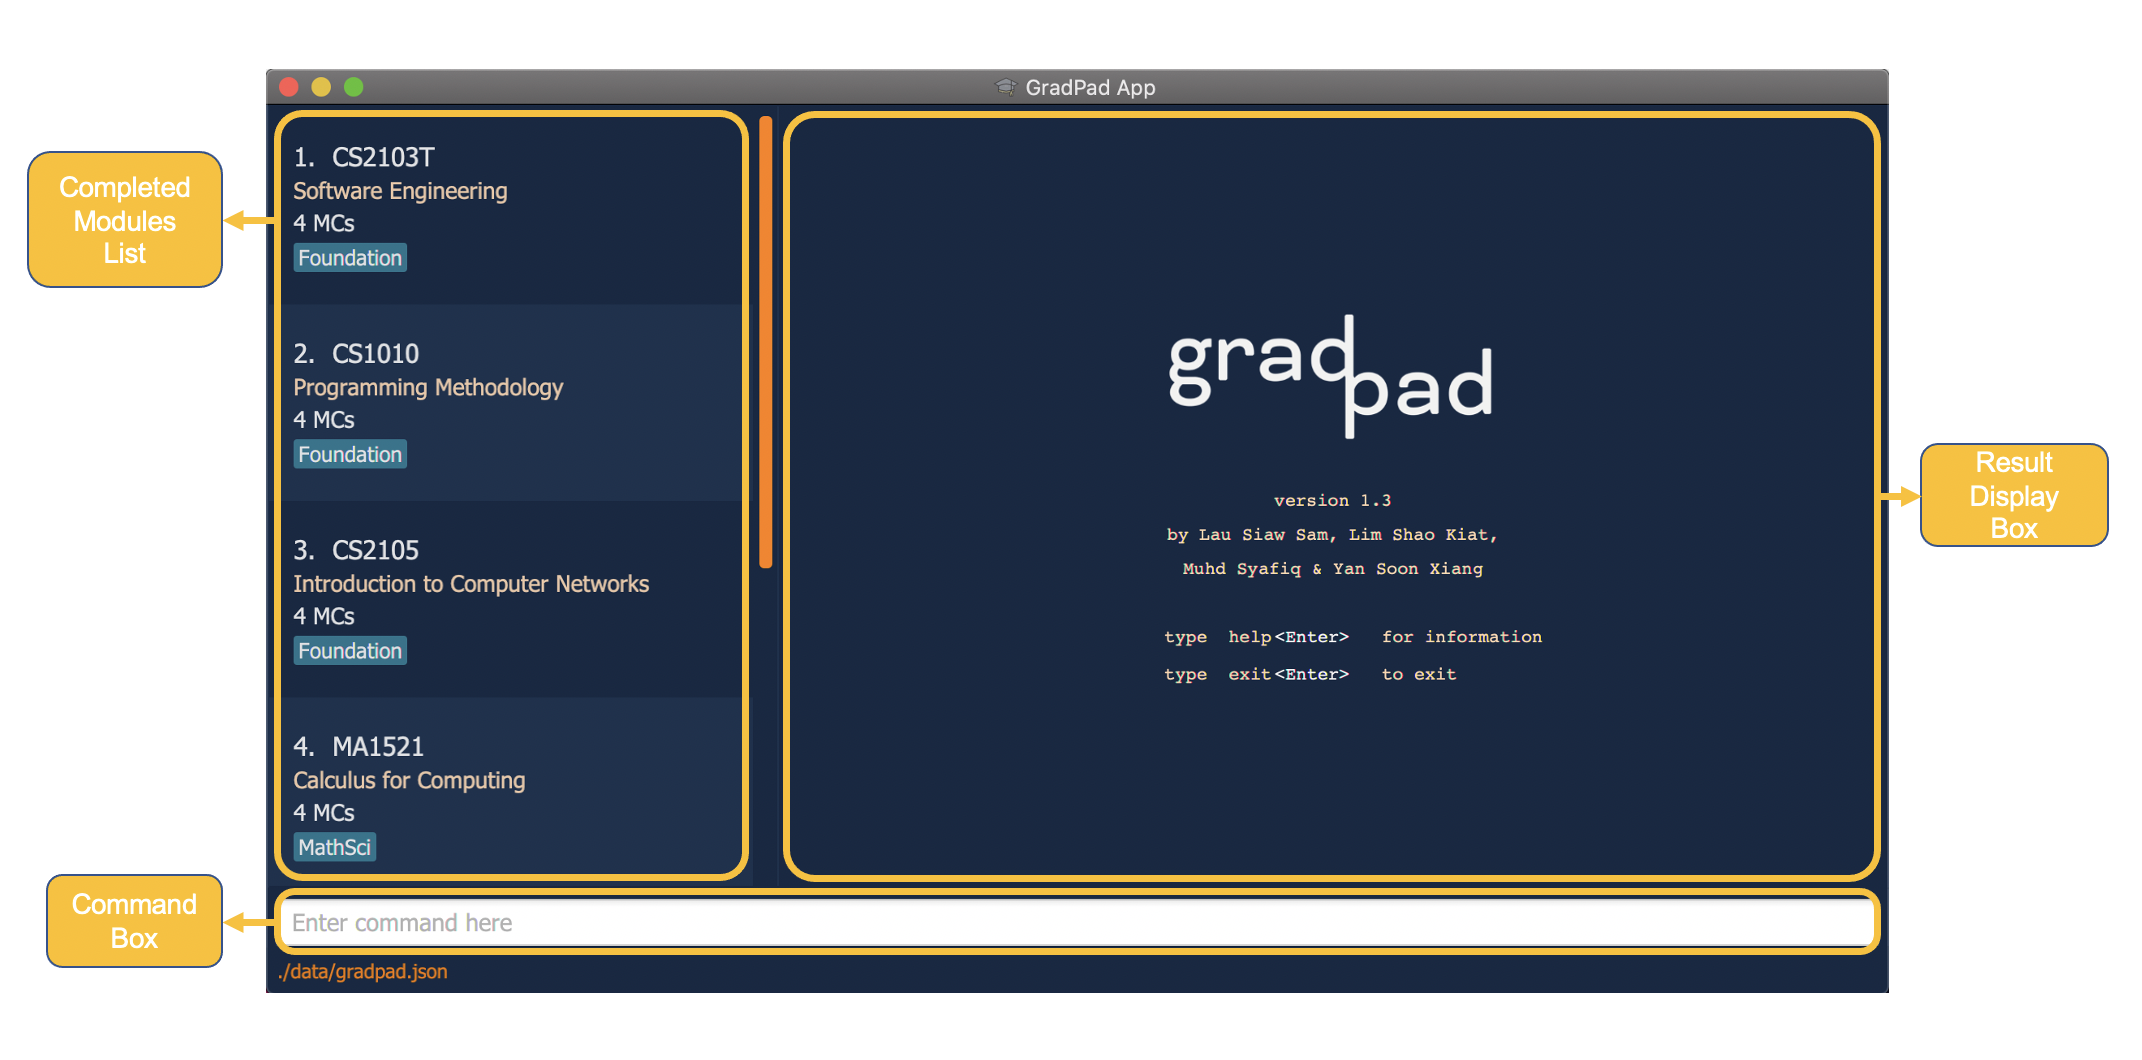
Double-click the file to start the app. The Main Page similar to the image below should appear in a few seconds. Note how the app contains some sample data.
-
Type a command in the Command Box and press Enter to execute it. e.g. typing
helpand pressing Enter will display the help page.
Some other example commands you can try:-
required: Shows a list of required modules in the CS curriculum. -
searchCS2103T: Searches for module namedCS2103Tfrom the NUSMods database (if connected to the internet) or from a local saved file. -
addCS2103T: Adds a module namedCS2103Tto the GradPad. -
deleteCS2103T: Deletes the module namedCS2103Tin the current list. -
exit: Exits the app.
-
![]() Note:
Note:
- You can still use GradPad without an internet connection. However, you will only be able to access modules within the NUS Computer Science curriculum while you’re offline.
- Detailed explanation of each command can be found here.
- Refer to the Feature Summary List below for a summary of all features.
Feature Summary List
A consolidated view of GradPad’s features is listed in the table below for easy reference.
![]() Note:
Note:
- Italicised words (e.g. Completed Modules List) refer to actual sections on the GradPad user interface.
| Features | Description |
|---|---|
| Add a Module | Allows you to add any module of choice to the Completed Modules List for tracking purposes |
| View Added Modules | Allows you to check all the modules you’ve added to Completed Modules List |
| Find Modules in Completed Modules | Allows you to look for modules in Completed Modules List using keywords |
| Delete a Module | Allows you to delete unwanted modules from Completed Modules List |
| Edit a Module | Allows you to edit the details of a module you’ve already added to Completed Modules List |
| Check Modular Credits | Allows you to check your current modular credit tally |
| View all Required Modules | Allows you to display all required modules in the Computer Science curriculum onto the Result Display Box |
| View all General Education Modules | Allows you to display all available General Education Modules offered in NUS onto the Result Display Box |
| View all Science Modules | Allows you to display all available Science modules in the Computer Science curriculum onto the Result Display Box |
| Search for a Module | Allows you to search for any module available in NUS and display the module details onto the Result Display Box |
| Find Tags from Completed Modules | Allows you to check all tags that are used in Completed Modules List |
| Clear all Modules | Allows you to delete all the modules from Completed Modules List |
| View Help | Allows you to view a list of all possible commands |
| Exit the Program | Allows you to exit GradPad |
Refer to Commands below for details on all commands.
Commands
This section contains detailed explanations of all commands and their respective usages.
Each command explanation starts with a usage scenario, followed by an explanation of what the command does, and ends off by showing you how to use it.
![]() Notes about the Command Format and Feature Descriptions:
Notes about the Command Format and Feature Descriptions:
-
When a command requires parameters, they can be entered in any order.
For example, if the command specifiesedit MODULE_CODE c/NEW_MODULE_CODE t/core,edit MODULE_CODE t/core c/NEW_MODULE_CODEis also acceptable. -
When a command does not require parameters, e.g.
help, adding extraneous words, e.ghelp mewill not affect the command, allowing the command to run as per normal. -
Highlighted words (e.g.
this) refer to actual commands. -
Italicised words (e.g. Completed Modules List) refer to actual sections on the GradPad user interface.
Adding a module: add
Scenario:
You have just completed the CS2101 module, and you want to add the module into GradPad to track your academic progress.
You found the module to be enjoyable so you would like to add tags to remind yourself of how fun the module was.
The add command allows you to add a module you have completed into the Completed Modules List.
You can add a module by specifying a valid module code. You can also include multiple tags using the prefix t/ but they are optional.
Conveniently, you don’t have to specify the module title or modular credits of the module you are adding - GradPad
automatically retrieves them for you using data from NUSMods.
![]() Note:
Note:
- You cannot add a module that has been previously added as GradPad does not allow duplicate modules.
- You can use multiple words in a tag. However, there should only be a single space between any 2 words.
- Tags within a single module are case-insensitive, i.e. “core”, “CORE”, and “CoRe” are all considered the same.
In such a case, only the first tag amongst a group of duplicates will be added. For e.g.
add cs2103t t/core t/CORE t/CoReresults in only “core” being added.
To add the module:
-
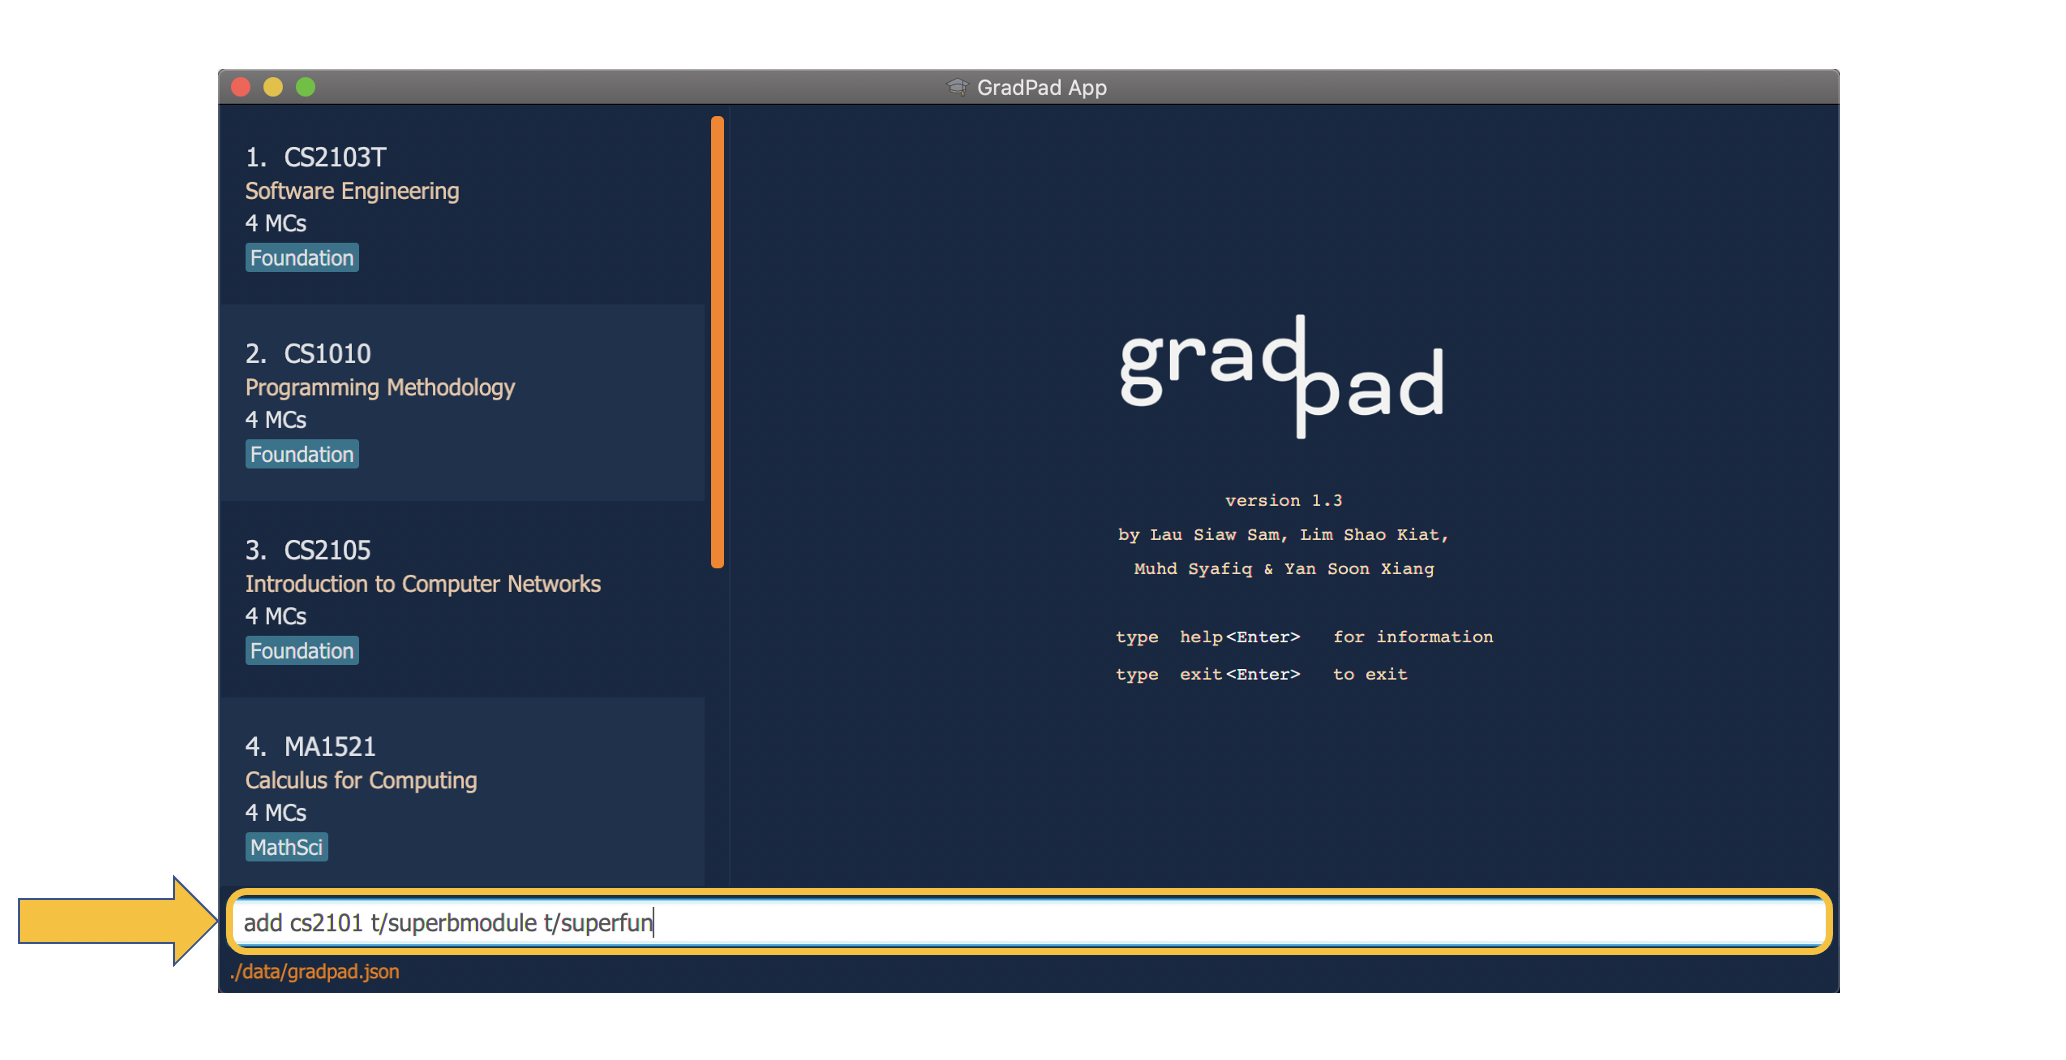
Type
add cs2101 t/superbmodule t/superfuninto the Command Box, and press Enter to execute it.
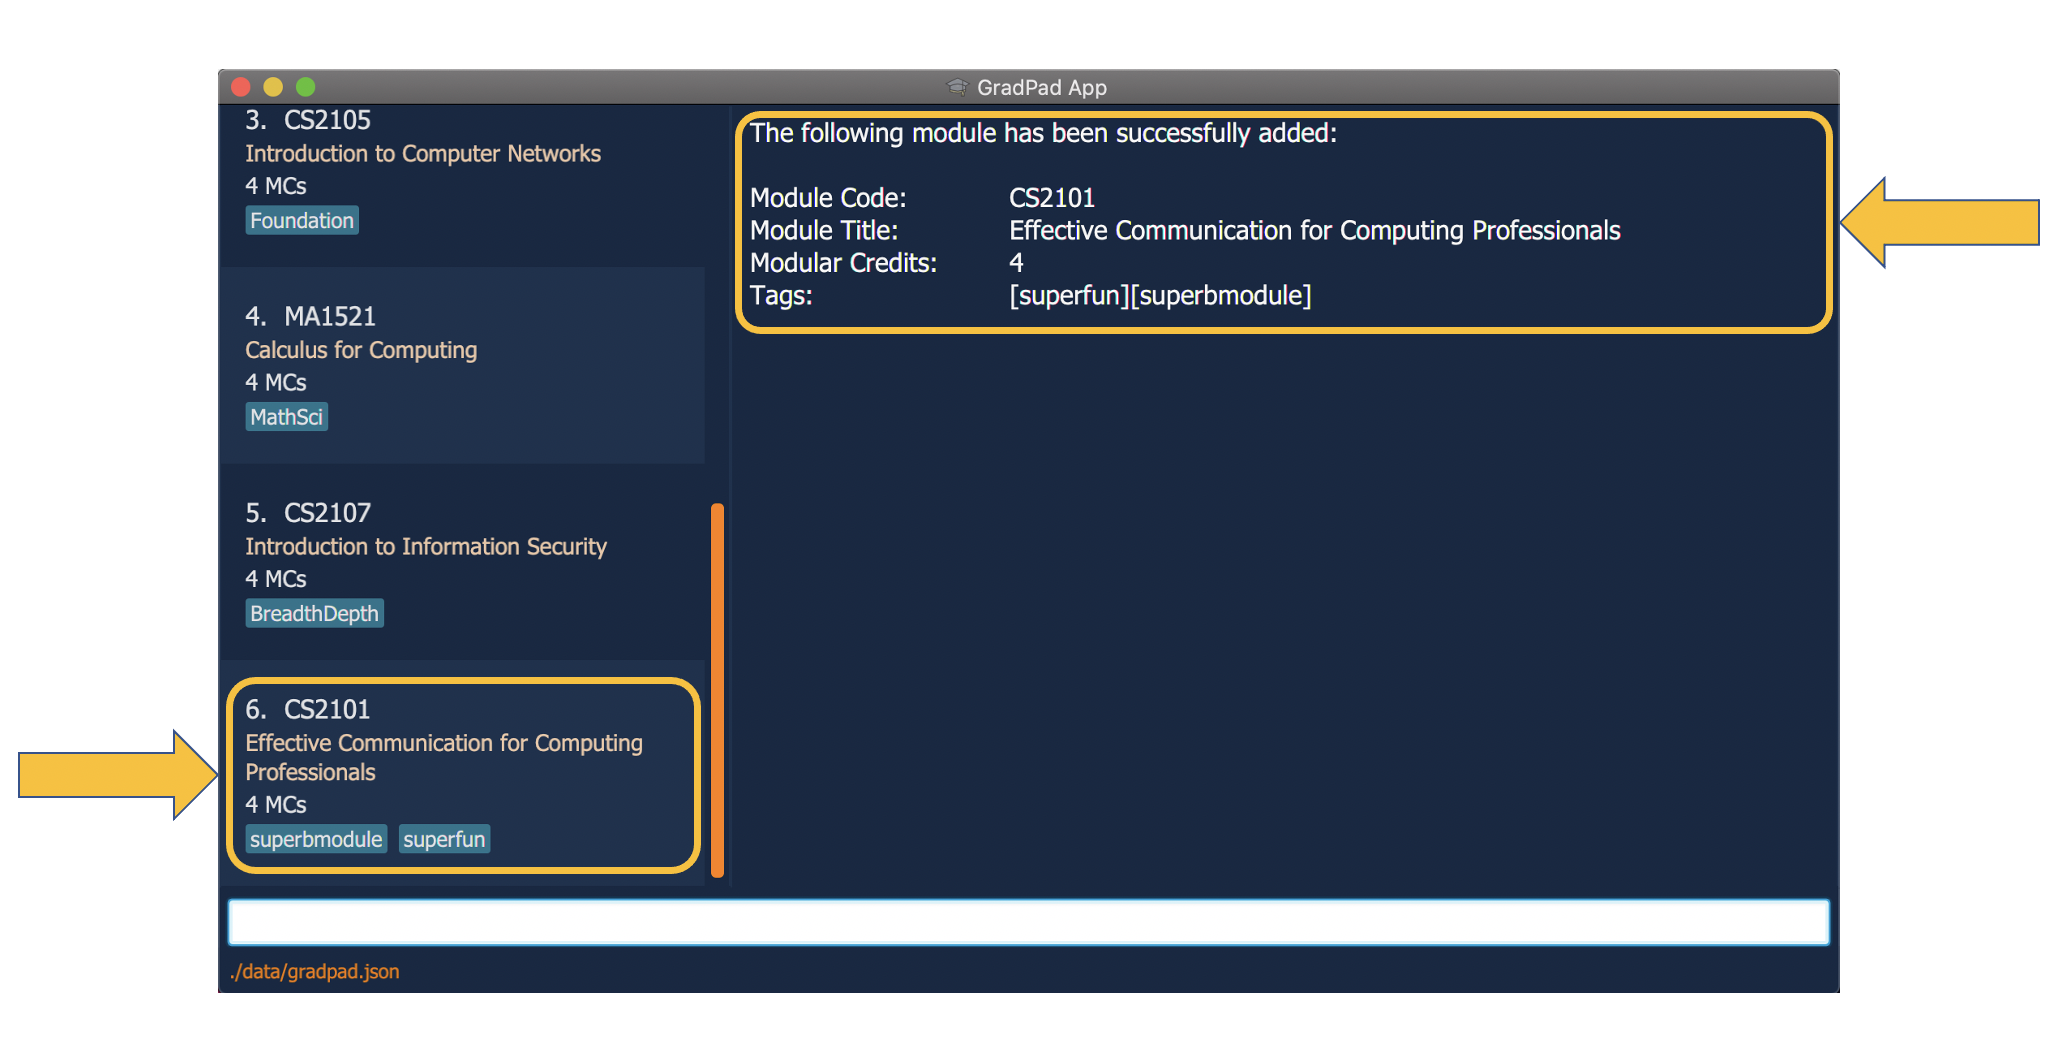
-
The Result Display Box will display the message “The following module has been successfully added”, along with the details of the module. You will then be able to see the CS2101 module at the bottom of the Completed Modules List .
Viewing all added modules: list
Scenario:
You have filtered the Completed Modules List to show modules whose module codes contain ‘cs1’, and you wish to
restore the list to view all the modules you have added.
The list command allows you to view all the modules you have added into the Completed Modules List in GradPad
using this command. This is especially useful when you have previously used a command that filters the list (i.e. find), and you wish to restore the list to its original state.
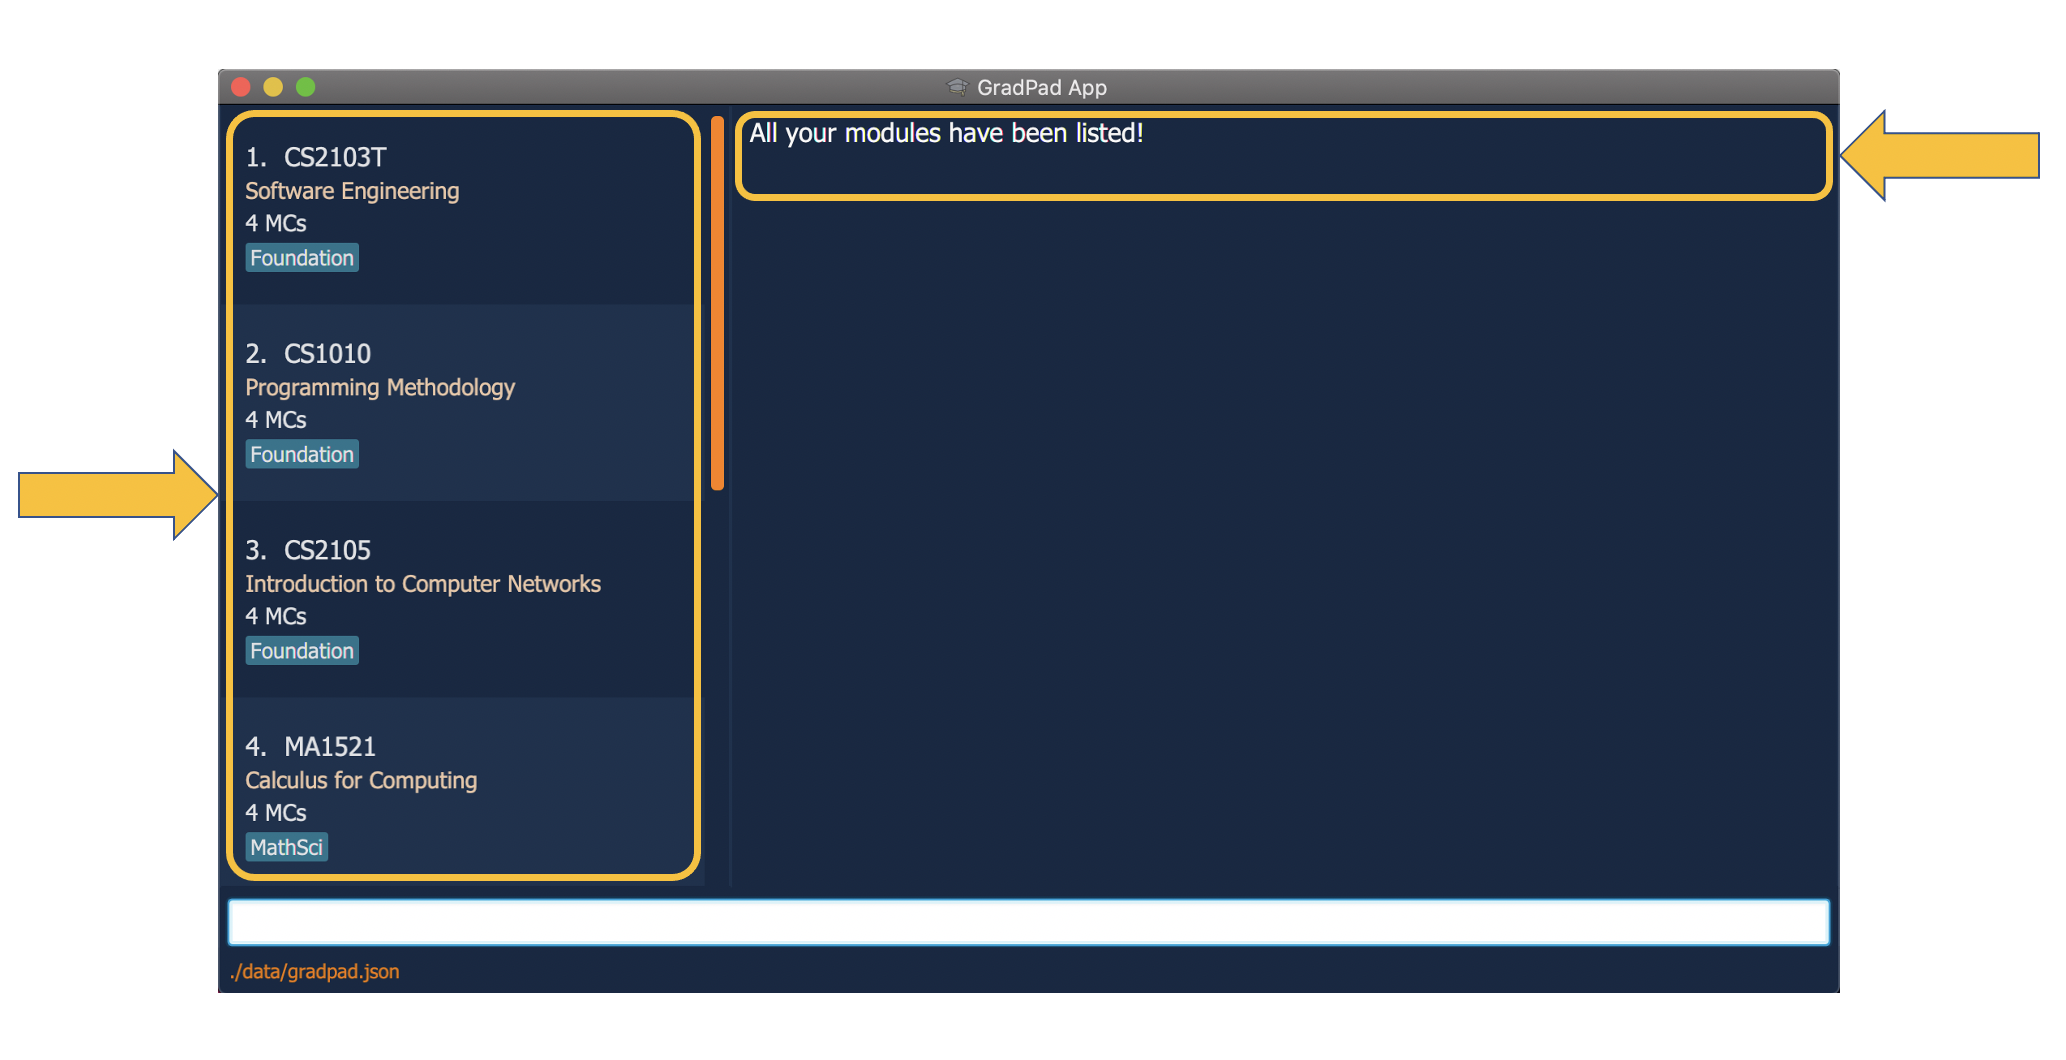
To view all modules:
-
Type
listinto the Command Box, and press Enter to execute it.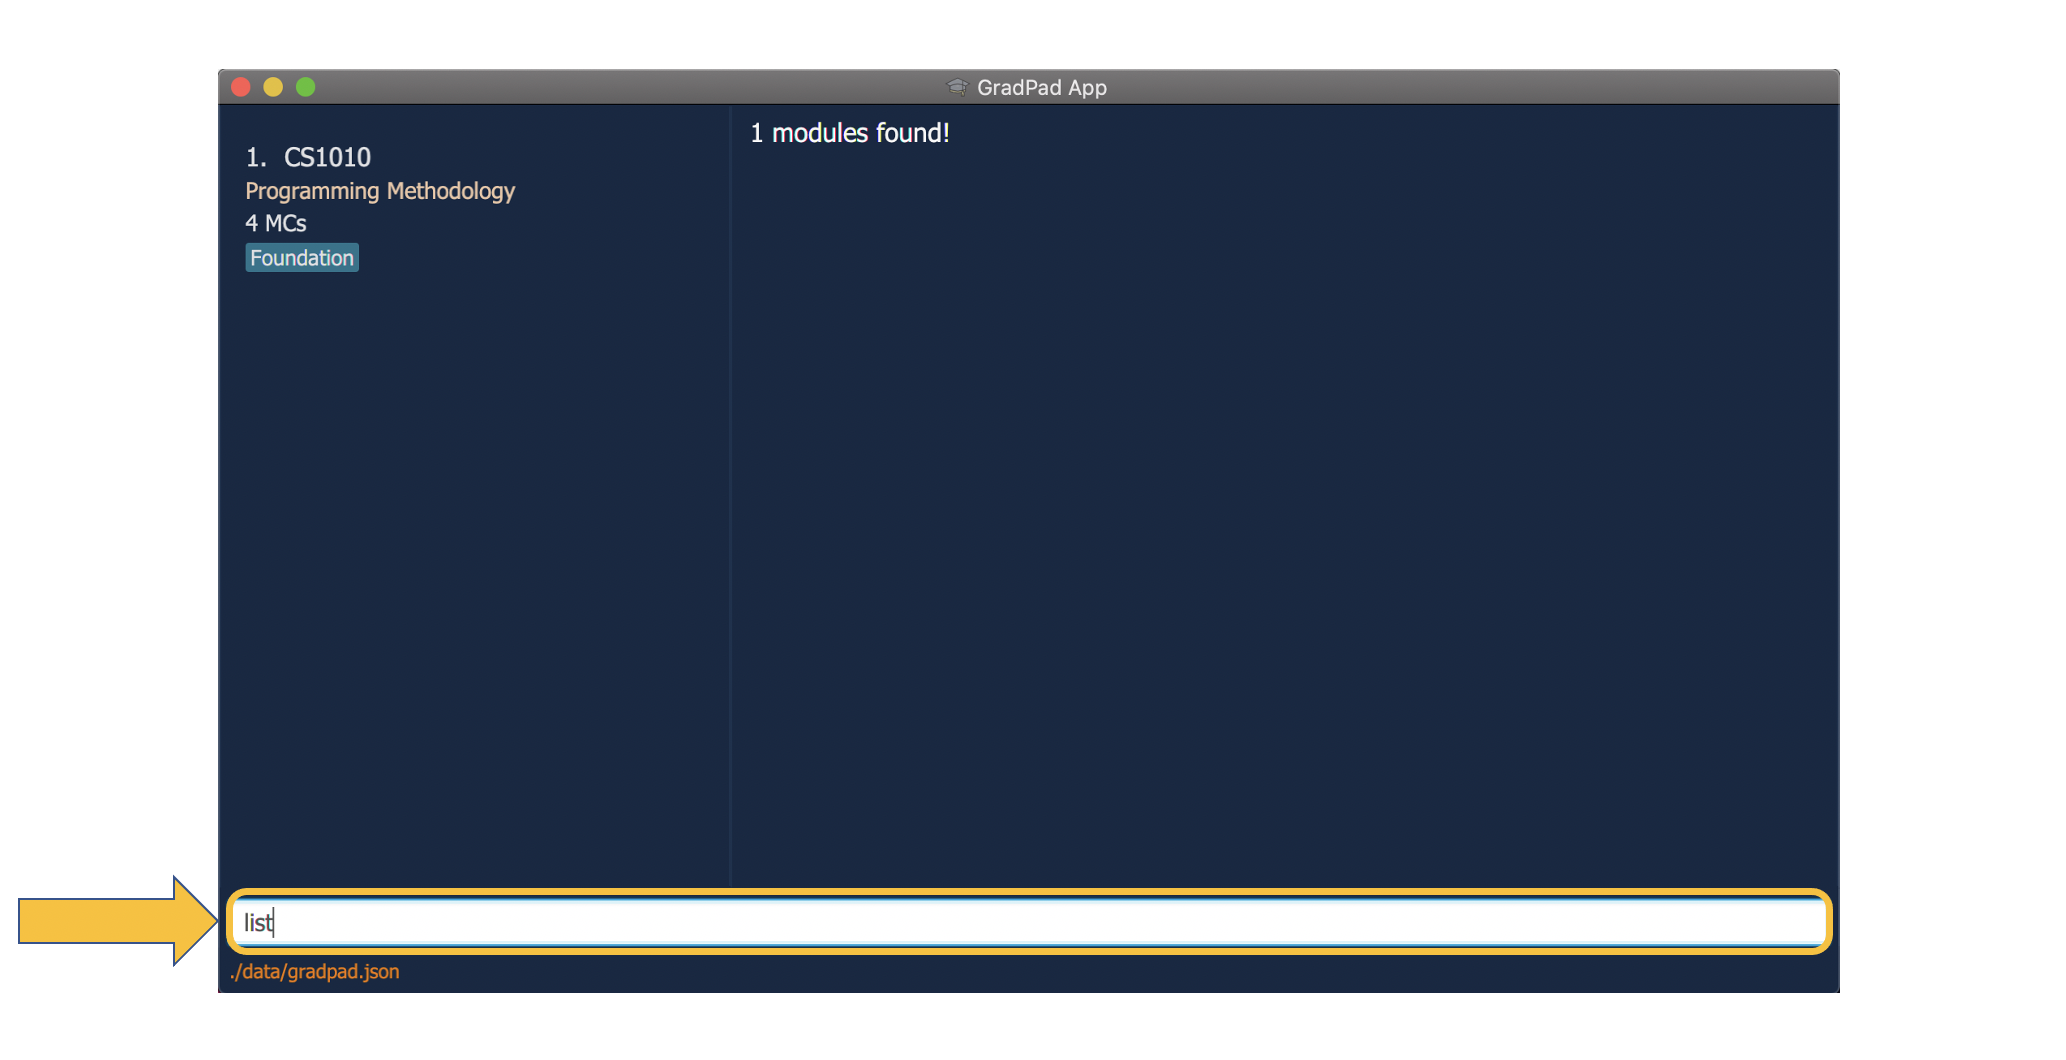
-
The Result Display Box will display the message “All your modules have been listed!”, and you will be able to view all your previously added modules in the Completed Modules List.
Viewing all added tags: tags
Scenario:
You wish to filter your Completed Modules List to display modules tagged as “foundation”. However, you’ve added
tons of tags to tons of modules and so you can’t remember if this tag actually exists.
The tags command allows you to view all the tags currently in your Completed Modules List in
GradPad. This is useful when you want to see what tags you can filter your Completed Modules List by (see the
find command below).
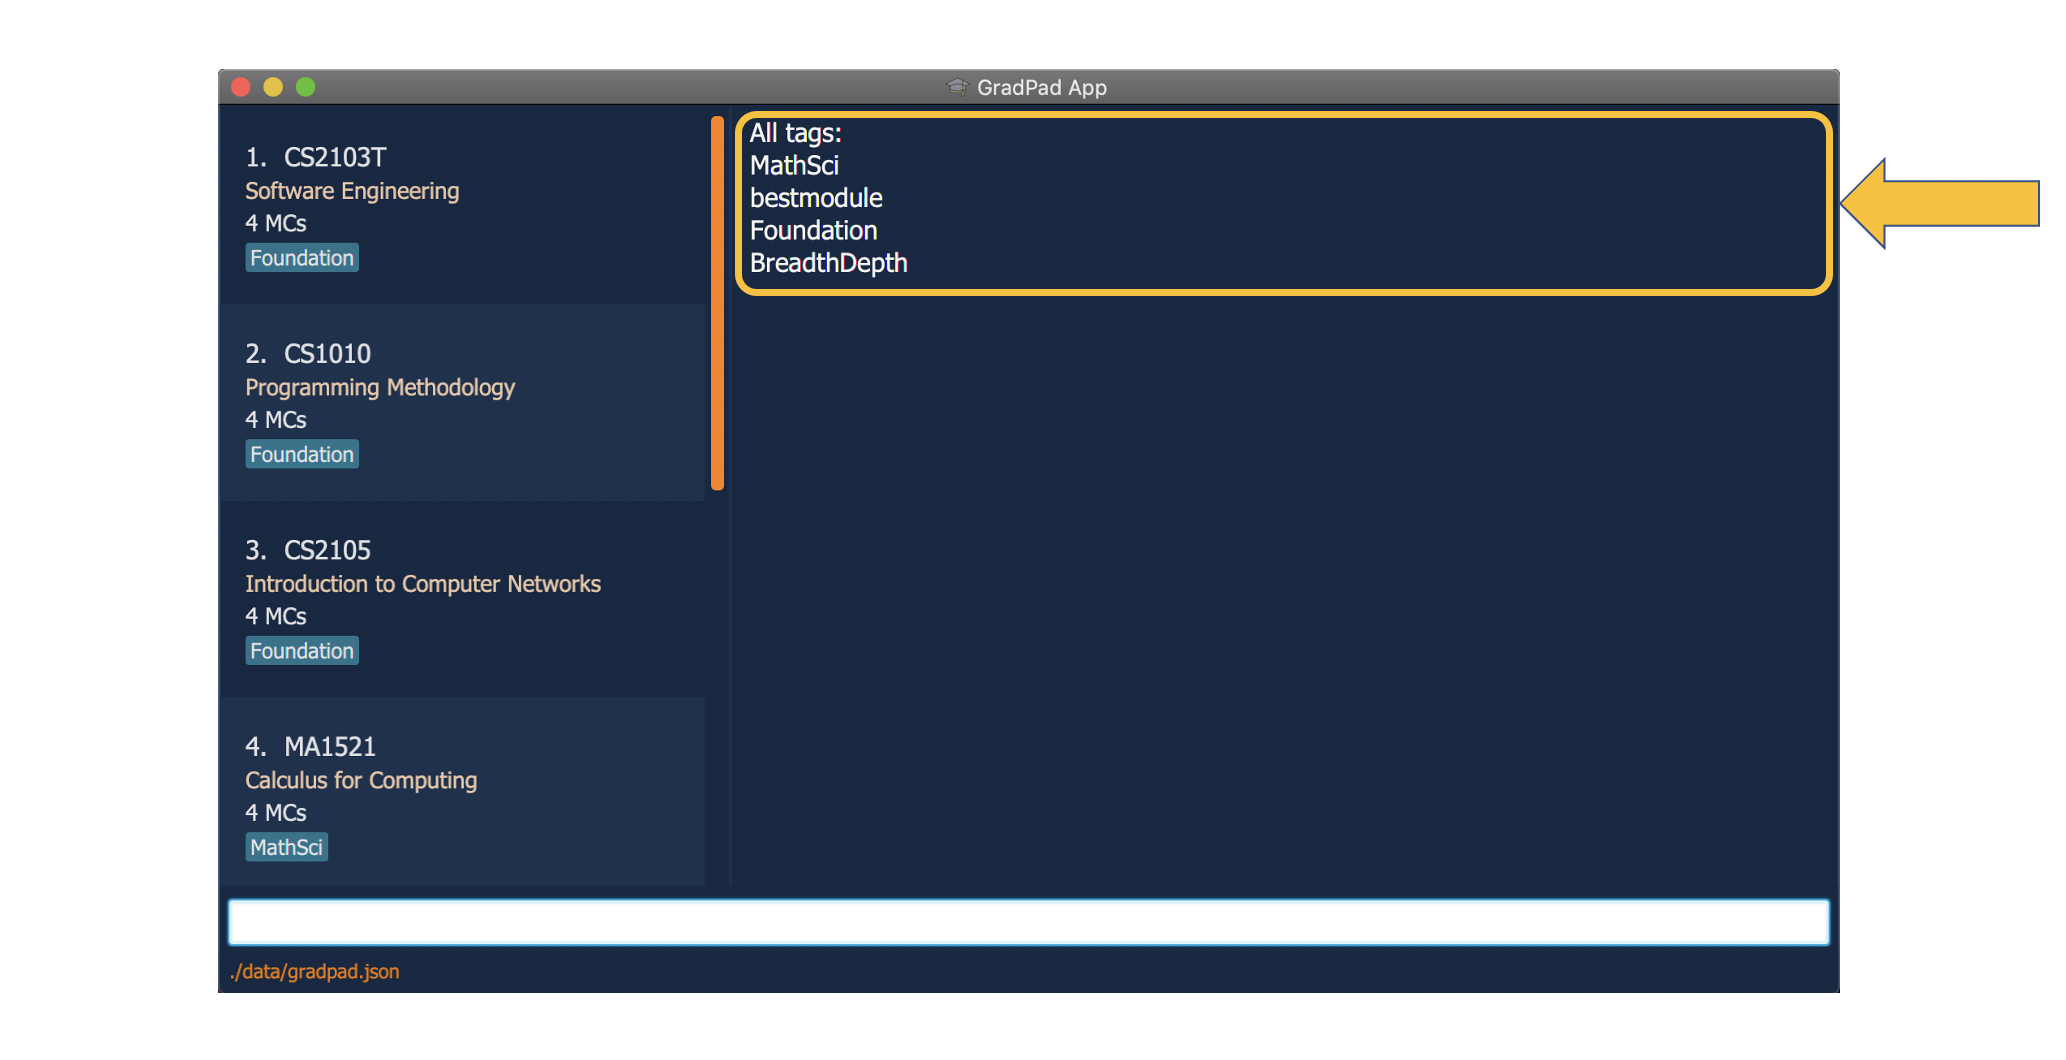
To view all tags:
-
Type
tagsinto the Command Box, and press Enter to execute it.
-
The Result Display Box will display a list of all existing tags.
Editing module details: edit
Scenario:
When you were a freshman, you added a module with tags “superbmodule” and “superfun”. But now that you’re graduating,
you actually think that the module was the best you’d taken in NUS.
The edit command allows you to edit the details of a module that you have added into GradPad.
You can edit a module by specifying the module code of the module in the Completed Modules List, followed by the
fields you wish to edit with their respective prefixes, c/ for new module code, t/ for new tag. You may edit
multiple fields in a single edit command.
The respective module title and modular credits for a module code will be automatically updated with data from NUSMods.
![]() Note:
Note:
-
When you edit tags, instead of changing the descriptions of the existing tags, editing tags replaces them with new ones.
-
Instead of deleting that module and adding it again with new tags, you can simply edit the module and replace the tags.
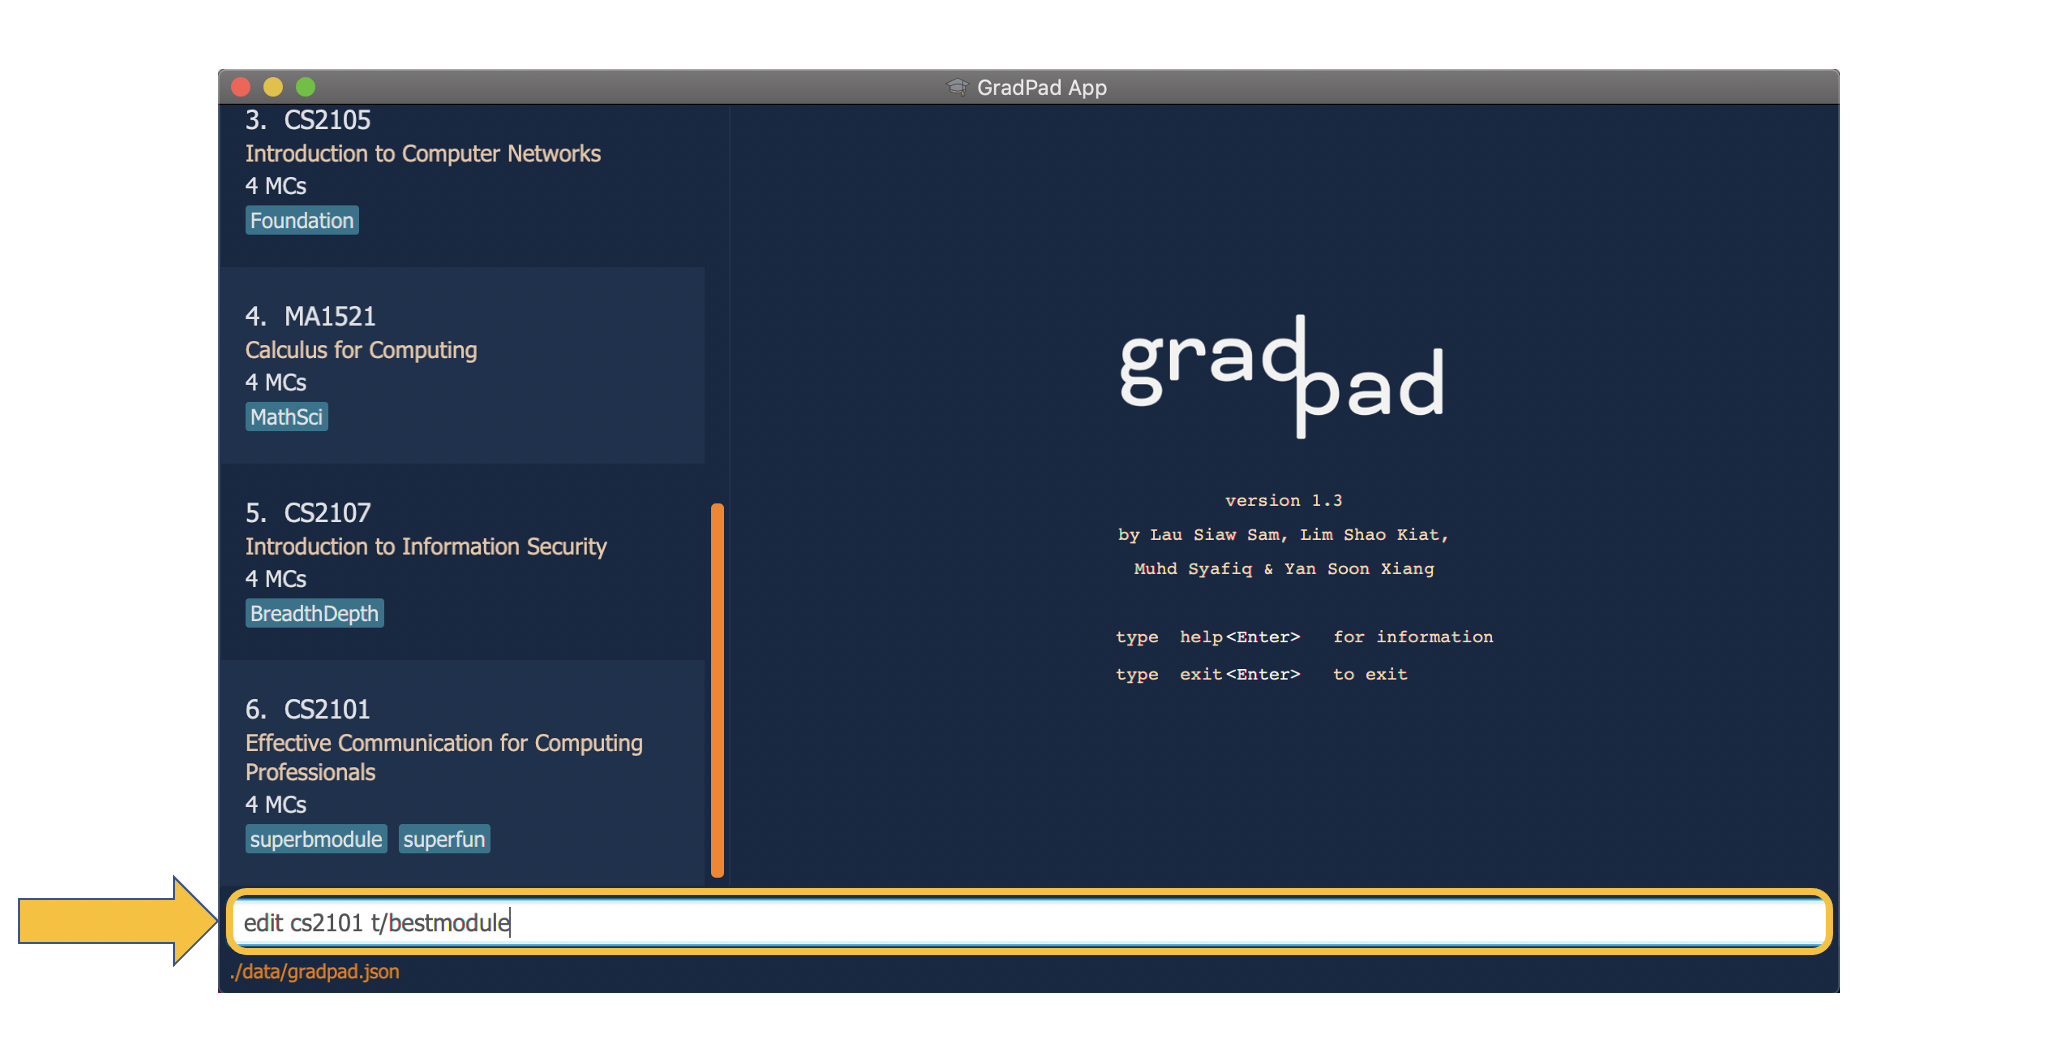
To edit the tag of an existing module:
-
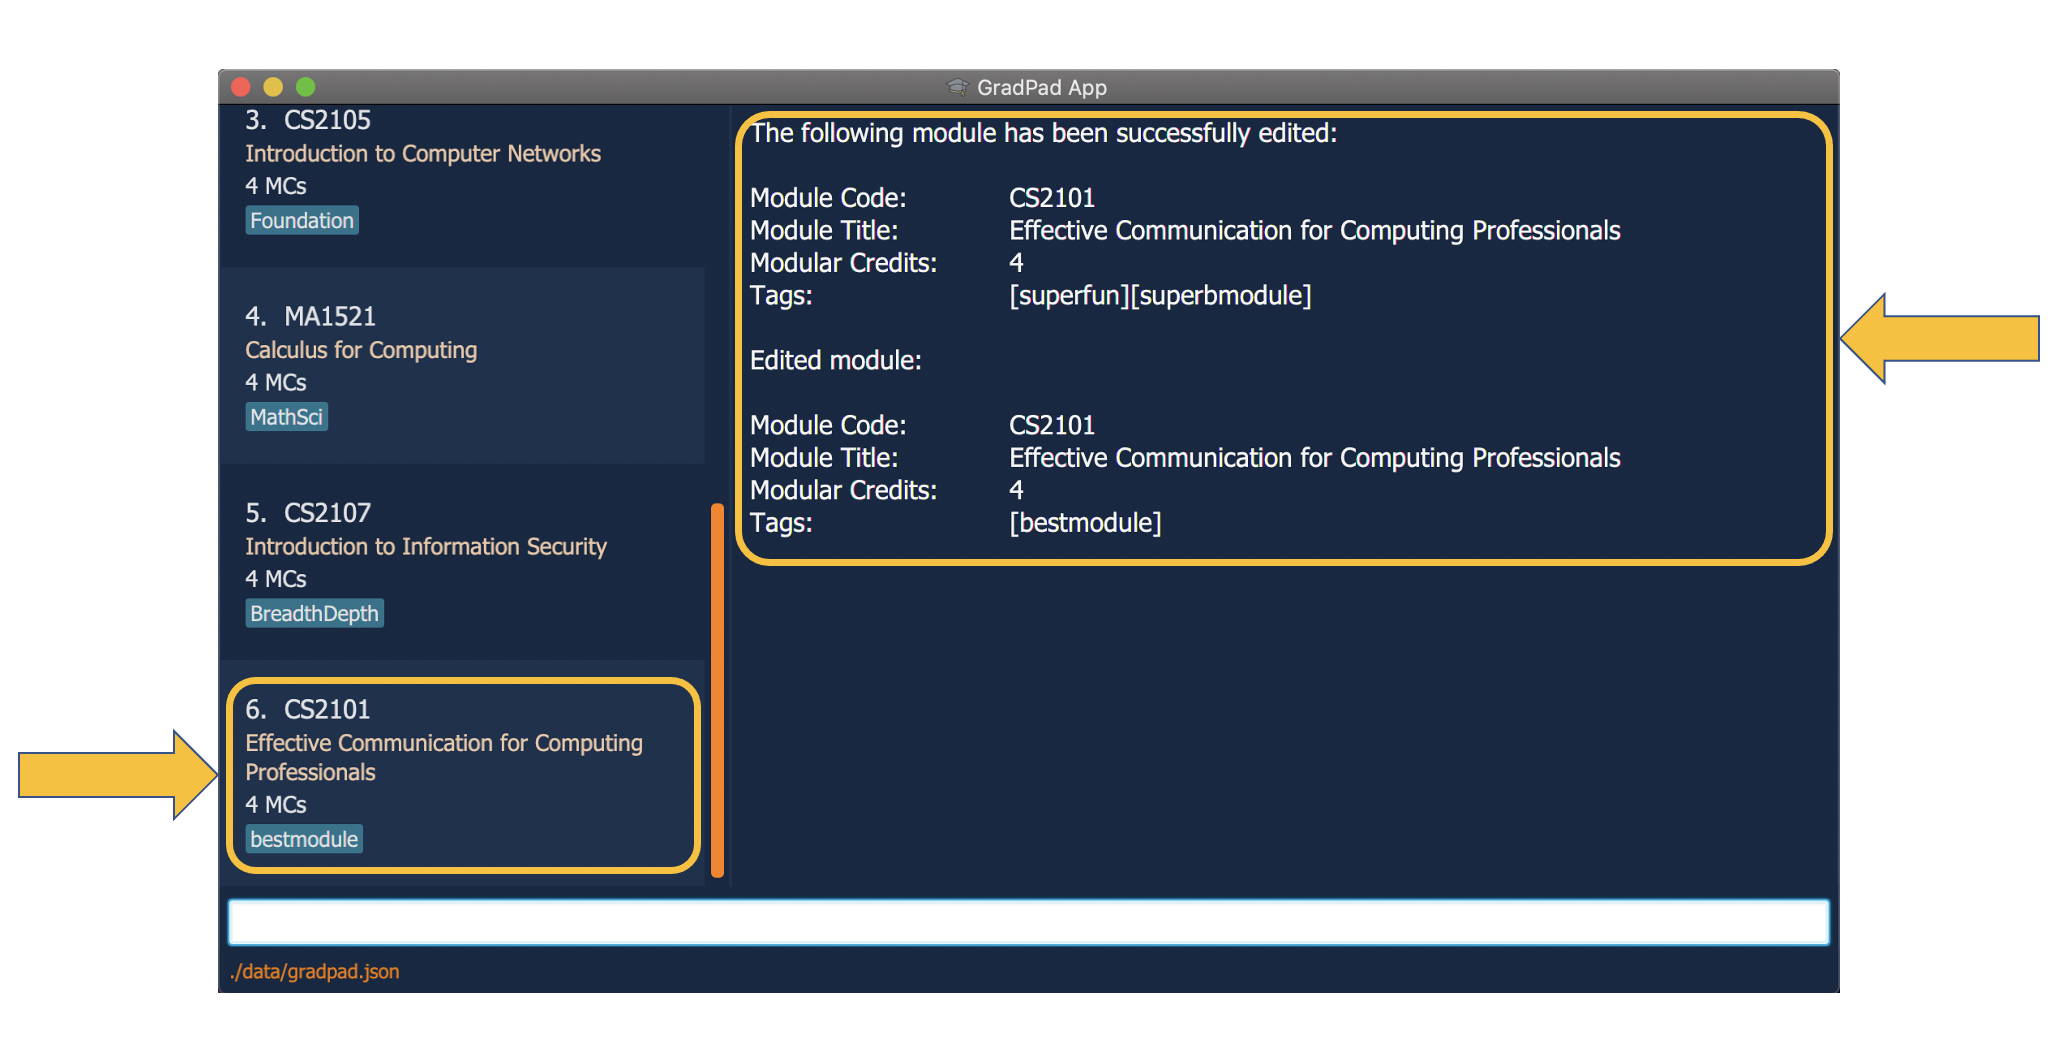
Type
edit cs2101 t/bestmoduleinto the Command Box, and press Enter to execute it.
-
The Result Display Box will display the message “The following module has been successfully edited”, along with the newly edited details of the module. You will also be able to see that the tags of the module displayed in the Completed Modules List has been replaced.
Finding a specific module or a group of modules: find
Scenario:
Let’s say you have been adding a huge number of modules into GradPad, and you have lost track of the modules you
have added. You want to check and see all MA-coded modules with the “bestmodule” tag.
The find command allows you to filter the Completed Modules List to display the modules that you want to see.
You can do this by specifying parts of the module code of the module(s) you wish to display.
Additionally, you can also specify the tags of the module(s) you wish to display. Likewise, you can also simply
specify parts of a tag instead of the entire tag.
Instead of scrolling through the long Completed Modules List and checking the modules one by one, you can easily
filter the list to display that module by find-ing said module.
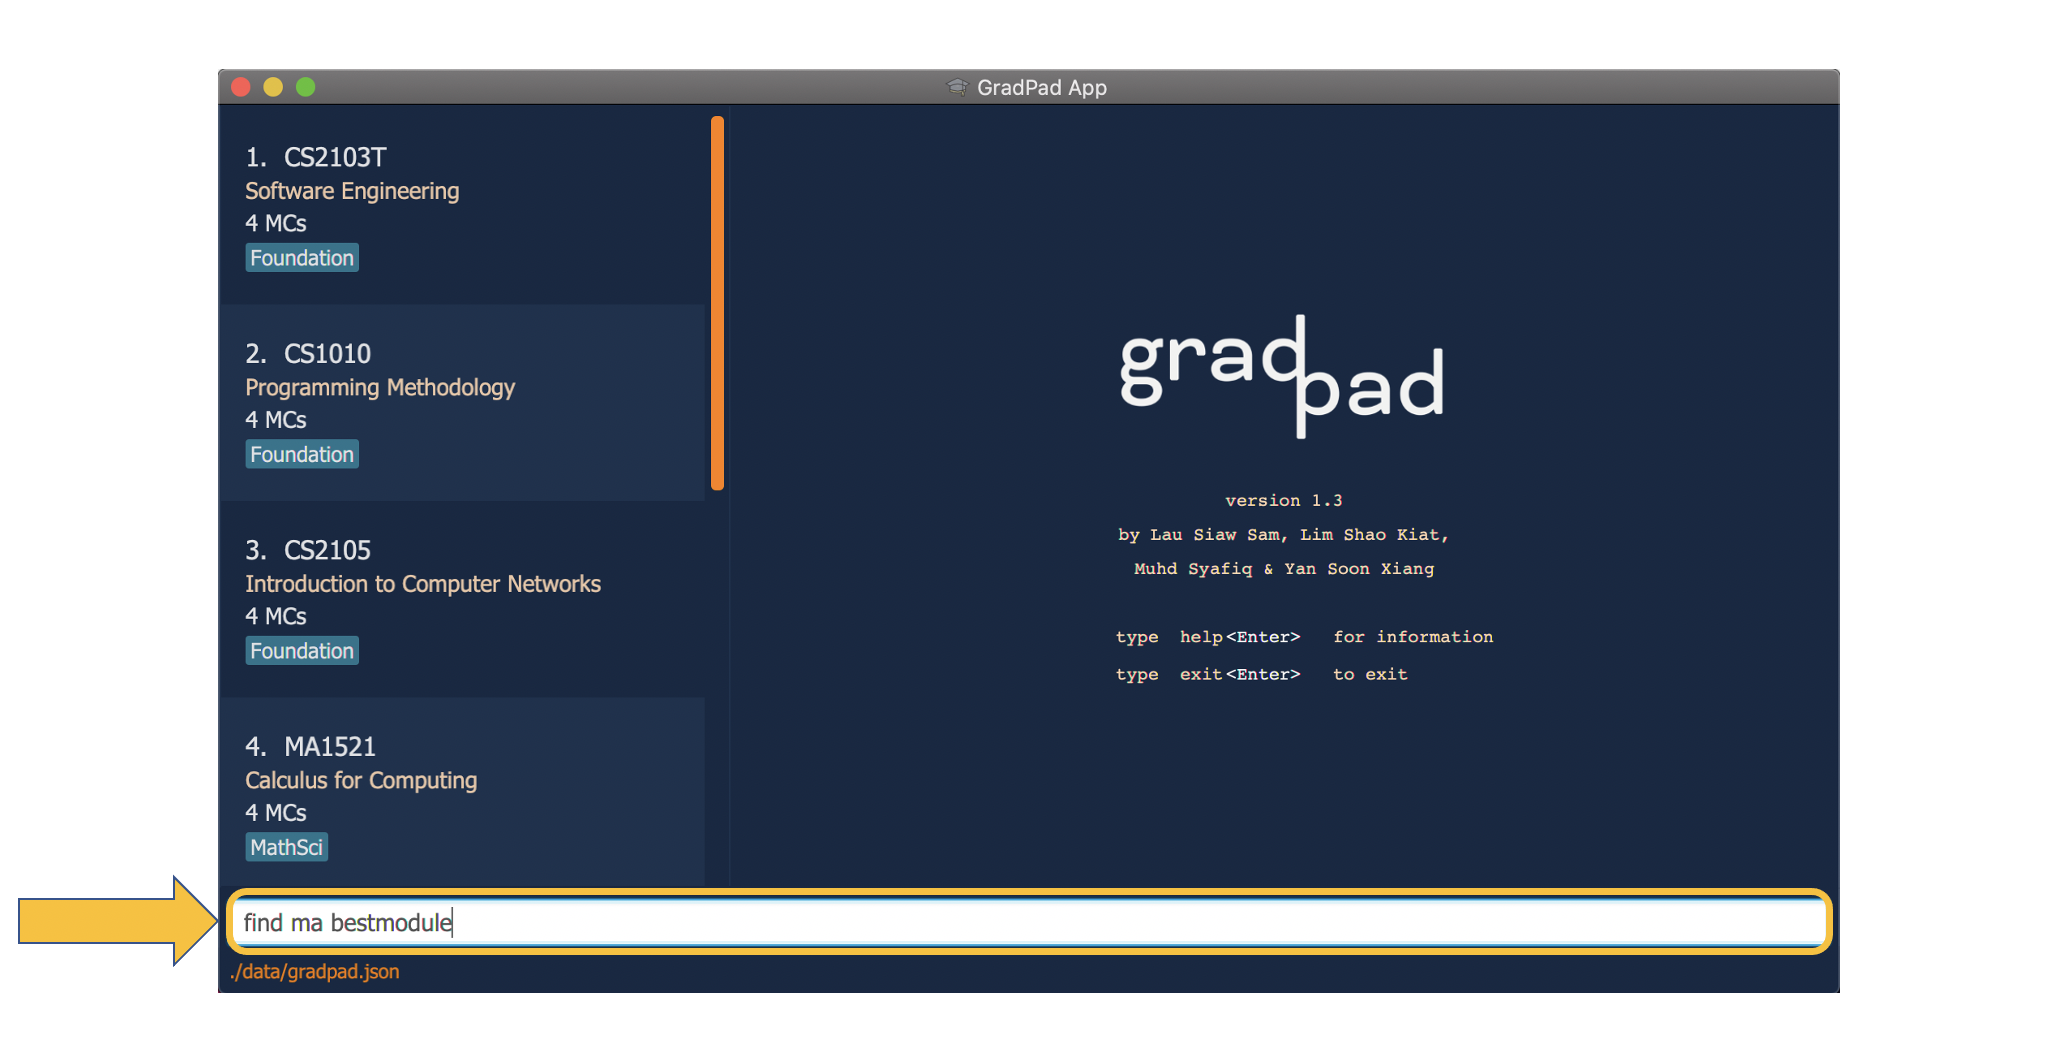
To find the module:
-
Type
find ma bestmoduleinto the Command Box, and press Enter to execute it.
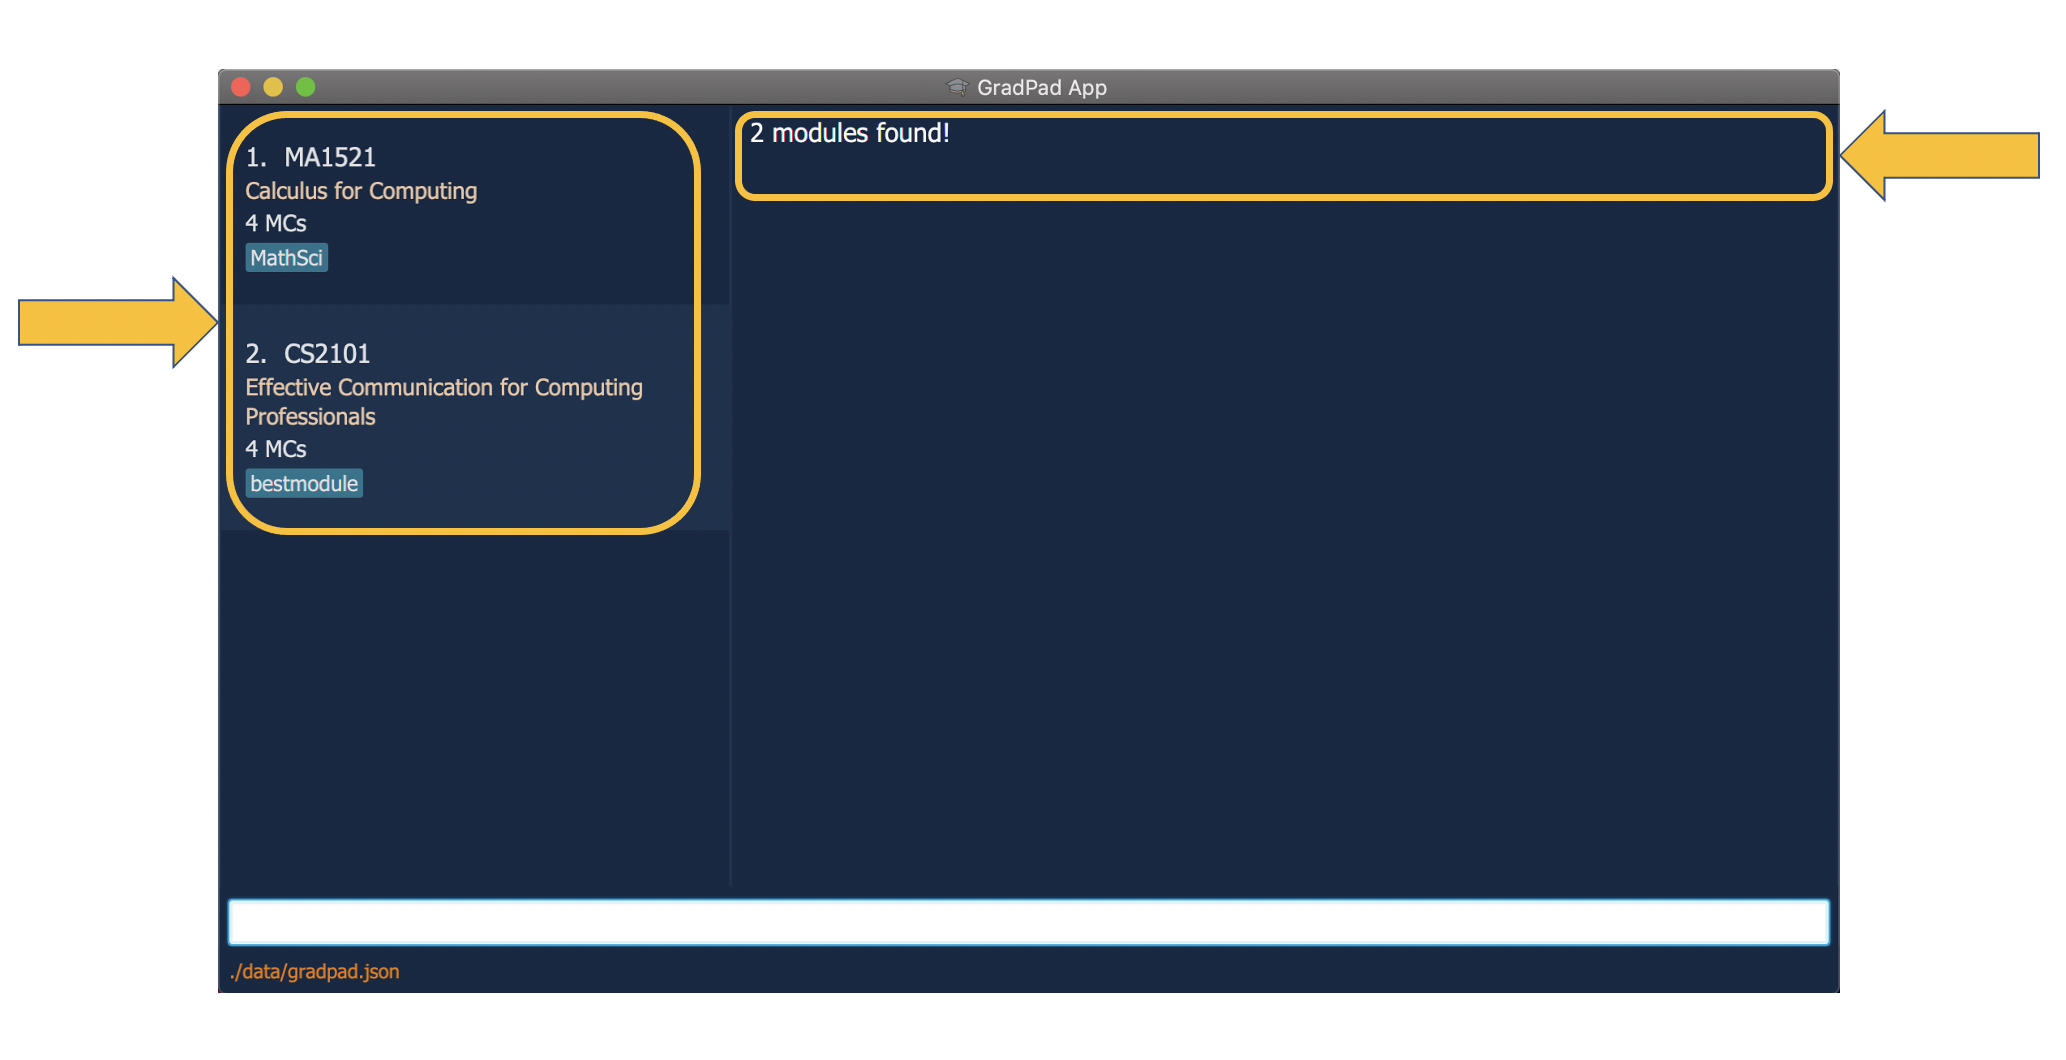
-
The Result Display Box will display the message “2 modules found!” and you will be able to see only the modules whose module codes contain “ma” and modules with “bestmodule” as a tag in the Completed Modules List.
Deleting a Module: delete
Scenario:
You have added several modules into GradPad but you realised that you accidentally added an additional module ‘CS2107’
that you have not completed yet. If you no longer want that module in your Completed Modules List,
you can simply delete it.
The delete command allows you to remove a module you have added into GradPad.
You can delete a module by specifying the module code of the module. (Case insensitive)
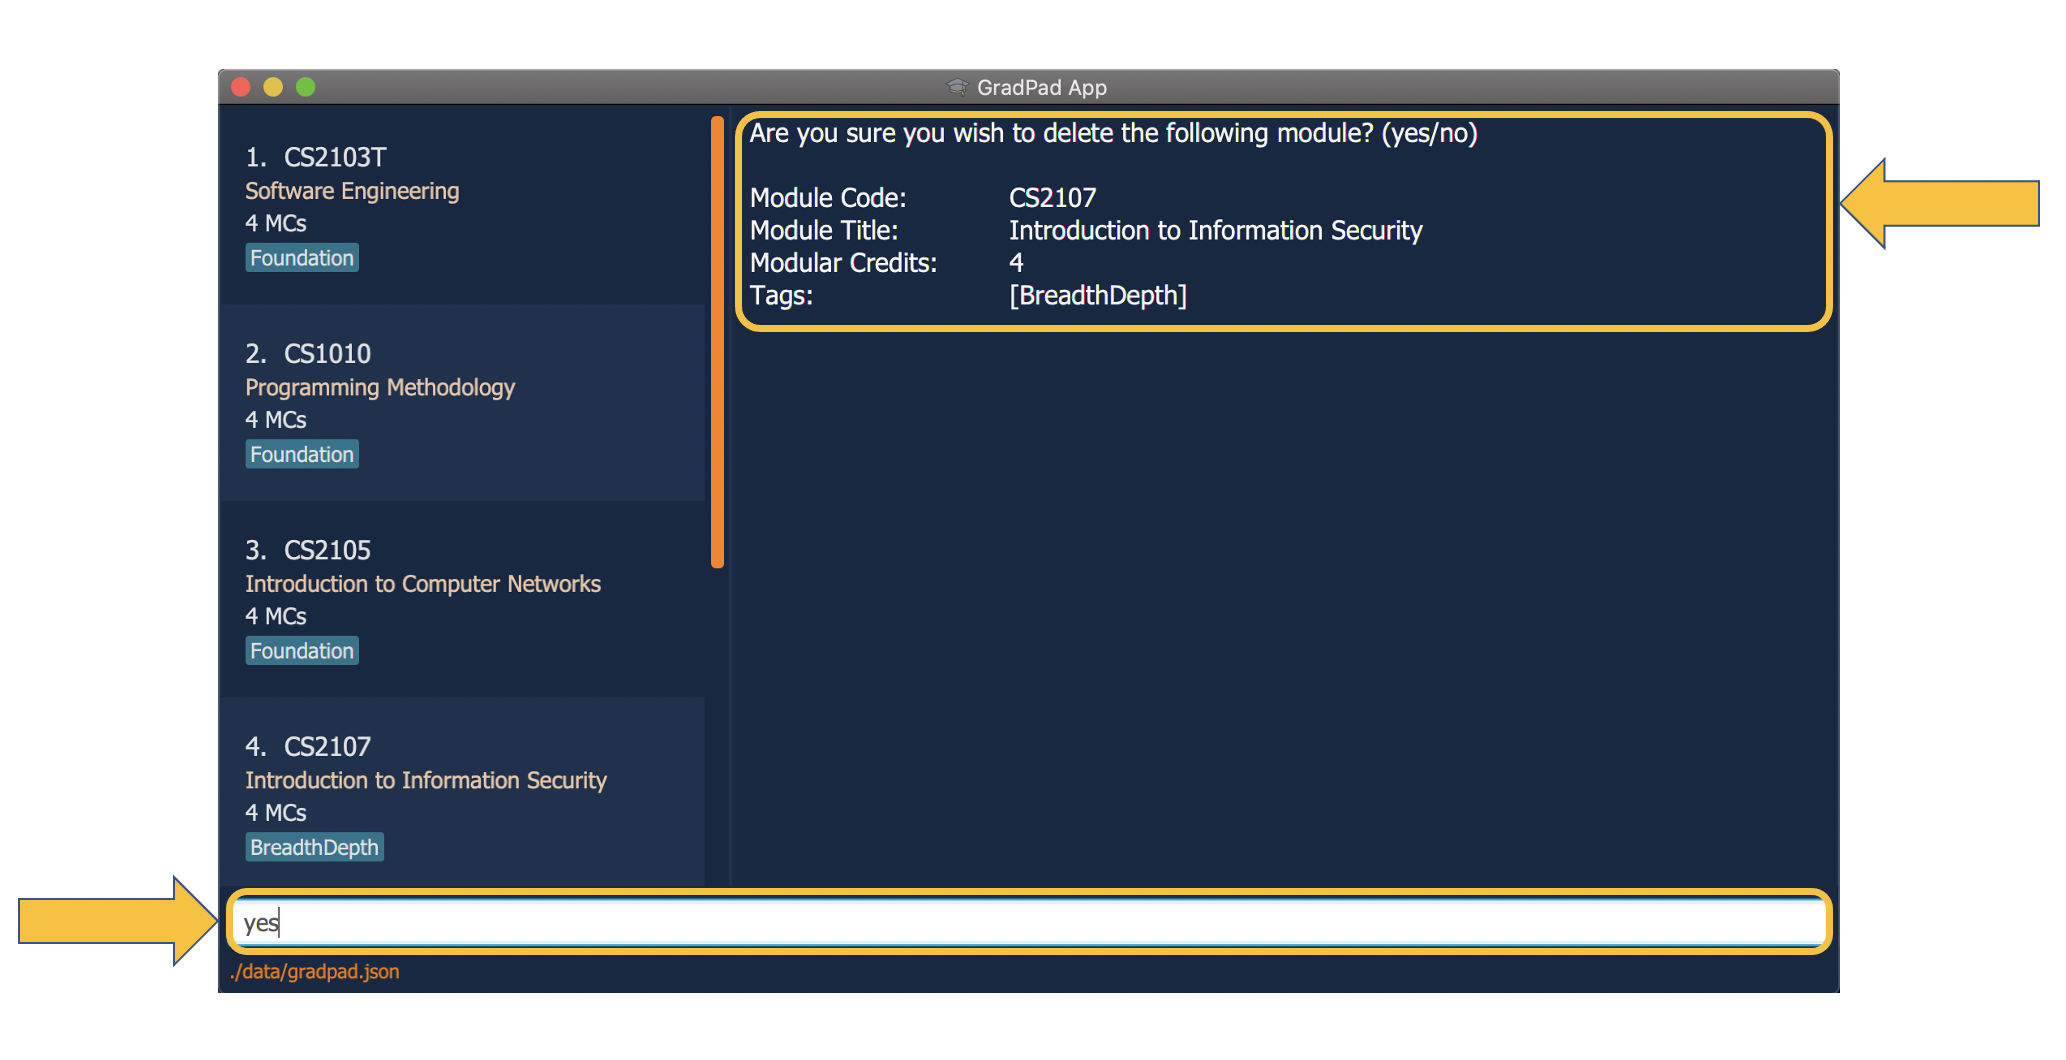
To delete the module:
-
Type
delete cs2107into the Command Box, and press Enter to execute it.

-
When you are prompted for a confirmation, type
yesinto the Command Box, and press Enter.
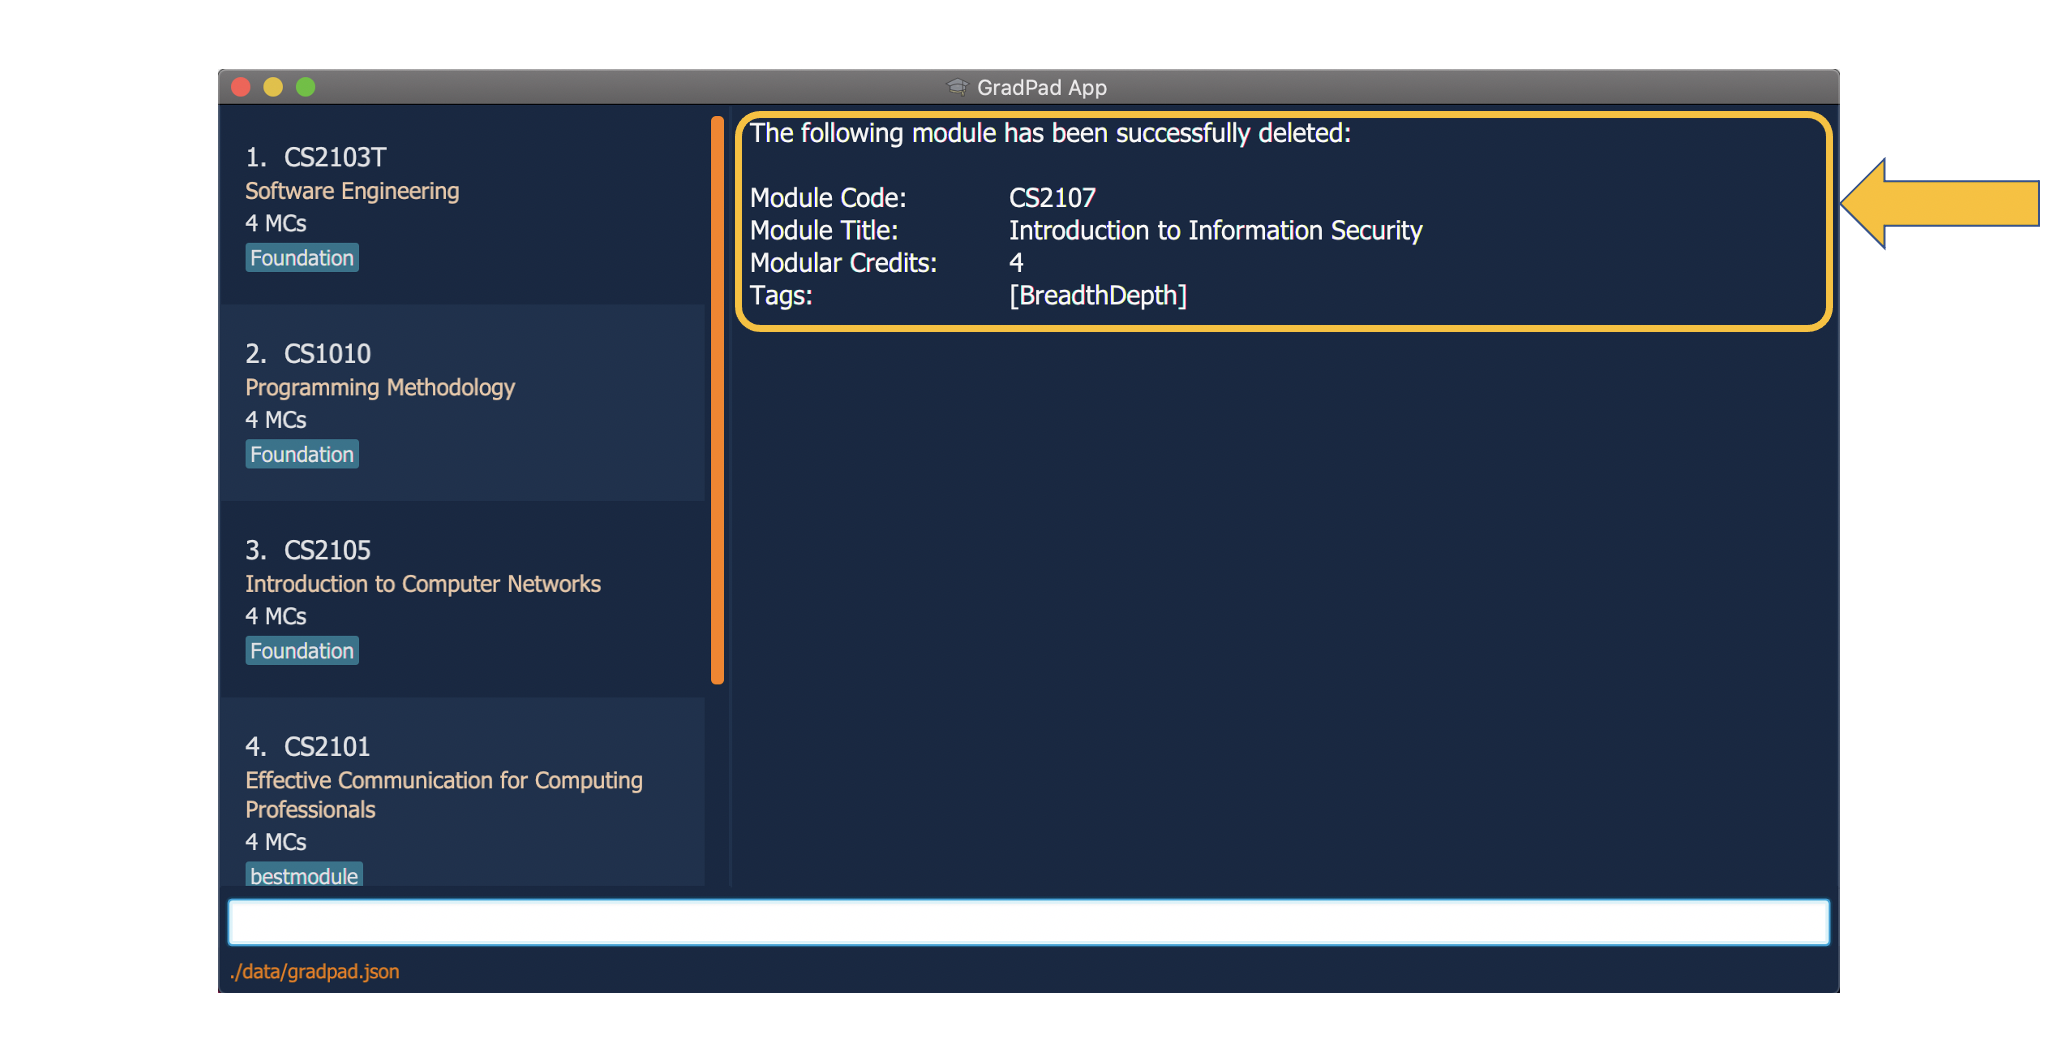
-
The Result Display Box will display the message “The following module has been successfully deleted” along with the details of the module you deleted.
![]() Tip:
Tip:
For experienced users, you can use the fdelete command instead, to bypass the confirmation step!
Checking total modular credits: checkmc
![]() Note:
Note:
A Modular Credit (MC) is a unit of the effort, stated in terms of time, expected of a typical student in managing his/her workload, with
an average of 20 MCs per semester.
Scenario:
You want to make sure you have hit the minimum criteria of 70MCs required for applying internship modules or the 160MCs graduation requirements.
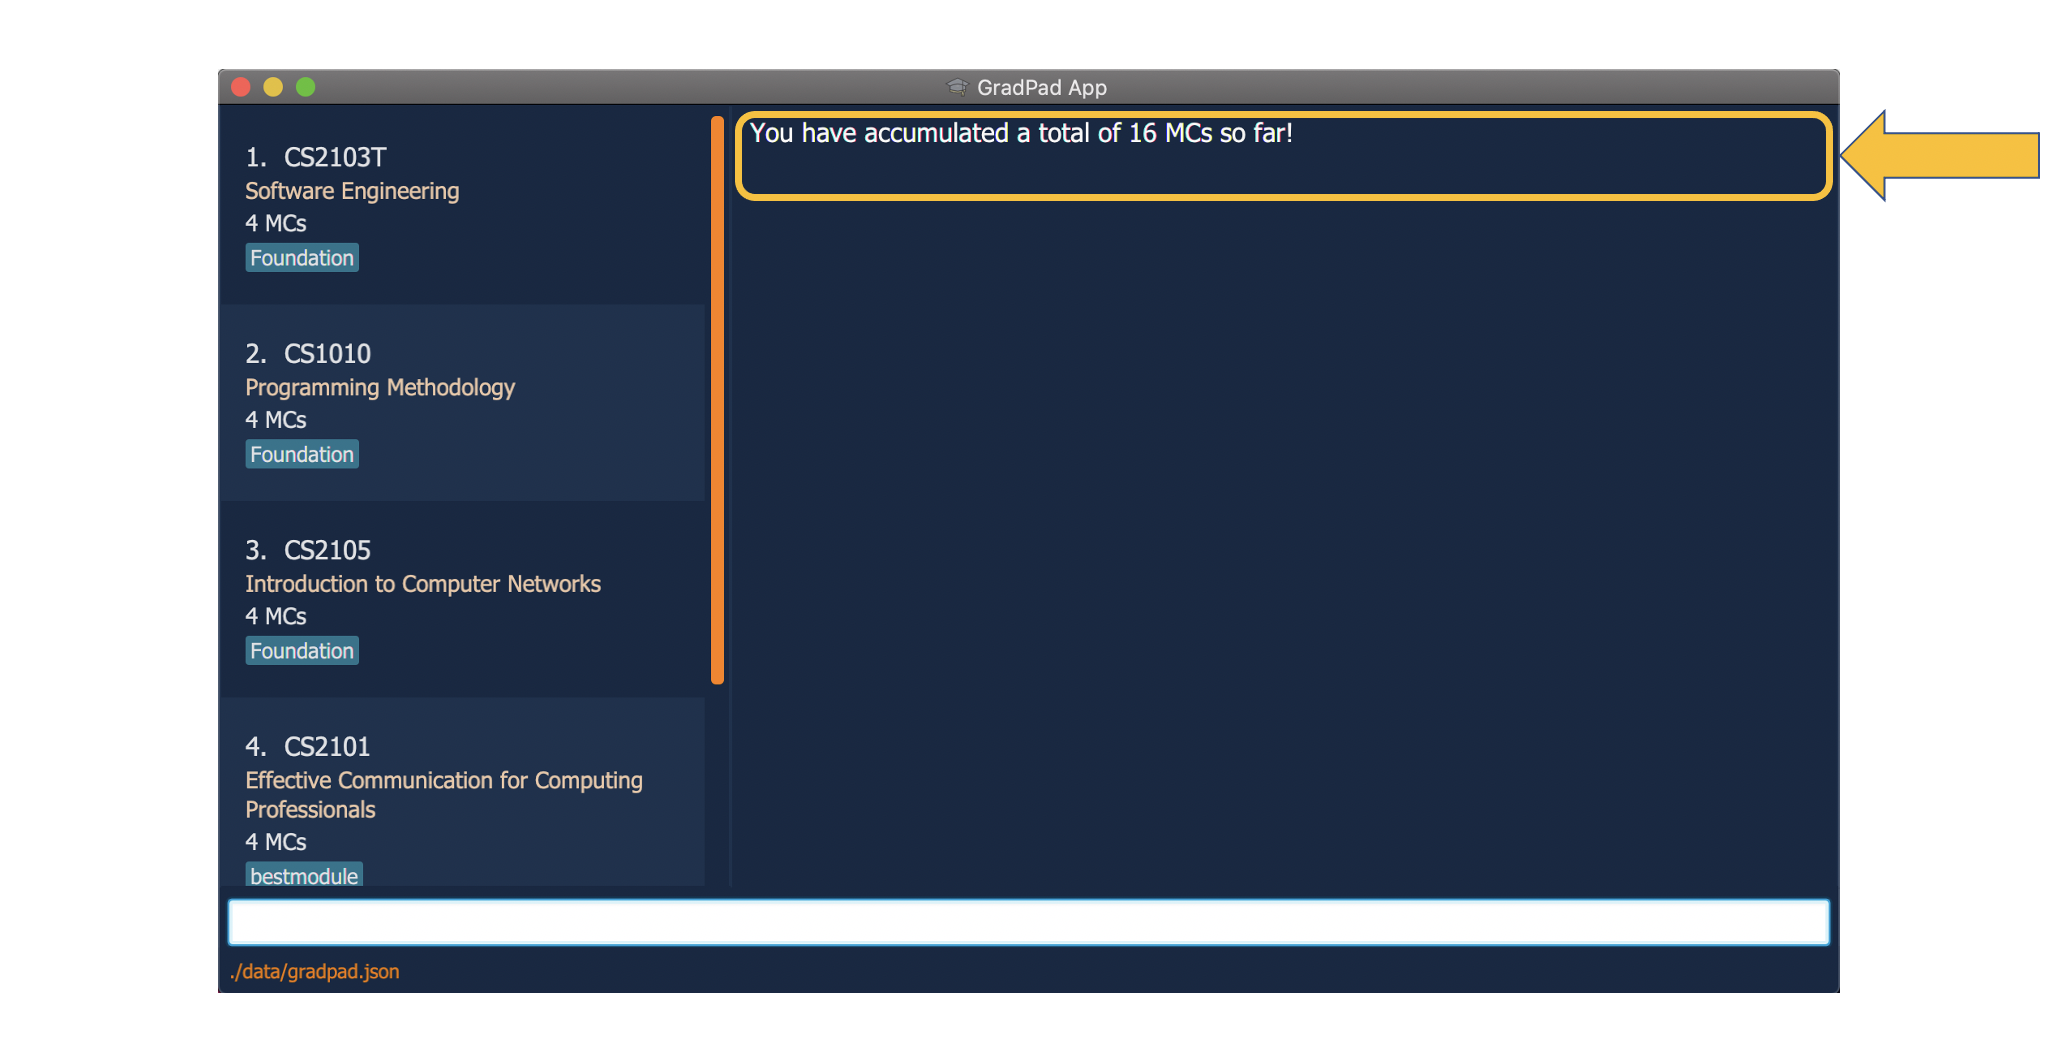
The checkmc command allows you to check the total amount of modular credits you have accumulated so far using this command.
This gives you a rough gauge of the progress of your graduation planning.
To check total modular credits:
-
Type
checkmcinto the Command Box, and press Enter to execute it.
-
The Result Display Box will display a message telling you how many modular credits you have accumulated so far.
Checking required modules: required
Scenario:
You have added several modules into your GradPad so far but you are unsure if they are part of
the Computer Science curriculum. You can simply check by using the required command.
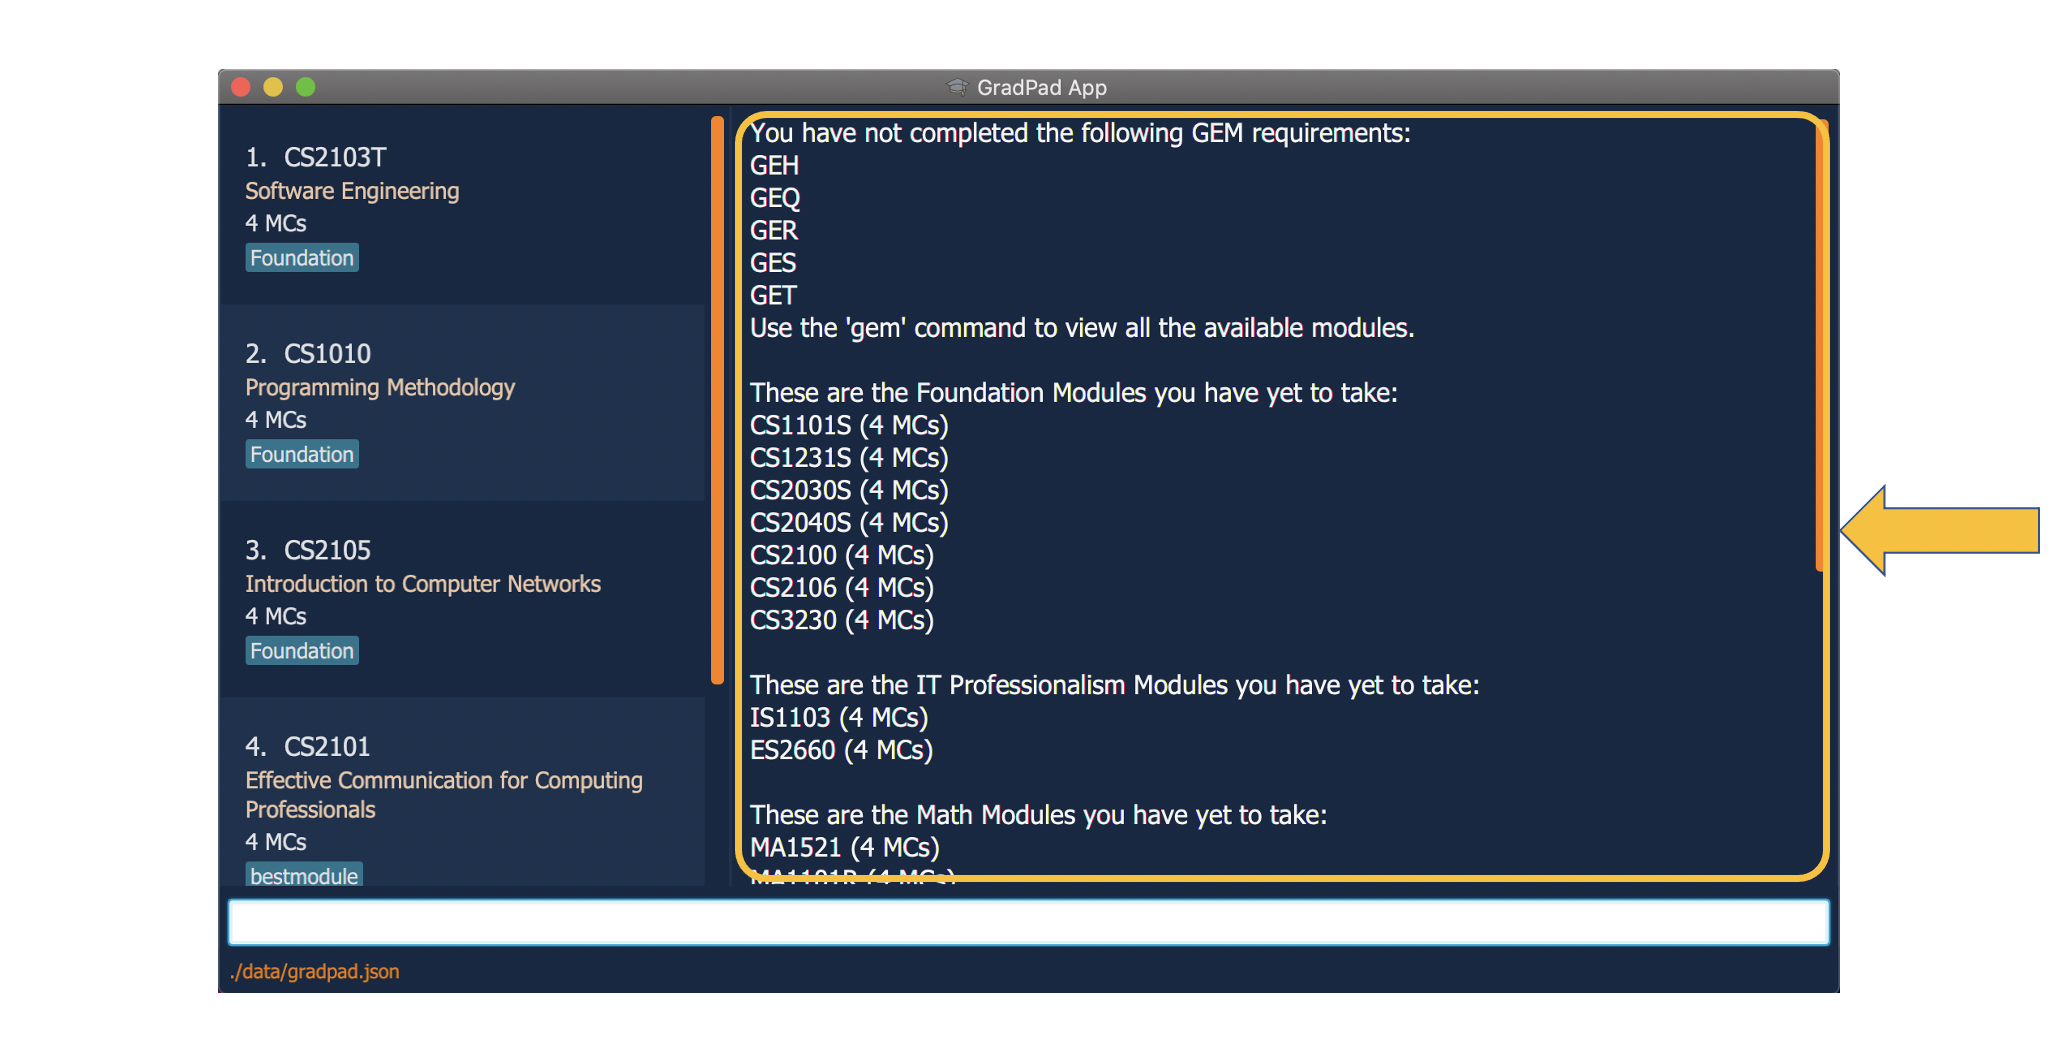
The required command allows you to check the modules of the Computer Science curriculum you have yet to take,
based on your Completed Modules List.
![]() Tip:
Tip:
The required command is able to identify equivalent and precluded Modules! (Eg. CS1010X and CS1101S)
To check required modules:
-
Type
requiredinto the Command Box, press Enter to execute it.
-
The Result Display Box will then display all the modules you have yet to take for each particular field, as shown below.
Checking General Education Modules: gem
Scenario:
You wish to take some GE modules to clear your GE requirement, but you are unsure what modules are available.
You can simply check by using the gem command.
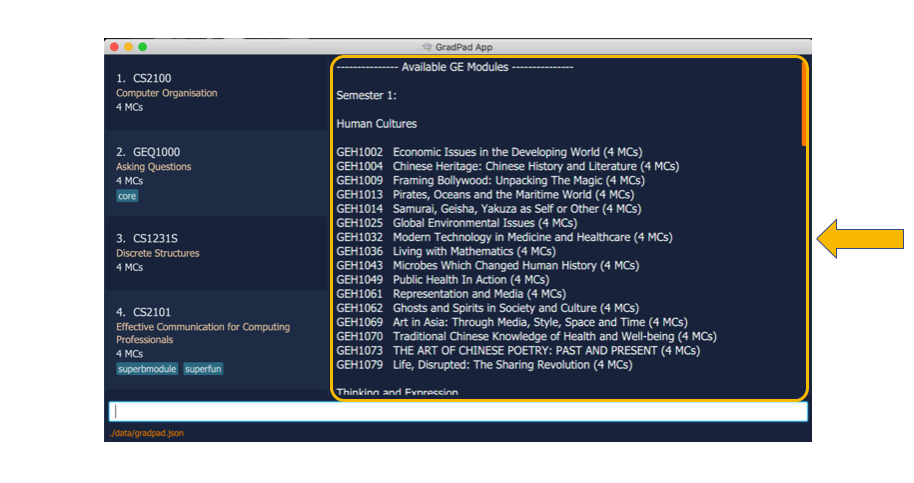
The gem command allows you to check all the available General Education (GE) modules that are available in NUS.
To ease your planning, the gem command indicates which modules are available in Semester 1 and/or 2.
To check GE modules:
-
Type
geminto the Command Box, press Enter to execute it.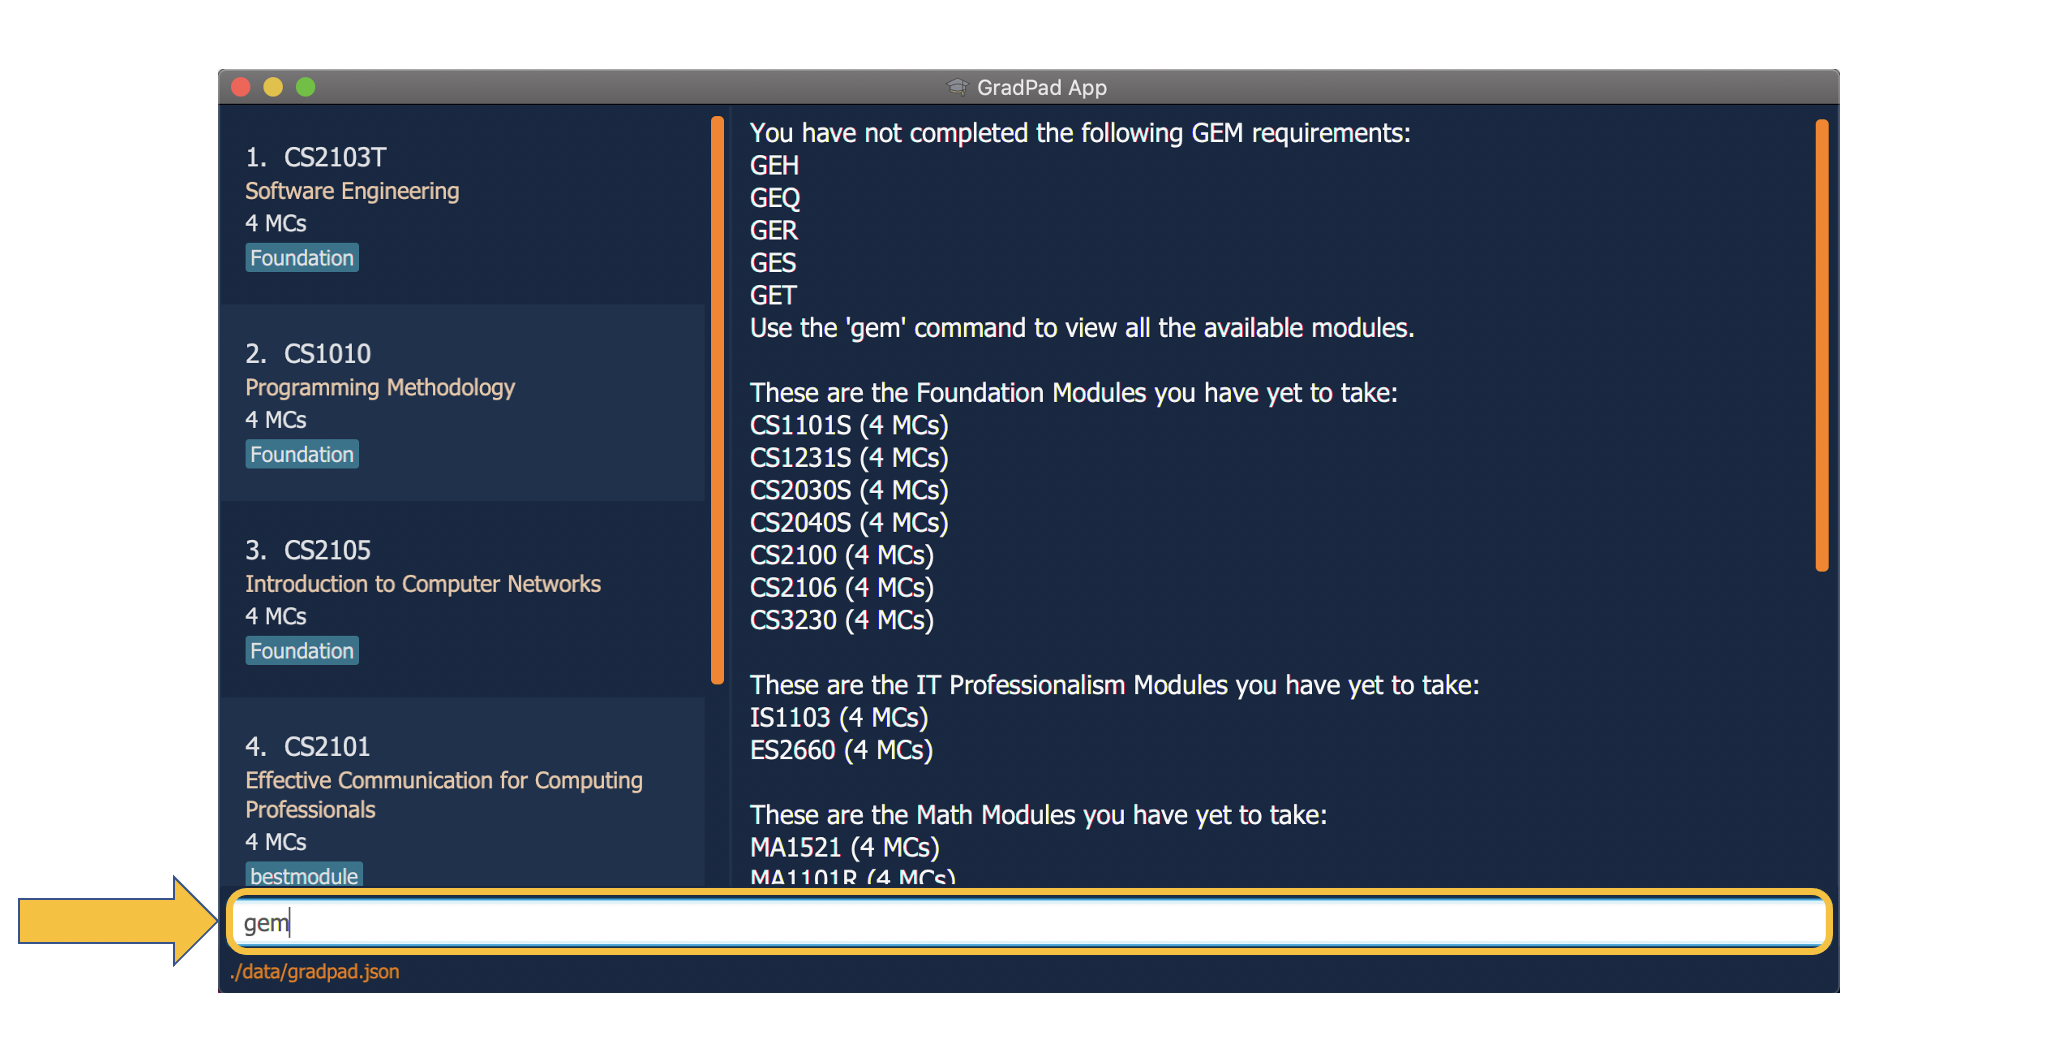
-
The Result Display Box will then display all the available GE modules that you can take, categorised into Semester 1 and 2, as shown below.
Checking Science modules: science
Scenario:
You wish to take a Science module to clear your Science requirement, but you forgot what modules are available.
You can simply check by using the science command.
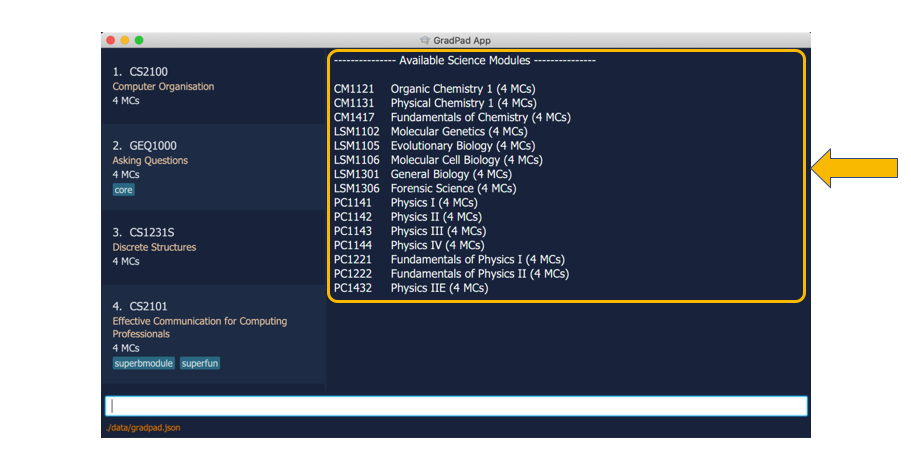
The science command allows you to check all the available Science modules of the Computer Science curriculum.
To check Science modules:
-
Type
scienceinto the Command Box, press Enter to execute it.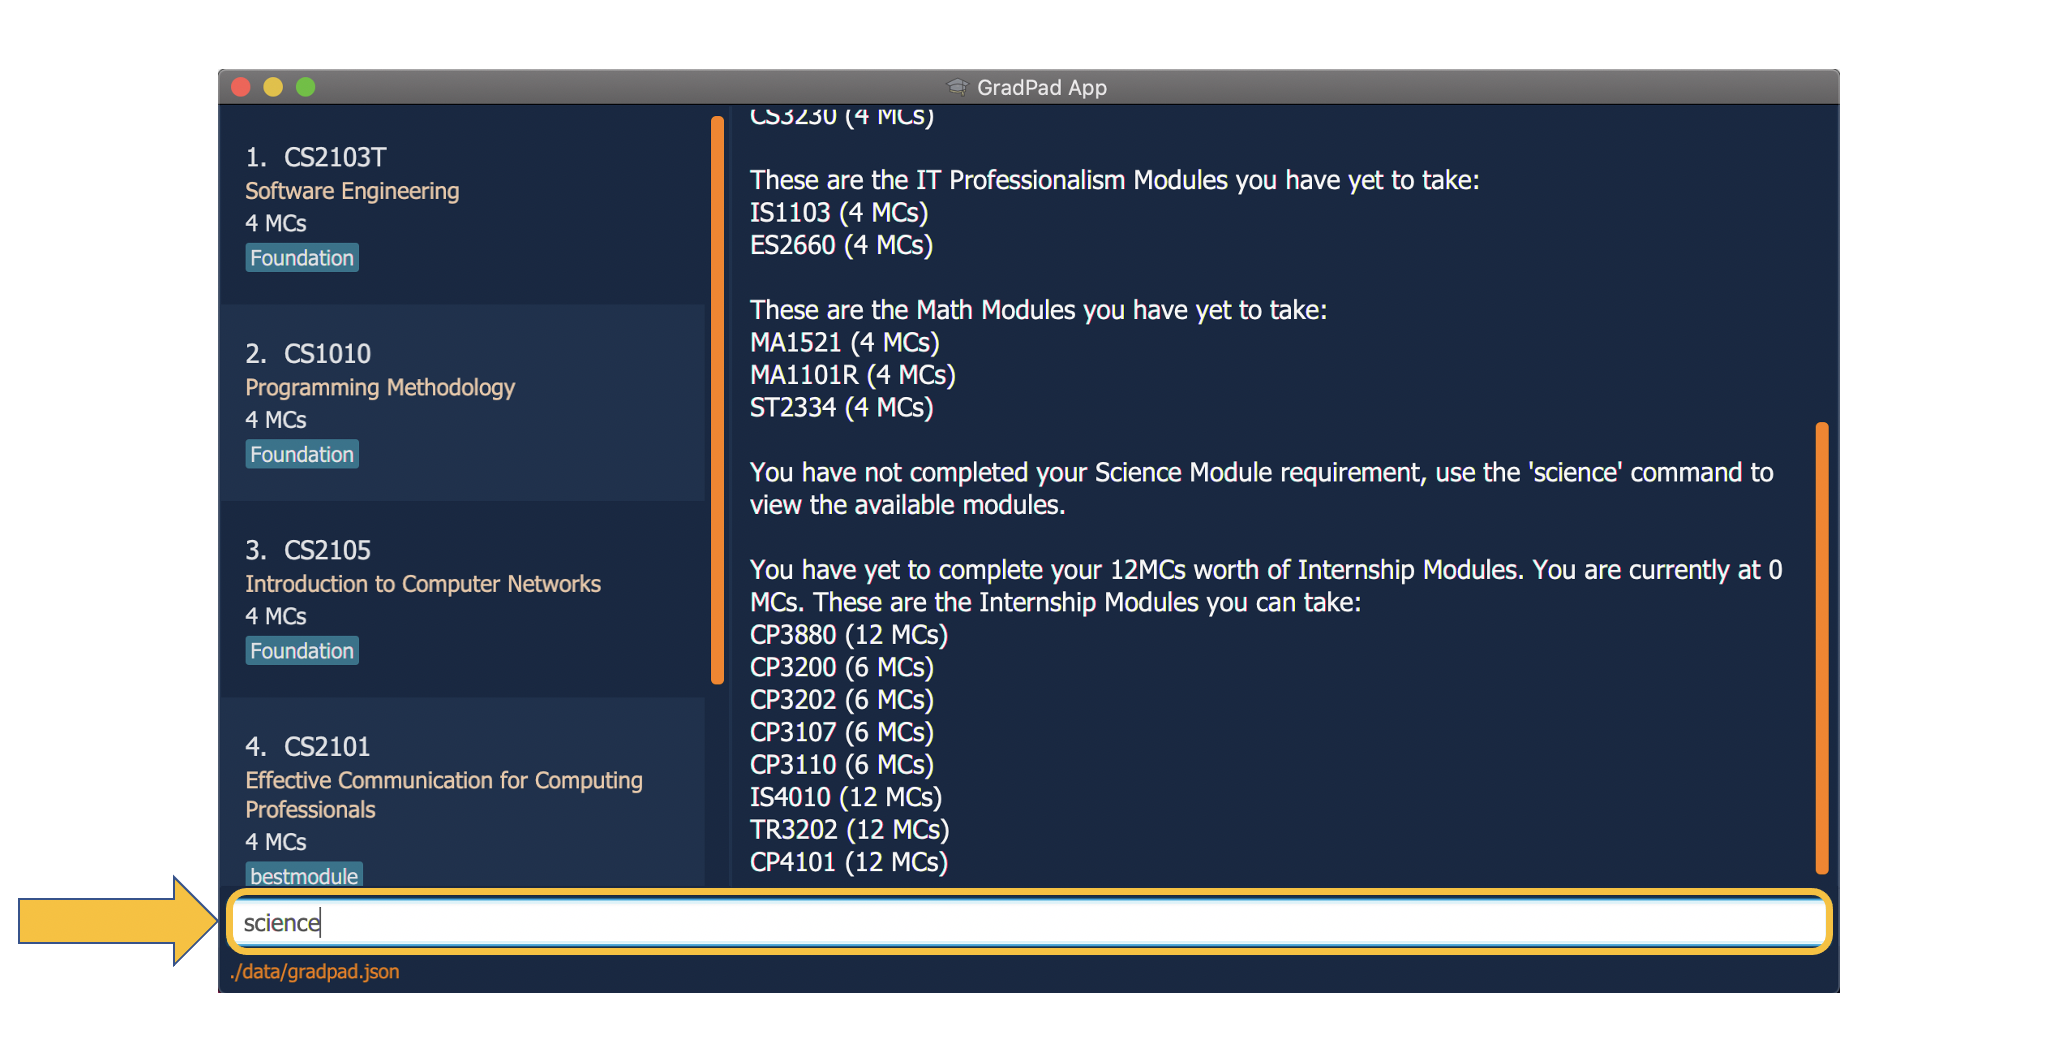
-
The Result Display Box will then display all the available Science modules that you can take, as shown below.
Searching for a module: search
Scenario:
After viewing the required modules you have yet to take, you wish to find out more about those modules (Eg. What are they about?
Do they have any pre-requisites?). You can simply look up those details by using the search command.
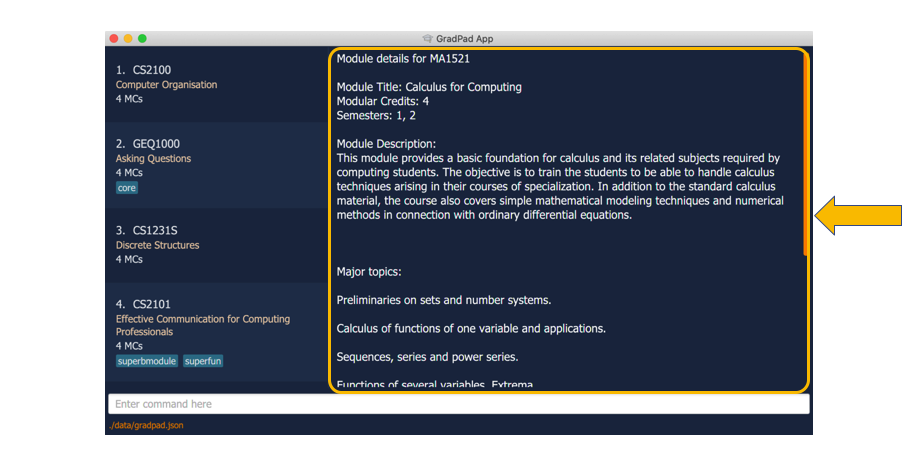
The search command allows you to search for any module available in NUS.
You can search for a module by specifying the module code of the module. The essential module details will then be retrieved from NUSMods database directly and displayed in the Result Display Box.
![]() Note:
Note:
If you are not connected to the internet, you can only search for modules that are in the NUS Computer Science
curriculum.
-
Type
search MA1521into the Command Box, press Enter to execute it.
-
The Result Display Box will then display all the relevant information about the module “MA1521”, as shown below.
Clearing all modules in GradPad: clear
Scenario:
You used GradPad to draft a plan for the modules you’re going to take, but now you wish to erase all of that and
start a new plan. Instead of deleting every module one by one, you can simply delete them all at one go.
The Clear command allows you to erase all modules from the Completed Modules List at one go with a single command.
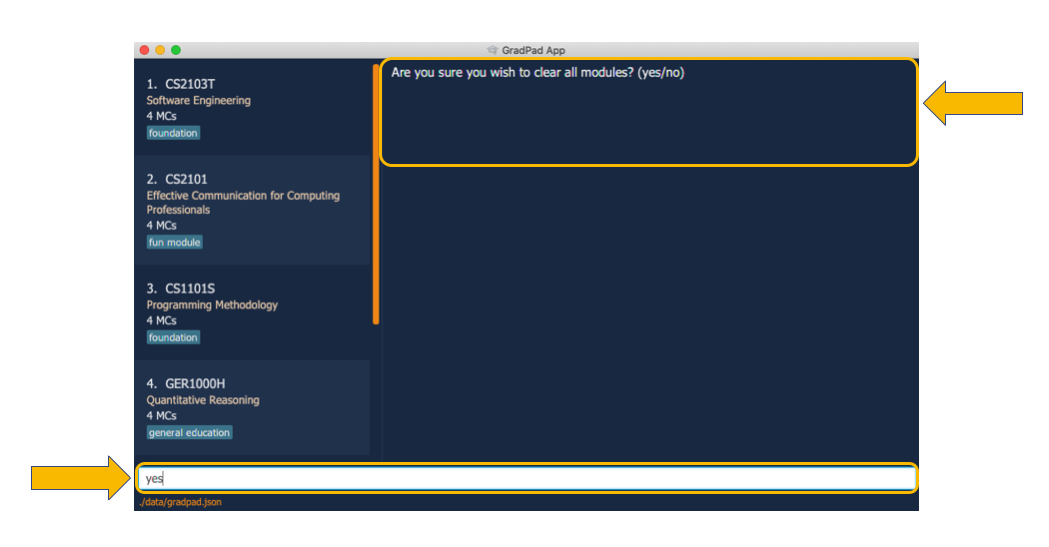
To clear all modules:
-
Type
clearinto the Command Box, and press Enter to execute it.
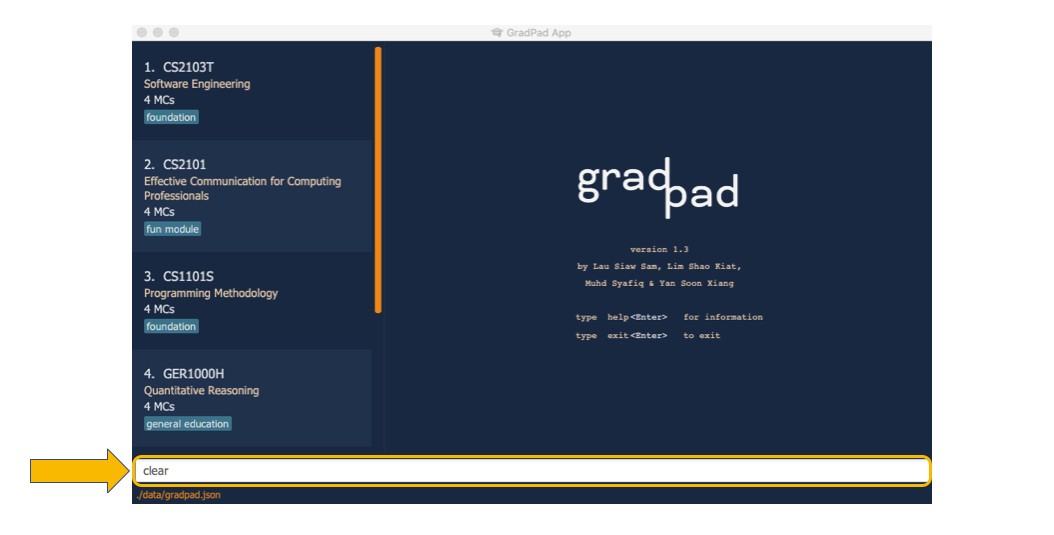
-
When you are prompted for a confirmation, type
yesinto the Command Box, and press Enter.
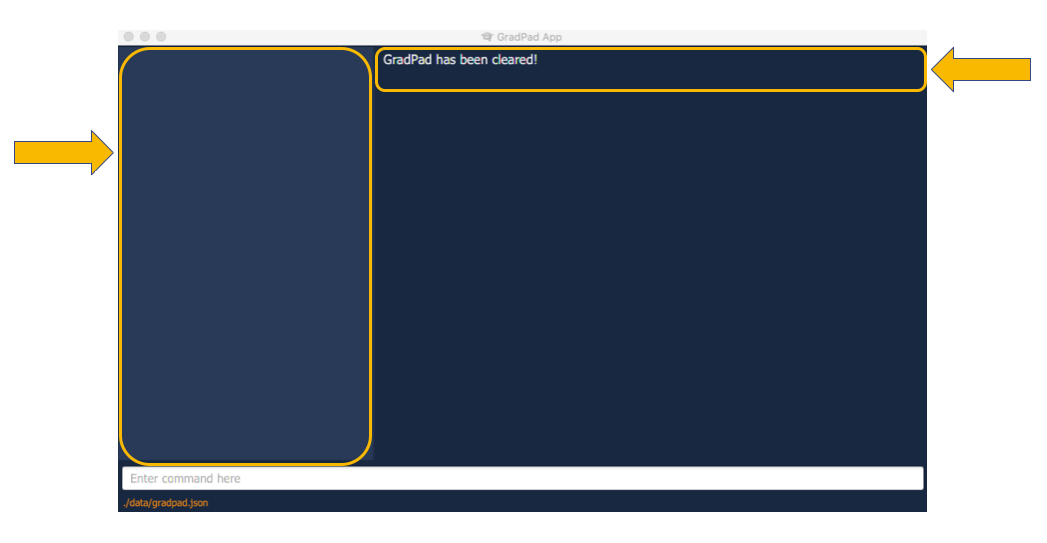
-
The Result Display Box will then display the message “GradPad has been cleared!” and the Completed Modules List will now be empty, as shown below.
![]() Tip:
Tip:
For experienced users, you can use the fclear command instead, to bypass the confirmation step!
Showing the help display: help
Scenario:
You are in the midst of planning your modules, but you suddenly forgot what commands are available to you.
Simply refresh your memory by using the help command to see all available commands and their respective functions.
The help command displays all of GradPad’s available commands and how to use them, to you.
This command is useful for first-timers or users who generally do not know how to use GradPad.
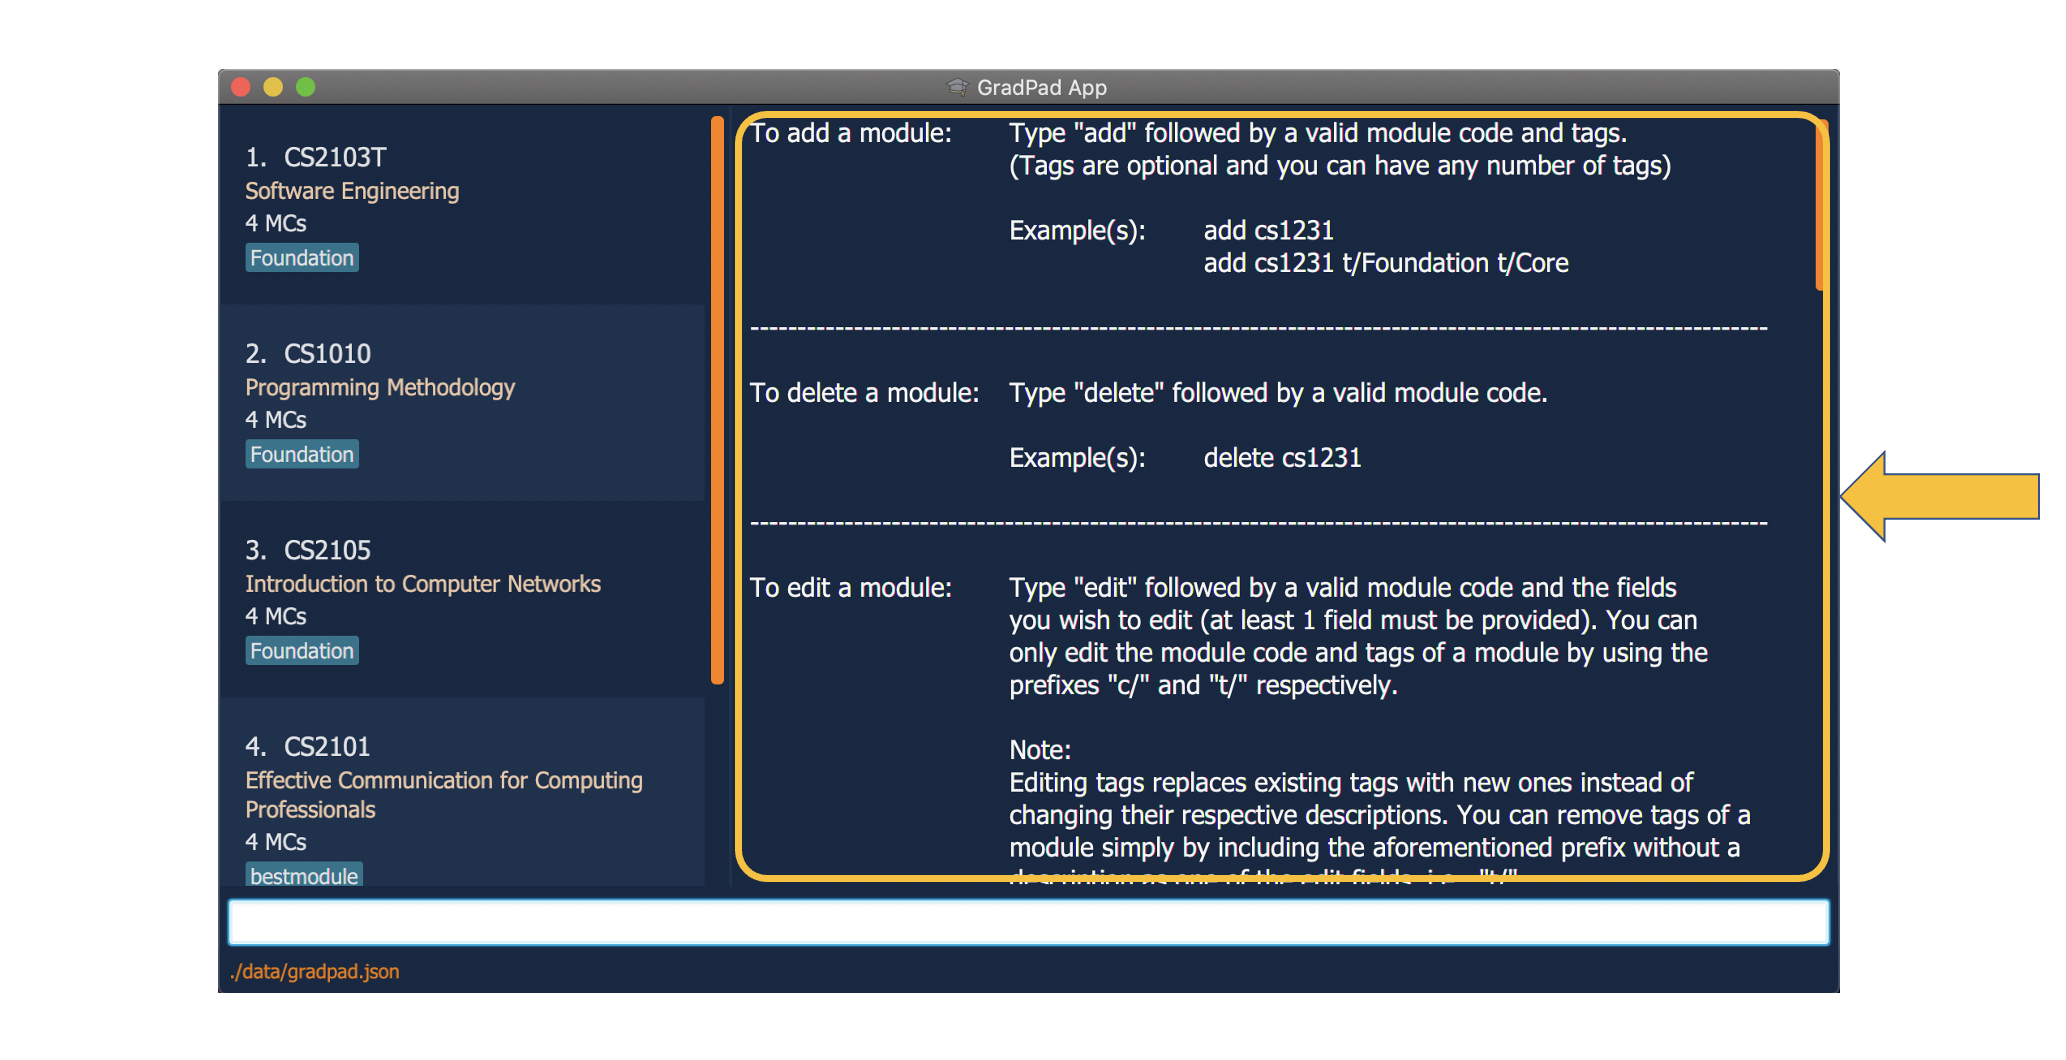
To show the help display:
-
Type
helpinto the Command Box, and press Enter to execute it.

-
The Result Display Box will display all of GradPad’s commands along with examples on how to use them.
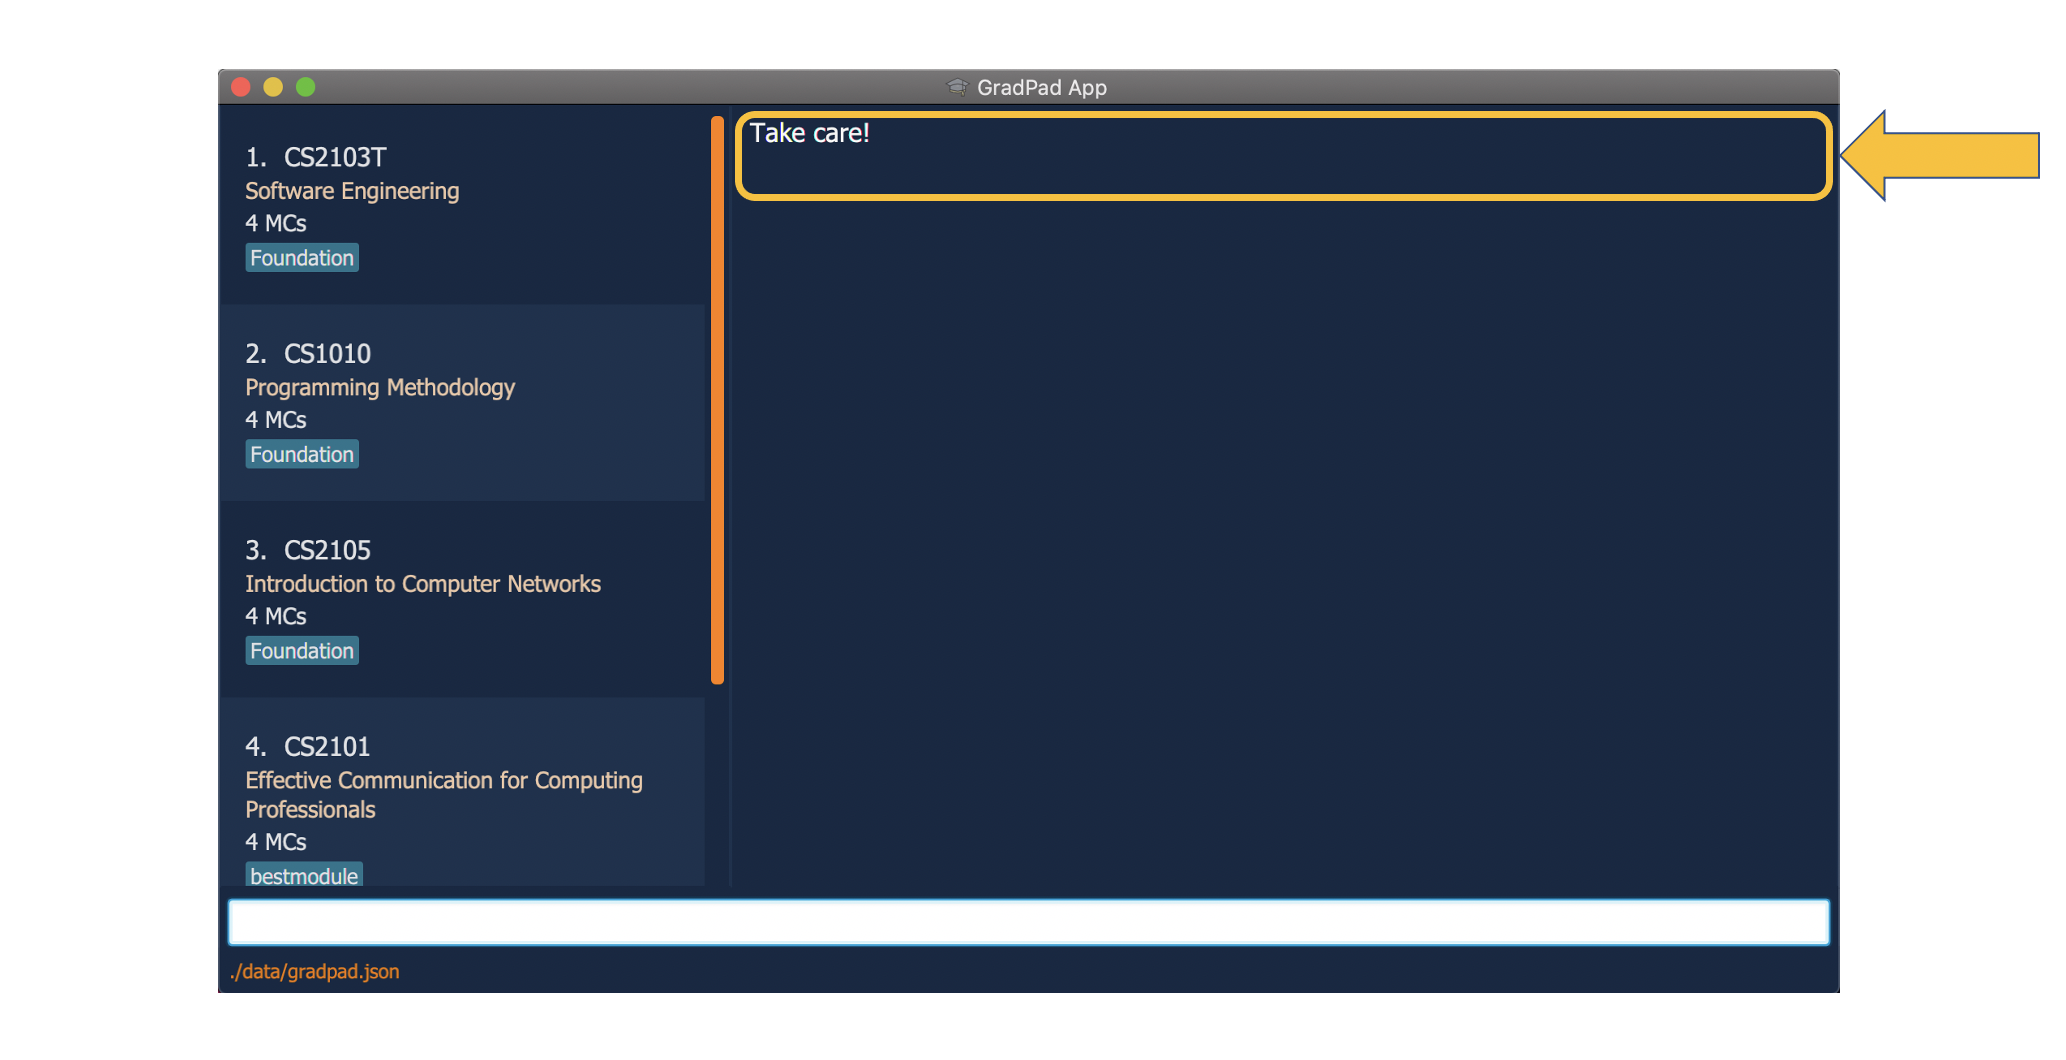
Exiting GradPad: exit
Apart from clicking the “close” button (red button) at the top of the GradPad window, you can exit GradPad using the exit command.
To exit:
-
Type
exitinto the Command Box, and press Enter to execute it.
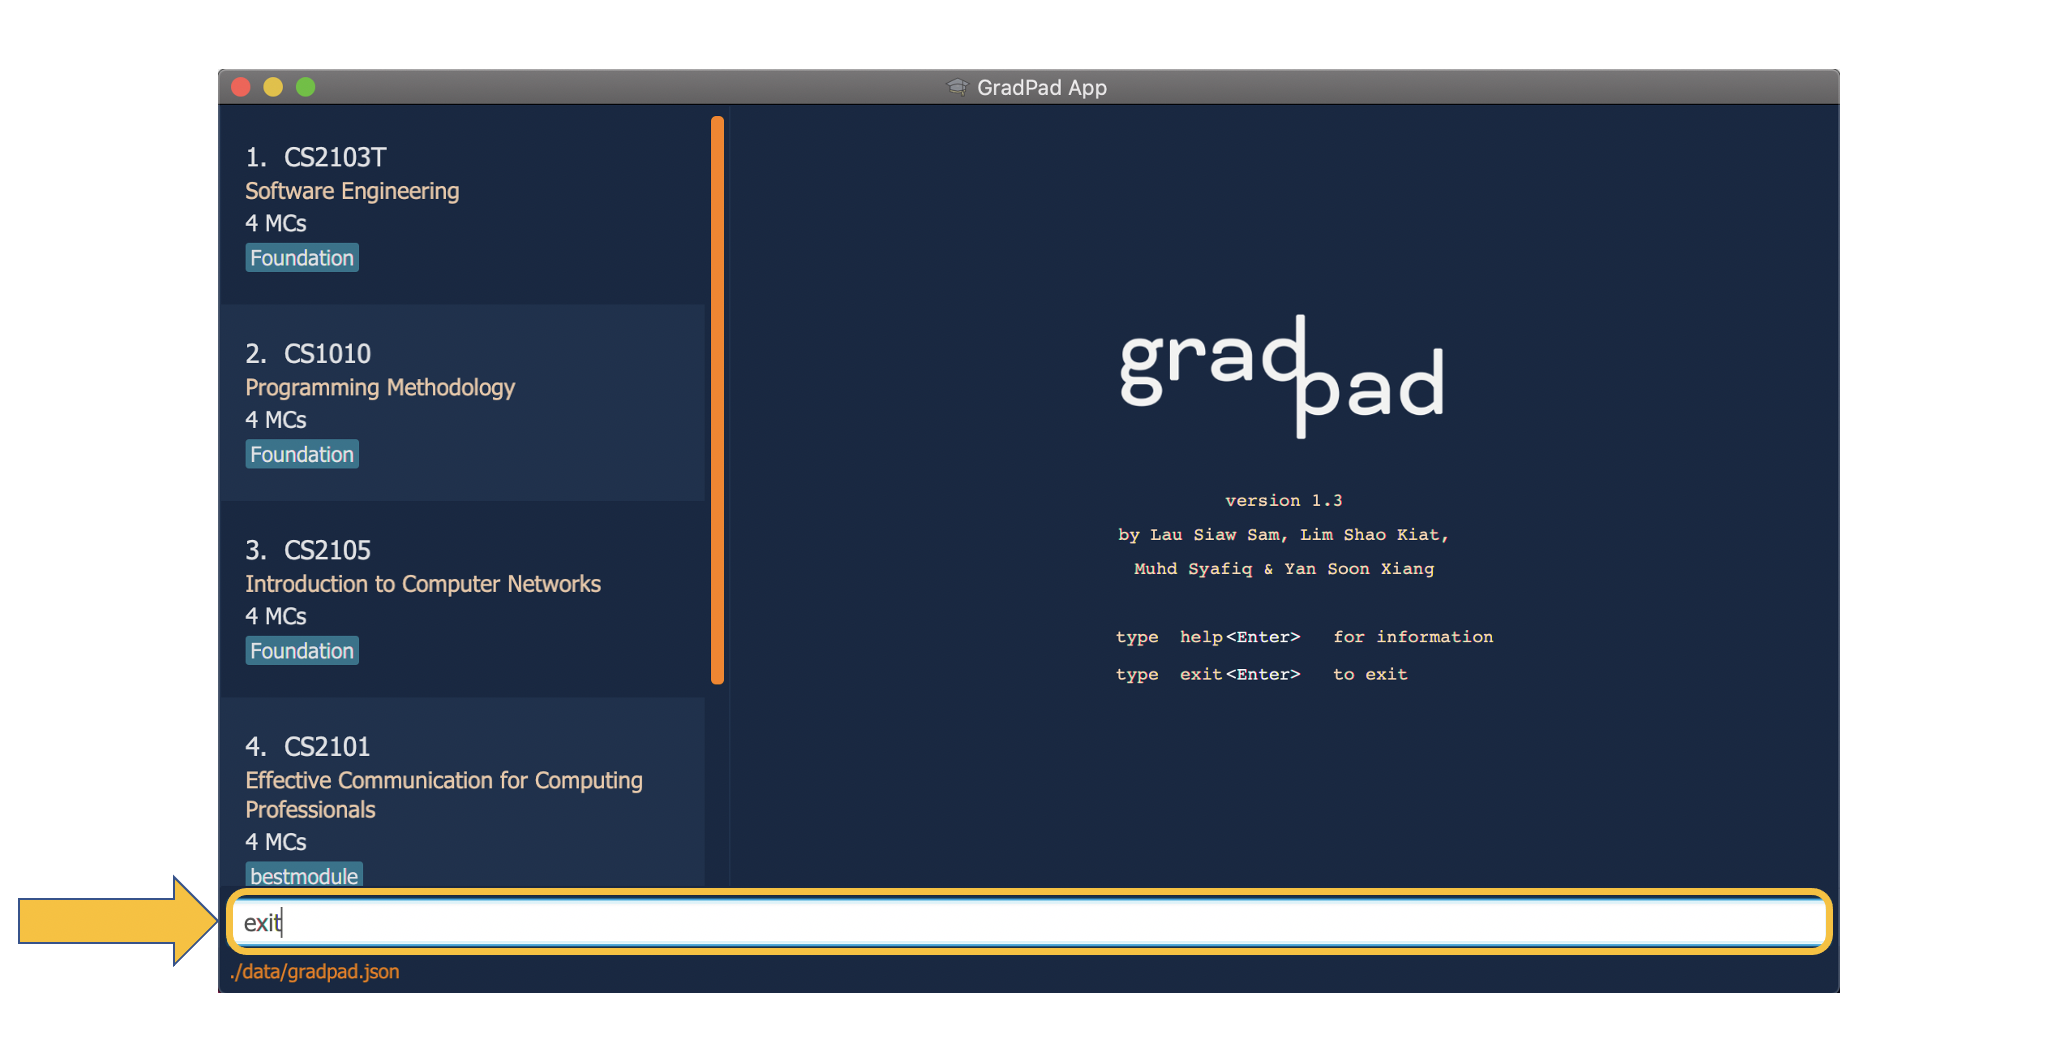
-
The Result Display Box will display the message “Take care!” and after a 1.5 second delay, the application will terminate.
FAQ
Q: How do I transfer my data to another Computer?
A:
-
In your old computer, find the
gradPad.jsonfile within your GradPad home folder and transfer this file to your new computer. -
On your new computer, launch GradPad once. In GradPad’s home folder, you should now see that an empty
gradPad.jsonfile has been created. -
Delete this empty file and replace it with the
gradPad.jsonfile from your old computer.
Command summary
This section is the table of all the commands available, and their respective usage example in GradPad.
![]() Notes about the Command summary:
Notes about the Command summary:
-
Words in curly braces (e.g.
{module code}) refers to compulsory input that is required for the command to function. -
Words in square brackets (e.g.
[c/module code]) refers to optional input that can be entered. -
For the
editcommand, at least the module code or tag is required for the command to function.
| Action | Format | Example |
|---|---|---|
| Add | add {module code} [t/tags] |
add CS2100 t/core |
| Edit | edit {module code} [c/module code] [t/tags] |
edit cs2103 c/CS2103T t/core |
| Delete | delete {module code} |
delete CS2103T |
| Force Delete | fdelete {module code} |
fdelete CS2103T |
| Completed Modules | list |
list |
| Find | find {module code or tag} |
find CS2103T foundation fun |
| Check MCs | checkmc |
checkmc |
| Required Modules | required |
required |
| General Education Modules | gem |
gem |
| Science Modules | science |
science |
| Search module details | search {module code} |
search CS2103T |
| Check existing Tags | tags |
tags |
| Clear | clear |
clear |
| Force Clear | fclear |
fclear |
| Help | help |
help |
| Exit | exit |
exit |